Toyota Venza: Tire information
Typical tire symbols
►Standard tire

►Compact spare tire
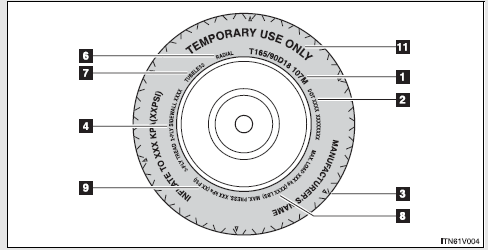
1. Tire size
2. DOT and Tire Identification Number (TIN)
3. Location of treadwear indicators
4. Tire ply composition and materials Plies are layers of rubber-coated parallel
cords. Cords are the strands which form the plies in a tire.
5. Summer tire or all season tire An all season tire has “M+S” on the sidewall. A tire not marked “M+S” is a summer tire.
6. Radial tires or bias-ply tires A radial tire has RADIAL on the sidewall. A tire not marked RADIAL is a bias-ply tire.
7. TUBELESS or TUBE TYPE A tubeless tire does not have a tube and air is directly filled in the tire. A tube type tire has a tube inside the tire and the tube maintains the air pressure.
8. Load limit at maximum cold tire inflation pressure 9. Maximum cold tire inflation pressure This means the pressure to which a tire may be inflated.
10. Uniform tire quality grading For details, see “Uniform Tire Quality Grading” that follows.
11. TEMPORARY USE ONLY
A compact spare tire is identified by the phrase “TEMPORARY USE ONLY” molded into its sidewall. This tire is designed for temporary emergency use only.
- Typical DOT and tire identification number (TIN)
- Tire size
- Tire section names
- Uniform Tire Quality Grading
- Glossary of tire terminology
 Fuel information
Your vehicle must use only unleaded gasoline.
Select octane rating 87 (Research Octane Number 91) or higher. Use of unleaded
gasoline with an octane rating lower than 87 may result in engine knocki ...
 Typical DOT and tire identification number (TIN)
1. DOT symbol*
2. Tire Identification Number (TIN)
3. Tire manufacturer’s identification mark
4. Tire size code
5. Manufacturer’s optional tire type code (3 or 4 letters)
6. Manufacturing w ...
Other materials about Toyota Venza:
System Description
SYSTEM DESCRIPTION
1. CRUISE CONTROL SYSTEM
This system is controlled by the ECM, and is activated by the throttle position
sensor and motor. The ECM controls the following functions: ON-OFF, - SET, + RES,
CANCEL, vehicle speed control, motor output cont ...
Problem Symptoms Table
PROBLEM SYMPTOMS TABLE
HINT:
Use the table below to help determine the cause of problem symptoms.
If multiple suspected areas are listed, the potential causes of the symptoms
are listed in order of probability in the "Suspected Area" ...
Data List / Active Test
DATA LIST / ACTIVE TEST
1. DATA LIST
HINT:
Using the Techstream to read the Data List allows the values or states of switches,
sensors, actuators and other items to be read without removing any parts. This non-intrusive
inspection can be very useful bec ...

0.1252