
Toyota Venza: Inspection
INSPECTION
PROCEDURE
1. INSPECT LUMBAR SUPPORT ADJUSTER ASSEMBLY
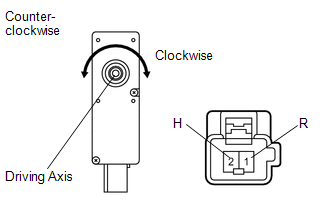
(a) Check operation of the lumbar support adjuster.
(1) Check if the lumbar support adjuster moves smoothly when the battery is connected to the lumbar support adjuster motor connector terminals.
OK:
|
Measurement Condition |
Operation Direction |
|---|---|
|
Battery positive (+) → 1 (R) Battery negative (-) → 2 (H) |
Clockwise |
|
Battery positive (+) → 2 (R) Battery negative (-) → 1 (H) |
Counterclockwise |
If the result is not as specified, replace the lumbar support adjuster assembly.
 Components
COMPONENTS
ILLUSTRATION
ILLUSTRATION
...
 Removal
REMOVAL
PROCEDURE
1. REMOVE FRONT SEAT HEADREST ASSEMBLY
2. REMOVE FRONT SEAT REAR OUTER TRACK COVER
3. REMOVE FRONT SEAT REAR INNER TRACK COVER
4. REMOVE FRONT SEAT ASSEMBLY
5. REMOVE ...
Other materials about Toyota Venza:
Terminals Of Ecu
TERMINALS OF ECU
1. TERMINALS OF ECU
Text in Illustration
*1
Component without harness connected
(Brake Actuator (Skid Control ECU))
Terminal No. (Symbol)
Terminal Description
1 (GND ...
Rear Airbag Sensor RH Circuit Malfunction (B1630/23)
DESCRIPTION
The side collision sensor RH circuit (to determine deployment of the front seat
side airbag assembly RH and curtain shield airbag assembly RH) is composed of the
center airbag sensor assembly, rear airbag sensor RH and side airbag sensor RH.
...
Navigation Antenna
Components
COMPONENTS
ILLUSTRATION
Removal
REMOVAL
PROCEDURE
1. REMOVE INSTRUMENT PANEL SAFETY PAD ASSEMBLY
HINT:
Refer to the procedure up to Remove Instrument Panel Safety Pad Assembly (See
page ).
2. REMOVE NO. 1 SIDE DEFROSTER NOZZLE DUCT ...

0.1516