Toyota Venza: Disassembly
DISASSEMBLY
PROCEDURE
1. REMOVE SEAT ADJUSTER COVER CAP
|
(a) Remove the seat adjuster cover cap. HINT: Use the same procedure for the RH side and LH side. |
|
.png)
2. REMOVE RECLINING POWER SEAT SWITCH KNOB
|
(a) Using a moulding remover, disengage the 4 claws to remove the reclining power seat switch knob. |
|
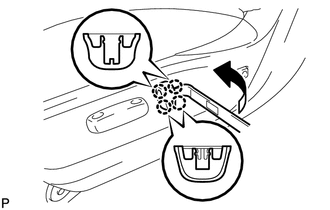
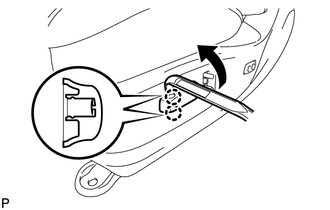
3. REMOVE SLIDE AND VERTICAL POWER SEAT SWITCH KNOB
|
(a) Using a moulding remover, disengage the 2 claws as shown in the illustration. |
|
|
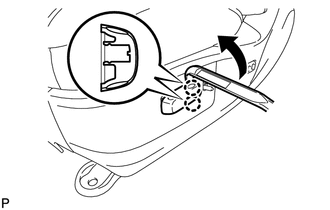
(b) Using a moulding remover, disengage the 2 claws to remove the slide and vertical power seat switch knob as shown in the illustration. |
|
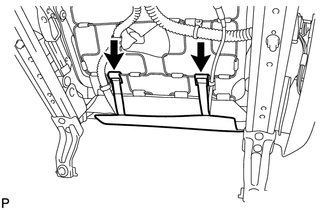
4. REMOVE FRONT SEAT CUSHION SHIELD ASSEMBLY
|
(a) Disengage the 2 hooks. |
|
|
(b) Remove the 5 screws. |
|
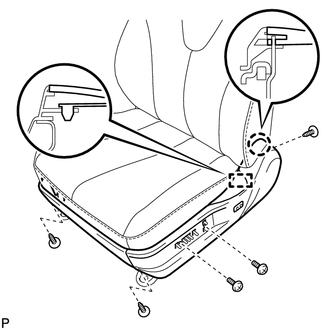
(c) Disengage the claw.
(d) Disengage the guide and remove the front seat cushion shield assembly.
|
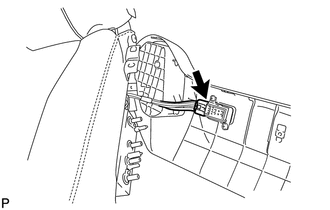
(e) Disconnect the connector from the front power seat lumbar switch. |
|
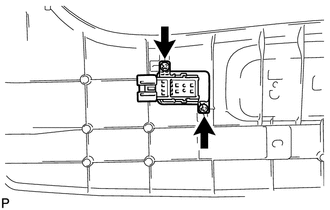
5. REMOVE FRONT INNER NO. 1 SEAT CUSHION SHIELD
|
(a) Remove the screw. |
|

(b) Disengage the 2 claws to remove the front inner No. 1 seat cushion shield from the front seat cushion shield.
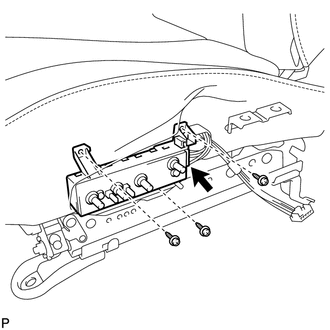
6. REMOVE FRONT POWER SEAT LUMBAR SWITCH
|
(a) Remove the 2 screws and front power seat lumbar switch. |
|
7. REMOVE POWER SEAT SWITCH (w/o Memory)
|
(a) Remove the 3 screws. |
|
(b) Disconnect the connector to remove the power seat switch.
8. REMOVE POSITION CONTROL ECU AND SWITCH ASSEMBLY (w/ Memory)
|
(a) Remove the 3 screws. |
|
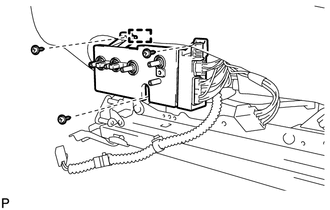
(b) Disengage the guide.
|
(c) Disconnect the 2 connectors to remove the position control ECU and switch assembly. |
|
9. REMOVE FRONT SEAT INNER BELT ASSEMBLY
.gif)
10. REMOVE FRONT SEAT BELT ANCHOR PLATE
11. REMOVE FRONT INNER SEAT CUSHION SHIELD
|
(a) Remove the screw. |
|
(b) Disengage the claw.
|
(c) Disengage the guide to remove the front inner seat cushion shield as shown in the illustration. |
|
12. REMOVE FRONT SEAT CUSHION PROTECTOR
|
(a) Remove the 2 front seat cushion protectors. |
|
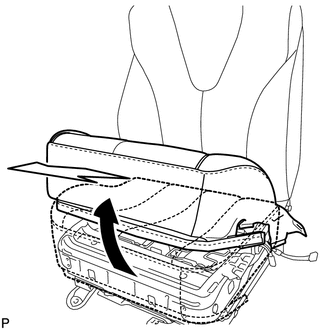
13. REMOVE SEPARATE TYPE FRONT SEAT CUSHION COVER WITH PAD
|
(a) Disengage the 4 hooks. |
|
(b) w/o Seat Heater System:
|
(1) Disengage each clamp. |
|
(c) w/ Seat Heater System:
|
(1) Disengage each clamp. |
|
(2) Disconnect the connector.
(d) Using a clip remover, remove the 2 clips.
(e) Disengage each hook as shown in the illustration.
|
(f) Remove the separate type front seat cushion cover with pad as shown in the illustration. |
|
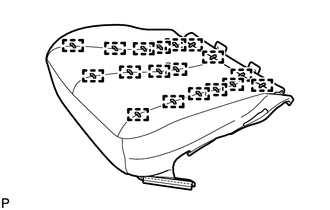
14. REMOVE SEPARATE TYPE FRONT SEAT CUSHION COVER
|
(a) Remove the 18 hog rings and separate type front seat cushion cover from the separate type front seat cushion pad. |
|
15. REMOVE FRONT SEAT CUSHION PROTECTOR (for LH Side)
|
(a) Remove the 2 clips and front seat cushion protector from the separate type front seat cushion cover. |
|

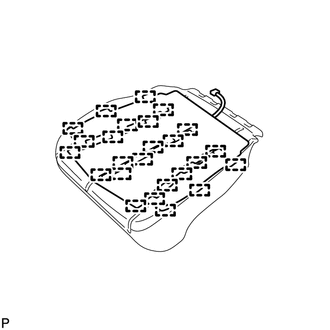
16. REMOVE FRONT SEAT CUSHION HEATER ASSEMBLY (w/ Seat Heater System)
|
(a) Cut off the 25 tack pins that fasten the front seat cushion heater assembly, and then remove the front seat cushion heater assembly from the separate type front seat cushion cover. |
|
17. REMOVE FRONT SEATBACK BOARD SUB-ASSEMBLY
|
(a) Remove the 2 screws. |
|
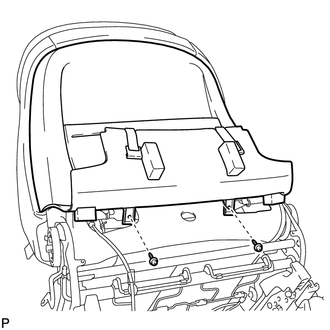
|
(b) Using a moulding remover, disengage the 10 claws as shown in the illustration. |
|
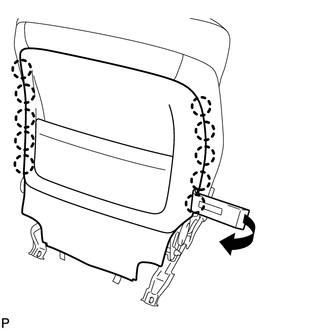
|
(c) Using a moulding remover, disengage the 4 claws as shown in the illustration. |
|
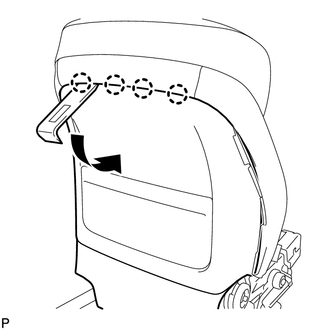
|
(d) Disengage the 2 guides to remove the front seatback board sub-assembly as shown in the illustration. |
|
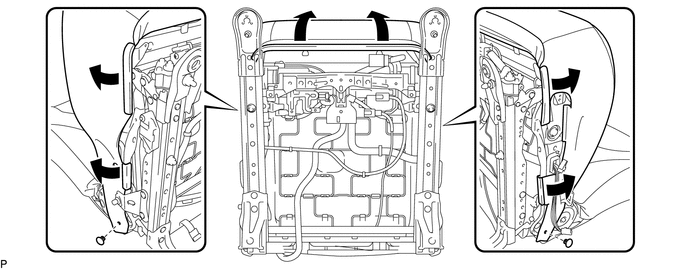
18. REMOVE SEPARATE TYPE FRONT SEATBACK COVER WITH PAD
|
(a) Turn back the separate type front seatback cover with pad to remove the nut and guide, and separate the bracket of the front seatback cover with pad. Text in Illustration
|
|
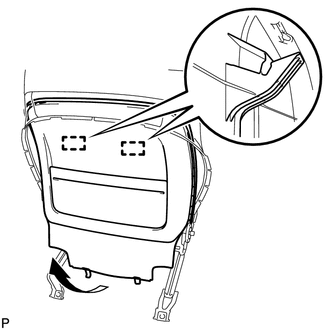
|
(b) Disengage the 4 hooks. |
|

|
(c) Remove the 2 hog rings. |
|
|
(d) Remove the 2 hog rings. |
|
|
(e) Disengage the 4 claws and remove the 2 front seat headrest supports. |
|
.png)
(f) Remove the separate type front seatback cover with pad from the front seat frame assembly with adjuster.
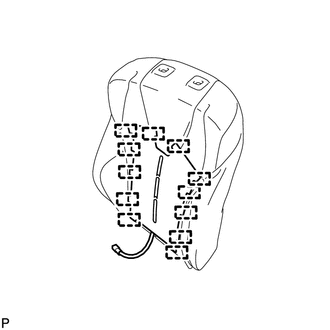
19. REMOVE SEPARATE TYPE FRONT SEATBACK COVER
|
(a) Remove the 10 hog rings and separate type front seatback cover from the separate type front seatback pad. |
|
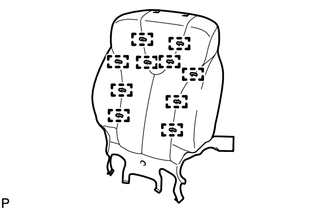
20. REMOVE FRONT SEATBACK HEATER ASSEMBLY (w/ Seat Heater System)
|
(a) Cut off the 12 tack pins that fasten the front seatback heater assembly, and then remove the front seatback heater assembly from the separate type front seatback cover. |
|
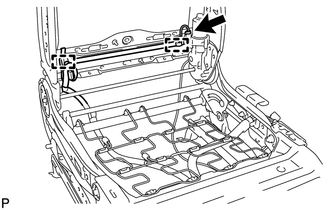
21. REMOVE FRONT SEAT SIDE AIRBAG ASSEMBLY
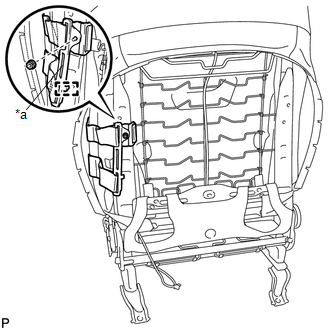
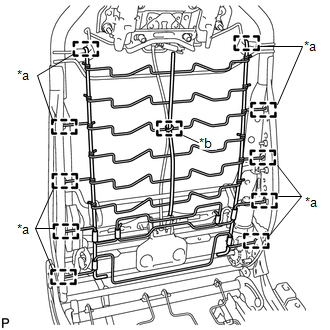
22. REMOVE LUMBAR SUPPORT ADJUSTER ASSEMBLY
|
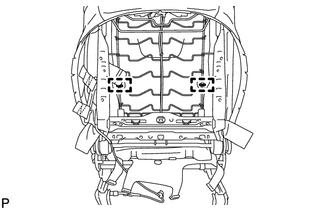
(a) Disengage the 10 guides and clamp to remove the front seatback spring sub-assembly. Text in Illustration
|
|
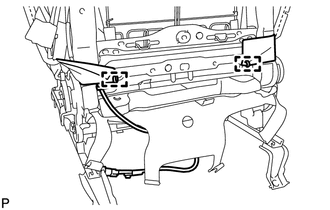
(b) Disconnect the connector.
|
(c) Remove the 2 screws. |
|
(d) Disengage the guide to remove the lumbar support adjuster assembly.
|
(e) Remove the bush. |
|
23. REMOVE UPPER ACTIVE HEADREST UNIT
|
(a) Remove the nut and disconnect the cable from the upper active headrest unit. |
|
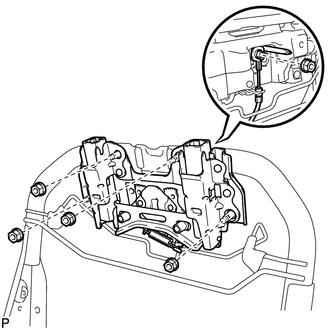
(b) Remove the 4 nuts and upper active headrest unit.
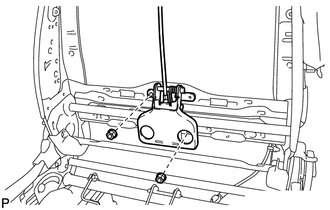
24. REMOVE LOWER ACTIVE HEADREST UNIT
|
(a) Remove the 2 nuts and lower active headrest unit. |
|
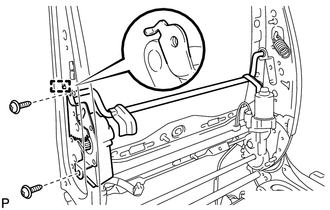
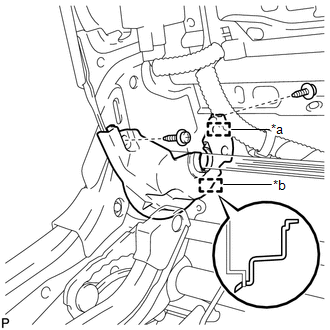
25. REMOVE SEAT RECLINING ADJUSTER INSIDE COVER LH
|
(a) Remove the 2 screws. |
|
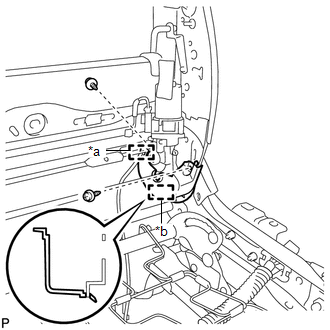
(b) Disengage the clamp.
(c) Disengage the guide to remove the seat reclining adjuster inside cover LH.
Text in Illustration|
*a |
Clamp |
|
*b |
Guide |
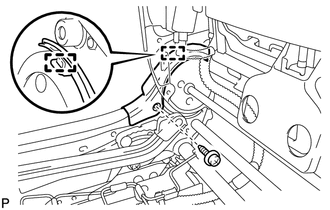
26. REMOVE RECLINING ADJUSTER INSIDE COVER LH
|
(a) Remove the screw. |
|
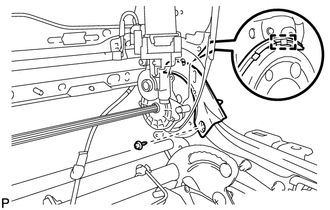
(b) Disengage the guide to remove the reclining adjuster inside cover LH.
27. REMOVE SEAT RECLINING ADJUSTER INSIDE COVER RH
|
(a) Remove the 2 screws. |
|
(b) Disengage the clamp.
(c) Disengage the guide to remove the seat reclining adjuster inside cover RH.
Text in Illustration|
*a |
Clamp |
|
*b |
Guide |
28. REMOVE RECLINING ADJUSTER INSIDE COVER RH
|
(a) Remove the screw. |
|
(b) Disengage the guide to remove the reclining adjuster inside cover RH.
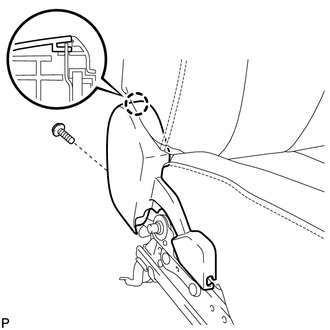
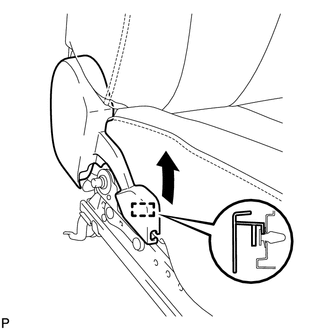
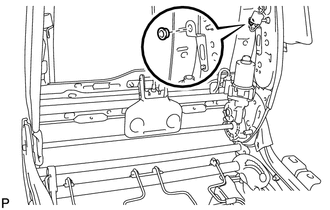
29. REMOVE FRONT SEAT LOWER CUSHION SHIELD LH
|
(a) Remove the screw. |
|
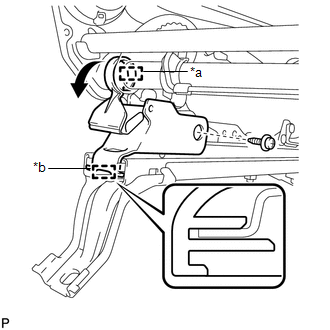
(b) Disengage the hook as shown in the illustration.
(c) Disengage the guide to remove the front seat lower cushion shield LH.
Text in Illustration|
*a |
Hook |
|
*b |
Guide |
30. REMOVE FRONT SEAT LOWER CUSHION SHIELD RH
|
(a) Remove the screw. |
|
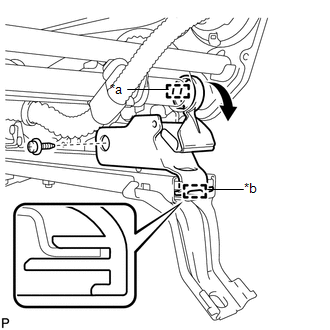
(b) Disengage the hook as shown in the illustration.
(c) Disengage the guide to remove the front seat lower cushion shield RH.
Text in Illustration|
*a |
Hook |
|
*b |
Guide |
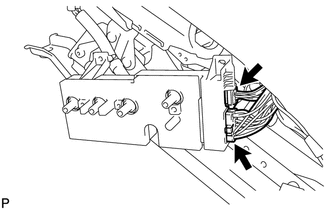
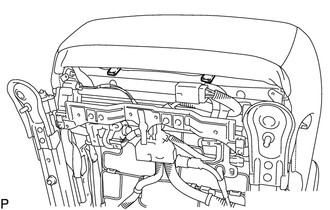
31. REMOVE FRONT SEAT WIRE
|
(a) Disengage the 2 clamps. |
|
(b) Disconnect the connector.
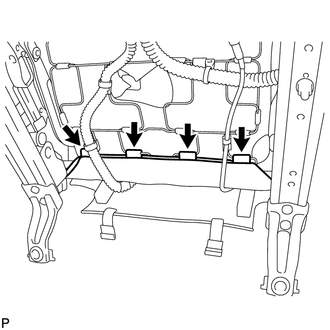
(c) w/ Seat Heater System:
|
(1) Disengage the 3 clamps. |
|
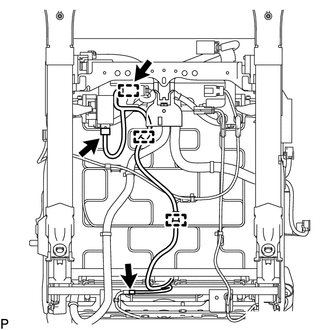
(2) Disconnect the 3 connectors.
|
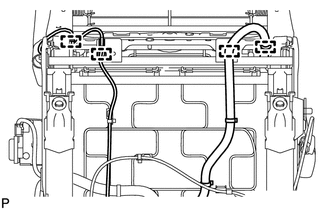
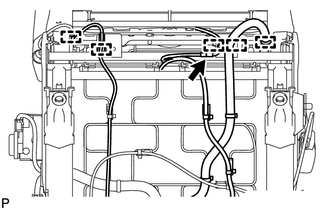
(d) Disengage the 2 claws. |
|

(e) Disengage the 5 clamps.
(f) Disconnect the 3 connectors and remove the front seat wire.
32. REMOVE SEAT HEATER CONTROL SUB-ASSEMBLY (w/ Seat Heater System)
|
(a) Disengage the clamp to remove the seat heater control sub-assembly. |
|

33. REMOVE SEAT POSITION SENSOR
34. REMOVE OCCUPANT CLASSIFICATION ECU (for Front Passenger Side)
35. REMOVE FRONT SEAT WIRE RH (for Front Passenger Side)
(a) Disengage each clamp and remove the front seat wire RH.
 Removal
REMOVAL
PROCEDURE
1. PRECAUTION
CAUTION:
Be sure to read Precaution thoroughly before servicing (See page
).
If the front seat side airbag assembly was deployed, replace the front ...
 Reassembly
REASSEMBLY
PROCEDURE
1. INSTALL FRONT SEAT WIRE RH (for Front Passenger Side)
(a) Engage each clamp and install the front seat wire RH.
2. INSTALL OCCUPANT CLASSIFICATION ECU (for Front Passenger ...
Other materials about Toyota Venza:
Air Outlet Damper Control Servo Motor Circuit (B1443/43)
DESCRIPTION
The air outlet control servo motor sends pulse signals to indicate the damper
position to the A/C amplifier. The A/C amplifier activates the motor (normal or
reverse) based on these signals to move the mode damper to any position, which contro ...
Front Airbag Sensor LH Malfunction (B1615/14)
DESCRIPTION
The front airbag sensor LH circuit consists of the center airbag sensor assembly
and front airbag sensor LH.
The front airbag sensor LH detects impacts to the vehicle and sends signals to
the center airbag sensor assembly to determine if the ...
Floor mats
Use only floor mats designed specifically for vehicles of the same model and
model year as your vehicle. Fix them securely in place onto the carpet.
Insert the retaining hooks (clips) into the floor mat eyelets.
Turn the upper knob of each retaining ho ...

0.146