
Toyota Venza: Steering Lock Position Signal Circuit Malfunction (B2285)
DESCRIPTION
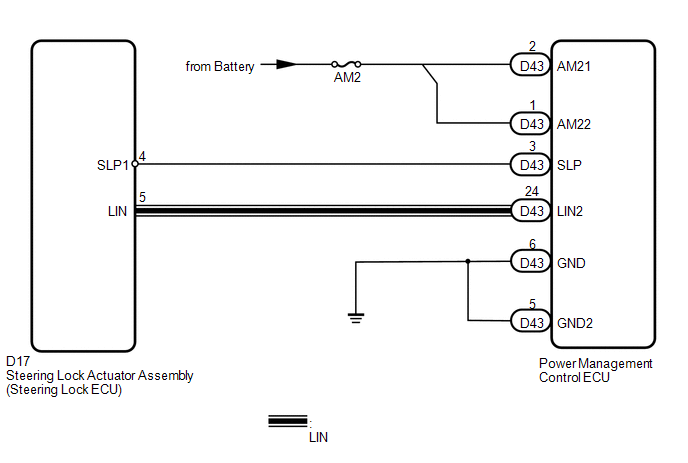
This DTC is stored when serial communication signals and LIN communication signals in the circuit between the power management control ECU and steering lock actuator assembly (steering lock ECU) are inconsistent.
|
DTC No. |
DTC Detection Condition |
Trouble Area |
|---|---|---|
|
B2285 |
Cable and LIN information between the power management control ECU and steering lock actuator assembly (steering lock ECU) are inconsistent. |
|
WIRING DIAGRAM
CAUTION / NOTICE / HINT
NOTICE:
- When the power management control ECU is replaced with a new one and the cable from the negative (-) battery terminal is connected, the power source mode becomes the on (IG) mode. When the battery is removed and reinstalled, the power source mode that was selected when the battery was removed is restored.
- Inspect the fuses for circuits related to this system before performing the following inspection procedure.
HINT:
Check the connector connection to the terminal to make sure that there is no abnormality such as a loose connection, deformation, etc.
PROCEDURE
|
1. |
CHECK LIN COMMUNICATION SYSTEM |
(a) Connect the Techstream to the DLC3.
(b) Turn the engine switch on (IG).
(c) Turn the Techstream on.
(d) Clear the DTCs (See page .gif) ).
).
(e) Check if DTC B2287 is output.
OK:
DTC B2287 is not output.
| NG | .gif) |
GO TO LIN COMMUNICATION SYSTEM |
|
.gif)
|
2. |
CHECK HARNESS AND CONNECTOR (BATTERY - POWER MANAGEMENT CONTROL ECU) |
| NG | |
REPAIR OR REPLACE HARNESS OR CONNECTOR (BATTERY - POWER MANAGEMENT CONTROL ECU) |
|
|
3. |
CHECK HARNESS AND CONNECTOR (POWER MANAGEMENT CONTROL ECU - BODY GROUND) |
| NG | |
REPAIR OR REPLACE HARNESS OR CONNECTOR (POWER MANAGEMENT CONTROL ECU - NO. 1 JUNCTION) |
|
|
4. |
INSPECT STEERING LOCK ACTUATOR ASSEMBLY |
|
(a) Reconnect the D43 connector to the power management control ECU. |
|
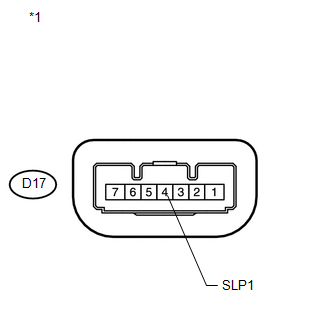
(b) Measure the resistance according to the value(s) in the table below.
Standard Resistance:
|
Tester Connection |
Condition |
Specified Condition |
|---|---|---|
|
D17-4 (SLP1) - Body ground |
Steering locked |
10 kΩ or higher |
|
D17-4 (SLP1) - Body ground |
Steering unlocked |
Below 1 Ω |
|
*1 |
Component with harness connected (Steering lock actuator assembly (steering Lock ECU)) |
| NG | |
REPLACE STEERING LOCK ACTUATOR ASSEMBLY |
|
|
5. |
CHECK HARNESS AND CONNECTOR (POWER MANAGEMENT CONTROL ECU - STEERING LOCK ECU) |
(a) Disconnect the D43 connector from the power management control ECU.
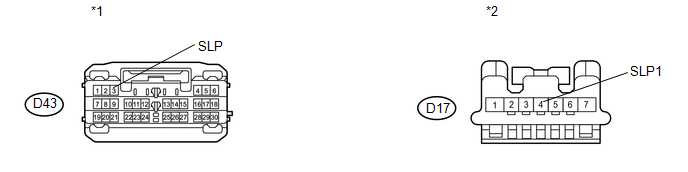
(b) Disconnect the D17 connector from the steering lock actuator assembly (steering lock ECU).
(c) Measure the resistance according to the value(s) in the table below.
Standard Resistance:
|
Tester Connection |
Condition |
Specified Condition |
|---|---|---|
|
D43-3 (SLP) - D17-4 (SLP1) |
Always |
Below 1 Ω |
|
D43-3 (SLP) - Body ground |
Always |
10 kΩ or higher |
|
*1 |
Front view of wire harness connector (to Power Management Control ECU) |
*2 |
Front view of wire harness connector (to Steering Lock Actuator Assembly (Steering Lock ECU)) |
| NG | |
REPAIR OR REPLACE HARNESS OR CONNECTOR (POWER MANAGEMENT CONTROL ECU - STEERING LOCK ECU) |
|
|
6. |
READ VALUE USING TECHSTREAM |
(a) Connect the Techstream to the DLC3.
(b) Turn the engine switch on (IG).
(c) Turn the Techstream on.
(d) Enter the following menus: Body Electrical / Power Source Control / Data List.
(e) Read the Data List according to the display on the Techstream.
Power Source Control|
Tester Display |
Measurement Item/Range |
Normal Condition |
Specified Condition |
|---|---|---|---|
|
Steering Unlock Switch |
Steering lock condition/ON or OFF |
ON: Steering unlocked OFF Steering locked |
- |
OK:
ON (steering lock is unlocked) and OFF (steering lock is locked) appear on the screen.
| OK | |
REPLACE STEERING LOCK ACTUATOR ASSEMBLY |
| NG | |
REPLACE POWER MANAGEMENT CONTROL ECU |
 Vehicle Speed Signal Malfunction (B2282)
DESCRIPTION
The power management control ECU receives vehicle speed information using 2 methods.
It receives a speed signal from the meter ECU. It also receives speed information
from the meter E ...
 Vehicle Speed Sensor Malfunction (B2283)
DESCRIPTION
The skid control ECU converts wheel speed sensor signals into 4-pulse signals
and sends them to the combination meter. After this signal is converted into a more
precise rectangular w ...
Other materials about Toyota Venza:
Installation
INSTALLATION
PROCEDURE
1. INSTALL CHARCOAL CANISTER LEAK DETECTION PUMP SUB-ASSEMBLY
(a) Engage the 2 claws to install a new charcoal canister leak detection
pump sub-assembly to the charcoal canister assembly.
NOTICE:
Do n ...
Cruise Control Main Switch
Components
COMPONENTS
ILLUSTRATION
Removal
REMOVAL
PROCEDURE
1. REMOVE STEERING PAD
(See page )
2. REMOVE CRUISE CONTROL MAIN SWITCH
(a) Remove the 2 screws.
(b) Disconnect t ...
Front Stabilizer Bar(for 2gr-fe 2wd)
Components
COMPONENTS
ILLUSTRATION
Removal
REMOVAL
PROCEDURE
1. REMOVE FRONT FRAME ASSEMBLY (When Using the Engine Support Bridge)
(See page )
2. REMOVE ENGINE ASSEMBLY WITH TRANSAXLE (When Not Using the Engine Support Bridge)
(See page )
3. ...

0.1183