Toyota Venza: Removal
REMOVAL
PROCEDURE
1. REMOVE NO. 1 SLIDING ROOF GLASS SUB-ASSEMBLY
(a) Fully open the No. 2 sliding roof glass sub-assembly.
|
(b) Using a T20 "TORX" socket wrench, remove the 6 screws and No. 1 sliding roof glass sub-assembly. |
|
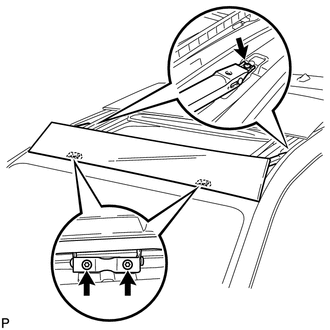
2. REMOVE SLIDING ROOF SIDE GARNISH LH
|
(a) Using a T25 "TORX" socket wrench, remove the screw and sliding roof side garnish LH as shown in the illustration. |
|
3. REMOVE SLIDING ROOF SIDE GARNISH RH
HINT:
Use the same procedure for the RH side and the LH side.
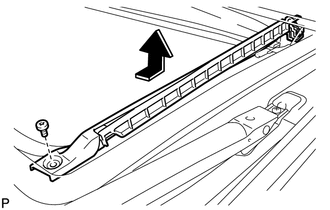
4. REMOVE NO. 2 SLIDING ROOF GLASS SUB-ASSEMBLY
(a) Fully close the No. 2 sliding roof glass sub-assembly.
|
(b) Using a T25 "TORX" socket wrench, remove the 3 screws. HINT: Use the same procedure for the RH side and the LH side. |
|
(c) Remove the No. 2 sliding roof glass sub-assembly.
5. REMOVE ROOF HEADLINING ASSEMBLY
HINT:
Refer to the procedure up to Remove Roof Headlining Assembly (See page
.gif) ).
).
6. REMOVE CURTAIN SHIELD AIRBAG ASSEMBLY LH
7. REMOVE CURTAIN SHIELD AIRBAG ASSEMBLY RH
HINT:
Use the same procedure for the RH side and the LH side.
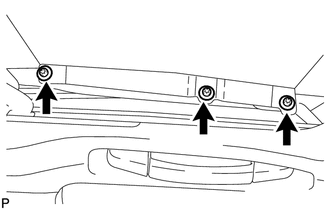
8. REMOVE NO. 3 SLIDING ROOF GLASS SUB-ASSEMBLY
(a) Remove the 20 nuts and No. 3 sliding roof glass sub-assembly.
9. REMOVE SLIDING ROOF DRIVE GEAR SUB-ASSEMBLY
|
(a) Remove the bolt, nut and room light bracket. |
|
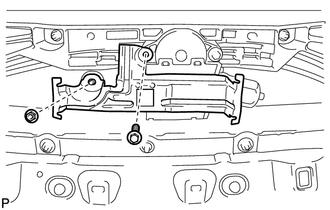
|
(b) Remove the bolt and sliding roof drive gear sub-assembly. |
|

10. REMOVE FRONT SLIDING ROOF HOUSING MOUNTING BRACKET LH
|
(a) Remove the 2 bolts, 2 nuts and front sliding roof housing mounting bracket LH. |
|
11. REMOVE FRONT SLIDING ROOF HOUSING MOUNTING BRACKET RH
HINT:
Use the same procedure for the RH side and the LH side.
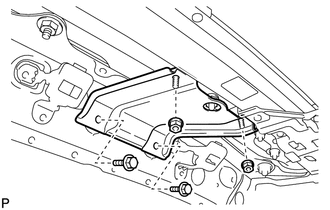
12. REMOVE CENTER SLIDING ROOF HOUSING MOUNTING BRACKET LH
|
(a) Remove the 3 bolts, 3 nuts and center sliding roof housing mounting bracket LH. |
|
13. REMOVE CENTER SLIDING ROOF HOUSING MOUNTING BRACKET RH
HINT:
Use the same procedure for the RH side and the LH side.
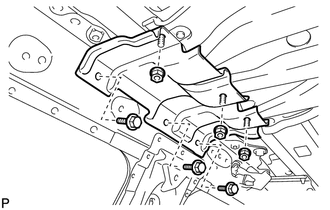
14. REMOVE REAR SLIDING ROOF HOUSING MOUNTING BRACKET LH
|
(a) Remove the bolt, nut and rear sliding roof housing mounting bracket LH. |
|
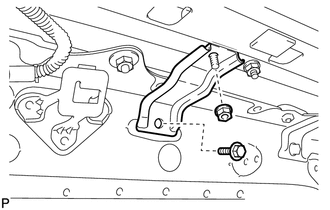
15. REMOVE REAR SLIDING ROOF HOUSING MOUNTING BRACKET RH
HINT:
Use the same procedure for the RH side and the LH side.
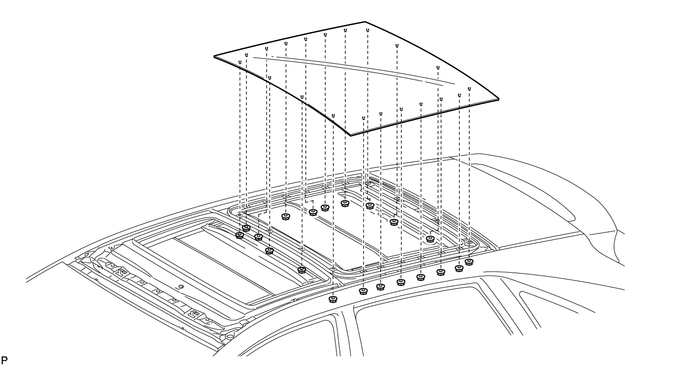
16. REMOVE SLIDING ROOF HOUSING ASSEMBLY
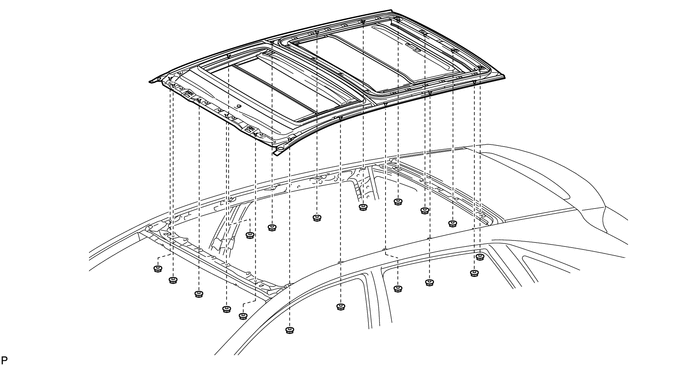
(a) Remove the 18 nuts and sliding roof housing assembly.
NOTICE:
- When removing the housing, be careful not to damage the vehicle.
- Perform this step with 2 or more technicians.
 Components
COMPONENTS
ILLUSTRATION
ILLUSTRATION
ILLUSTRATION
ILLUSTRATION
...
 Disassembly
DISASSEMBLY
PROCEDURE
1. REMOVE SLIDING ROOF HOUSING CENTER FRAME
(a) Remove the 2 nuts and sliding roof housing center frame.
2. REMOVE N ...
Other materials about Toyota Venza:
Chassis
General Maintenance
GENERAL MAINTENANCE
PROCEDURE
1. INSPECT STEERING LINKAGE AND GEAR HOUSING
(a) Check the steering wheel free play (See page
).
(b) Check the steering linkage for looseness or damage.
(1) Check that the tie rod ends do not have any ...
Inspection
INSPECTION
PROCEDURE
1. INSPECT INTAKE AIR CONTROL VALVE (for ACIS)
(a) Inspect the diaphragm.
(1) Using a vacuum pump, apply a vacuum of 60 kPa (450 mmHg, 17.7 in.Hg)
or higher to the diaphragm chamber. Wait for 1 minute and check that the ...
System Diagram
SYSTEM DIAGRAM
Communication Table
Transmitting ECU (Transmitter)
Receiving ECU (Receiver)
Signal
Communication Method
Certification ECU (smart key ECU assembly)
Power management contro ...

0.1214