Toyota Venza: Registration
REGISTRATION
PROCEDURE
1. REGISTER TRANSMITTER CODE
HINT:
- The vehicles garage door opener system records transmitter codes for systems such as garage doors, gates, door locks, home lighting systems, security systems or other transmitter-code based systems.
- The garage door opener system is built into the roof console box assembly. If the roof console box assembly is replaced, transmitter codes previously registered in the garage door opener system must be re-registered.
- Ensure that the customer is aware that existing codes may be cleared from the garage door opener system while performing diagnosis of the system. All remotes required to reprogram the system should be made available at the time of inspection or repair of the garage door opener system.
(a) Re-registration of codes in the garage door opener system (registration mode).
CAUTION:
- When programming a garage door opener system, a garage door or other device may be operated. To prevent injury or damage, it is necessary to make sure that people and objects are out of the way of the garage door or other devices.
- Before beginning programming of the garage door opener system, turn off the engine and remove the key from the ignition key cylinder.
- The garage door opener system cannot be used with openers that:
(1) Were manufactured before April 1, 1982.
(2) Do not meet Federal Safety Standards (for example, garage doors without a jam protection function).
HINT:
- A maximum of 3 transmitter codes can be registered with the garage door opener system. It is possible to register 1 handheld transmitter code (original transmitter) for each of the 3 garage door opener system switches.
- Disconnecting the vehicle battery will not clear the transmitter codes registered in the garage door opener system.
- An attempt to overwrite a previously registered code may fail. In this case, the previously registered handheld transmitter code will not be cleared.
- To successfully program the garage door opener system, it may be necessary to replace the handheld transmitter battery before programming.
|
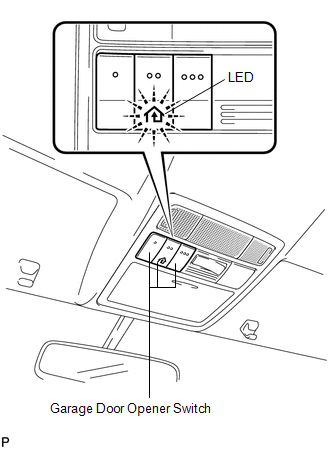
(1) Step 1: Select one of the garage door opener system switches to program. |
|
(2) Step 2:
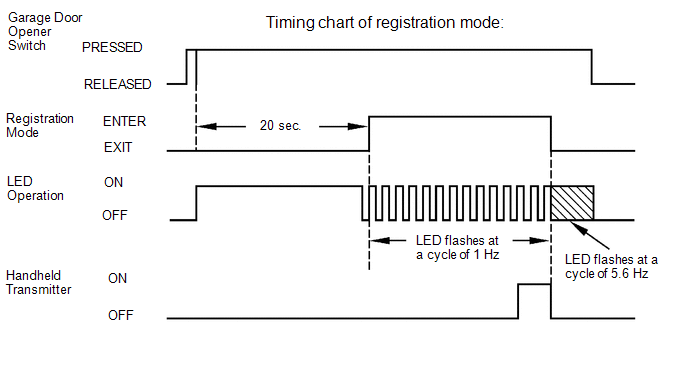
Press and hold the selected switch for 20 seconds. The garage door opener system will enter registration mode. Continue to hold this switch during steps 3 and 4.
HINT:
The garage door opener system LED should stay on while holding the selected switch for the 20-second period. After entering registration mode, the LED will flash approximately once per second (1 Hz). This indicates that the garage door opener system has entered registration mode and is listening for a code from a handheld transmitter.
|
(3) Step 3: After the garage door opener system has entered registration mode, bring the original handheld transmitter within 2 to 9 cm (1 to 3 in.) of the garage door opener system. Press and hold the switch on the handheld transmitter. If the flashing speed of the garage door opener system LED changes from the slow speed to a faster speed, proceed to step 4. HINT: Some handheld transmitters stop transmitting after 1 to 2 seconds. In this case, continue to hold the selected garage door opener system switch while pressing the handheld transmitter switch for 2 seconds at a time. Repeat the cycle of pressing and releasing the transmitter switch while monitoring for a change of the flashing speed of the garage door opener system LED. |
|
(4) Step 4:
When the LED begins to flash more rapidly, release both switches. This indicates that the garage door opener system has been successfully programmed. If the garage door opener system fails to program, review all hints before trying the programming process again.
HINT:
- If transmitter registration fails:
(1) The battery in the handheld transmitter may be weak or need to be replaced.
(2) The handheld transmitter and opener device to be registered may not be compatible with the vehicle garage door opener system.

- After entering garage door opener system registration mode, registration of the handheld transmitter code must be completed within 75 seconds. If 75 seconds have elapsed, the garage door opener system will enter low power mode.
- For first time programming, it may be necessary to press and hold the two outer switches until the garage door opener system LED begins to flash rapidly. The length of time that it is necessary to hold the switches in this case should be approximately 20 seconds.
- In some cases, the garage door opener system LED may flash slowly (once per second (1 Hz)) as soon as the selected garage door opener system switch is pressed. This indicates that the system is ready or "listening" for a code from a handheld transmitter. Continue to hold the switch and proceed from step 3 (above).
|
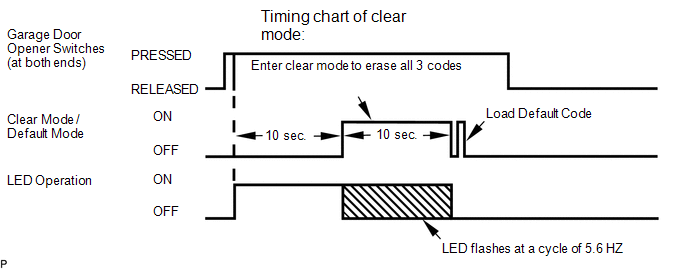
(b) Clearing transmitter codes in the garage door opener system (clear mode). HINT: All 3 codes registered in the garage door opener system will be cleared. No option exists for clearing only 1 transmitter code. (1) Press and hold the left and right switches of the garage door opener system for 20 seconds. The LED will begin to flash approximately 5 times per second (5.6 Hz). This indicates that the codes contained in the vehicle garage door opener system have been cleared. Releasing the switches ends clear mode. HINT:
|
|

(c) Low power mode:
(1) If the garage door opener switch is stuck or held for 75 seconds or more while in registration mode, the garage door opener system will enter low power mode to economize on power consumption. When the garage door opener system has entered low power mode, the LED turns off. When the garage door opener system switch is released, low power mode will end.
2. ROLLING CODE SYSTEMS
(a) If the handheld transmitter for the opener device (customer's garage door) being programmed uses a rolling code, it may be necessary to "train" the garage door opener device.
HINT:
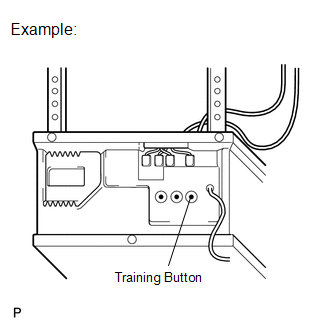
- "Train" refers to causing the opener device (customer's ceiling mounted garage door opener) to recognize a non-rolling code.
- The steps required to "train" an opener device may vary depending on the model, type, age, and manufacturer of the device.
(1) Locate the training button on the opener device.
(2) Press the training button.
(3) Within 30 seconds, press and release the programmed "garage door opener system" switch twice. Some opener devices may require the garage door opener system switch to be pressed three times.
(4) The vehicle garage door opener system should now operate the opener device.
HINT:
Opener device refers to a device such as a ceiling mounted garage door opener, which is located at the customer's residence. It is necessary to read the instructions for the customer's opener device, to allow the above procedure to be performed safely and successfully. The customer should be aware that performing this procedure will result in a lowered level of security for the customer's opener device.
 System Diagram
SYSTEM DIAGRAM
...
 System Description
SYSTEM DESCRIPTION
1. DESCRIPTION
(a) A maximum of 3 codes for transmitter-code based systems such as garage doors
gates and entry gates can be registered to the vehicle garage door opener system. ...
Other materials about Toyota Venza:
Engine Hood Courtesy Switch Circuit
DESCRIPTION
The security courtesy switch is installed together with the hood lock. This switch
turns off when the engine hood is opened and turns on when the engine hood is closed.
WIRING DIAGRAM
PROCEDURE
1.
INSPECT HOOD LOCK AS ...
Installation
INSTALLATION
PROCEDURE
1. INSTALL CHARCOAL CANISTER LEAK DETECTION PUMP SUB-ASSEMBLY
(a) Engage the 2 claws to install a new charcoal canister leak detection
pump sub-assembly to the charcoal canister assembly.
NOTICE:
Do n ...
Key information
Keys
The following keys are provided with the vehicle.
►Vehicles with smart key system
1. Electronic keys
• Operating the smart key system
• Operating the wireless remote control function
2. Mechanical keys
3. Key number plate
►Veh ...

0.1702