
Toyota Venza: On-vehicle Inspection
ON-VEHICLE INSPECTION
CAUTION / NOTICE / HINT
HINT:
- Use the same procedure for the RH side and LH side.
- The procedure listed below is for the LH side.
PROCEDURE
1. REMOVE REAR WHEEL
2. SEPARATE REAR FLEXIBLE HOSE
.gif)
3. SEPARATE REAR DISC BRAKE CALIPER ASSEMBLY
4. REMOVE REAR DISC
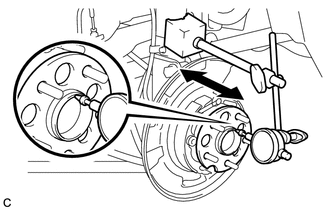
5. INSPECT REAR AXLE HUB BEARING LOOSENESS
|
(a) Using a dial indicator, check for looseness near the center of the axle hub. Maximum looseness: 0.05 mm (0.00196 in.) NOTICE: Ensure that the dial indicator is set perpendicular to the measurement surface. If the looseness exceeds the maximum, replace the rear axle hub and bearing assembly. |
|
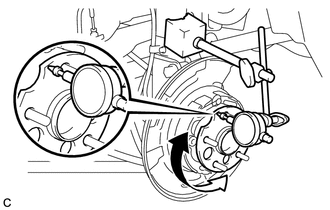
6. INSPECT REAR AXLE HUB RUNOUT
|
(a) Using a dial indicator, check for runout on the surface of the axle hub outside the hub bolt. Maximum runout: 0.08 mm (0.00314 in.) NOTICE: Ensure that the dial indicator is set perpendicular to the measurement surface. If the runout exceeds the maximum, replace the rear axle hub and bearing assembly. |
|
7. INSTALL REAR DISC
8. INSTALL REAR DISC BRAKE CALIPER ASSEMBLY
9. INSTALL REAR FLEXIBLE HOSE
10. INSTALL REAR WHEEL
Torque:
103 N·m {1050 kgf·cm, 76 ft·lbf}
 Components
COMPONENTS
ILLUSTRATION
...
 Removal
REMOVAL
CAUTION / NOTICE / HINT
HINT:
Use the same procedure for the RH side and LH side.
The procedure listed below is for the LH side.
PROCEDURE
1. REMOVE REAR WHEEL
2. SEPAR ...
Other materials about Toyota Venza:
Removal
REMOVAL
PROCEDURE
1. REMOVE FRONT SEAT HEADREST ASSEMBLY
2. REMOVE FRONT SEAT REAR OUTER TRACK COVER
3. REMOVE FRONT SEAT REAR INNER TRACK COVER
4. REMOVE FRONT SEAT ASSEMBLY
5. REMOVE SLIDE AND VERTICAL POWER SEAT SWITCH KNOB
6. REMOVE RECL ...
Skid Control ECU Malfunction (C1300/62)
DESCRIPTION
The skid control ECU outputs this DTC, if malfunctions are found in the circuit
inside the ECU by self diagnosis.
DTC Code
DTC Detection Condition
Trouble Area
C1300/62
Internal failu ...
Malfunction in Deceleration Sensor (C0365/28,C1234/34,C1245/32,C1245/45)
DESCRIPTION
The skid control ECU receives signals from the yaw rate and acceleration sensor
via the CAN communication system.
The yaw rate sensor has a built-in acceleration sensor.
If there is trouble in the bus lines between the yaw rate and acceleratio ...

0.1195