Toyota Venza: Lubrication System
On-vehicle Inspection
ON-VEHICLE INSPECTION
PROCEDURE
1. INSPECT ENGINE OIL LEVEL
(a) Warm up the engine, stop it and wait 5 minutes. The engine oil level should be between the low level mark and full level mark on the engine oil level dipstick.
If the engine oil level is low, check for leaks and add engine oil to the full level mark.
NOTICE:
Do not fill the engine with oil to above the full level mark.
HINT:
A certain amount of engine oil will be consumed while driving. In the following situations, engine oil consumption may increase, and engine oil may need to be refilled in between oil maintenance intervals.
- When the engine is new, for example directly after purchasing the vehicle or after replacing the engine.
- If low quality engine oil or oil of an inappropriate viscosity is used.
- When driving at high engine speeds or with a heavy load (when towing, etc.), or when accelerating or decelerating frequently while driving.
- When idling for a long time, or when driving frequently through heavy traffic.
When judging the amount of oil consumption, keep in mind that the oil may have become diluted, making it difficult to judge the true level accurately.
2. INSPECT ENGINE OIL QUALITY
(a) Check the oil for deterioration, water contamination, discoloration or thinning. If the quality is visibly poor, replace the oil and filter.
3. INSPECT OIL PRESSURE
(a) Remove the oil pressure switch assembly (See page
.gif) ).
).
|
(b) Install an oil pressure gauge. |
|
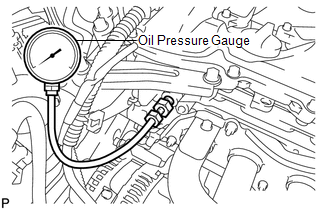
(c) Warm up the engine.
(d) Measure the oil pressure.
Standard Oil Pressure:
|
Condition |
Specified Condition |
|---|---|
|
Idle |
30 kPa (0.3 kgf/cm2, 4.4 psi) or more |
|
4000 rpm |
260 kPa (2.7 kgf/cm2, 38 psi) or more |
(e) Remove the oil pressure gauge.
(f) Install the oil pressure switch assembly (See page
).
 Engine Oil Cooler
Components
COMPONENTS
ILLUSTRATION
Removal
REMOVAL
PROCEDURE
1. REMOVE EXHAUST MANIFOLD ASSEMBLY
HINT:
See page
2. DRAIN ENGINE OIL
3. DRAIN ENGINE COOLANT
4. REMOVE OIL COOLE ...

Other materials about Toyota Venza:
On-vehicle Inspection
ON-VEHICLE INSPECTION
PROCEDURE
1. CHECK RADIATOR CAP SUB-ASSEMBLY
(a) Measure the valve opening pressure.
(1) If there are water stains or foreign matter on rubber packings 1, 2 or 3,
clean the part(s) with water and finger scouring.
(2) Check that r ...
Problem Symptoms Table
PROBLEM SYMPTOMS TABLE
Use the table below to help determine the cause of problem symptoms.
If multiple suspected areas are listed, the potential causes of the symptoms
are listed in order of probability in the "Suspected Area" column ...
Registration
REGISTRATION
CAUTION / NOTICE / HINT
NOTICE:
When the automatic transaxle is replaced, the transaxle compensation
code must be input into the TCM (proceed to Procedure 1). After the automatic
transaxle is reinstalled, the Quick Response (QR) ...

0.1814