
Toyota Venza: Installation
INSTALLATION
PROCEDURE
1. INSTALL FRONT DOOR FRONT WINDOW FRAME MOULDING
|
(a) Engage the front door front window frame moulding to the door frame. |
|
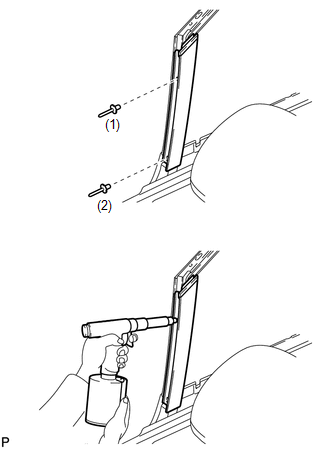
(b) Using an air riveter or hand riveter with a nose piece, install the front door front window frame moulding with 2 new rivets.
HINT:
- Tighten the 2 rivets in the order shown in the illustration.
- If the rivet cannot be cut, pull it once and cut it.
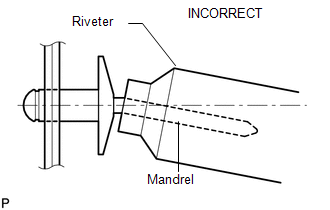
- Do not pry the rivet with the riveter, as this will cause damage to the riveter and mandrel.
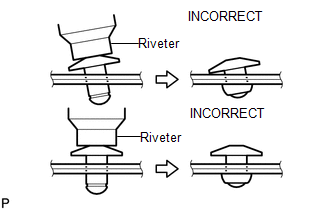
- Confirm that the rivets are seated properly against the moulding. Do
not tilt the riveter when installing the rivet to the moulding. Do not leave
any space between the rivet head and moulding.
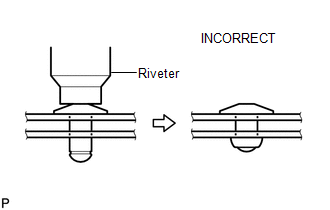
- Do not leave any space between the moulding and door frame. Firmly hold
the 2 items together while installing the rivet.
2. INSTALL FRONT DOOR UPPER WINDOW FRAME MOULDING
|
(a) Engage the guide and front door upper window frame moulding to the door frame. |
|
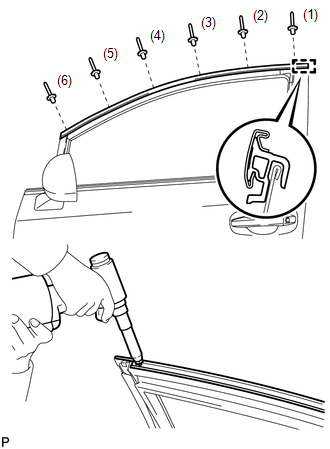
(b) Using an air riveter or hand riveter with a nose piece, install the front door upper window frame moulding with 6 new rivets.
HINT:
- Tighten the 6 rivets in the order shown in the illustration.
- If the rivet cannot be cut, pull it once and cut it.
- Do not pry the rivet with the riveter, as this will cause damage to the riveter and mandrel.
- Confirm that the rivets are seated properly against the moulding. Do
not tilt the riveter when installing the rivet to the moulding. Do not leave
any space between the rivet head and moulding.
- Do not leave any space between the moulding and door frame. Firmly hold
the 2 items together while installing the rivet.
3. INSTALL FRONT DOOR PANEL SUB-ASSEMBLY
|
(a) Install the front door panel sub-assembly with the 4 bolts <B>. Torque: 26 N·m {265 kgf·cm, 19 ft·lbf} NOTICE: To prevent damage, when installing the front door panel sub-assembly, make sure that there are enough people available to hold it securely. |
|
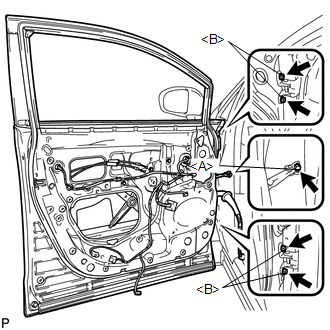
(b) Apply adhesive to the threads of the bolt <A>.
Adhesive:
Toyota Genuine Adhesive 1324, Three Bond 1324 or equivalent
(c) Engage the front door check assembly with the bolt <A>.
Torque:
29 N·m {296 kgf·cm, 21 ft·lbf}
|
(d) Using a brush, apply anti-rust coating to the front door hinge assembly as shown in the illustration. |
|
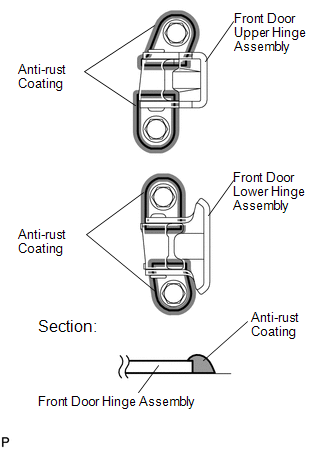
(e) Connect each connector.
4. INSTALL COWL SIDE TRIM SUB-ASSEMBLY
.gif)
5. INSTALL FRONT DOOR SCUFF PLATE
6. INSTALL FRONT DOOR REAR WINDOW FRAME MOULDING
HINT:
When installing the front door rear window frame moulding, heat the vehicle body and front door rear window frame moulding using a heat light.
Heating Temperature|
Item |
Temperature |
|---|---|
|
Vehicle Body |
40 to 60°C (104 to 140°F) |
|
Moulding |
20 to 30°C (68 to 86°F) |
NOTICE:
Do not heat the vehicle body or front door rear window frame moulding excessively.
(a) Clean the vehicle body surface.
(1) Using a heat light, heat the vehicle body surface.
(2) Remove the double-sided tape from the vehicle body.
(3) Wipe off any tape adhesive residue with cleaner.
(b) Clean the front door rear window frame moulding (if reusing the front door rear window frame moulding).
(1) Using a heat light, heat the front door rear window frame moulding.
(2) Remove the double-sided tape from the front door rear window frame moulding.
(3) Wipe off any tape adhesive residue with cleaner.
|
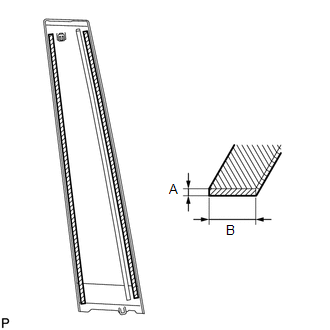
(4) Apply new double-sided tape to the front door rear window frame moulding.
|
|
|
(c) Install the front door rear window frame moulding. Text in Illustration
(1) Using a heat light, heat the vehicle body and front door rear window frame moulding. (2) Remove the peeling paper from the face of the front door rear window frame moulding. HINT: After removing the peeling paper, keep the exposed adhesive free from foreign matter. (3) Install the front door rear window frame moulding with the clip. |
|
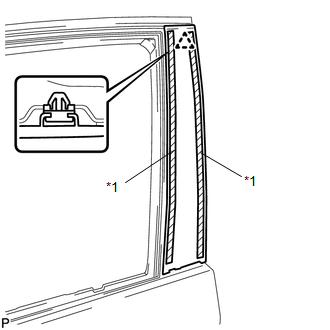
7. CONNECT FRONT DOOR WEATHERSTRIP
|
(a) Engage the 2 clips and connect the front door weatherstrip. |
|
.png)
8. INSTALL FRONT DOOR BELT MOULDING
9. INSTALL FRONT DOOR GLASS RUN
10. INSTALL FRONT DOOR GLASS SUB-ASSEMBLY
11. INSTALL FRONT DOOR SERVICE HOLE COVER
12. INSTALL FRONT NO. 1 SPEAKER ASSEMBLY
13. INSTALL DOOR SIDE AIRBAG SENSOR
14. INSTALL FRONT DOOR INSIDE HANDLE SUB-ASSEMBLY
15. INSTALL FRONT DOOR TRIM BOARD SUB-ASSEMBLY
16. INSTALL COURTESY LIGHT ASSEMBLY
17. INSTALL POWER WINDOW REGULATOR MASTER SWITCH ASSEMBLY WITH FRONT DOOR ARMREST BASE PANEL (for Driver Side)
18. INSTALL POWER WINDOW REGULATOR SWITCH ASSEMBLY WITH FRONT DOOR ARMREST BASE PANEL (for Front Passenger Side)
19. INSTALL FRONT DOOR INSIDE HANDLE BEZEL PLUG
20. INSPECT FRONT DOOR
21. ADJUST FRONT DOOR
22. CONNECT CABLE TO NEGATIVE BATTERY TERMINAL
NOTICE:
When disconnecting the cable, some systems need to be initialized after the cable
is reconnected (See page ).
23. INSPECT SRS WARNING LIGHT
(See page )
24. INITIALIZE POWER WINDOW CONTROL SYSTEM
(See page )
 Components
COMPONENTS
ILLUSTRATION
ILLUSTRATION
ILLUSTRATION
...
 Removal
REMOVAL
PROCEDURE
1. DISCONNECT CABLE FROM NEGATIVE BATTERY TERMINAL
CAUTION:
Wait at least 90 seconds after disconnecting the cable from the negative (-)
battery terminal to disable the SRS sys ...
Other materials about Toyota Venza:
Image from Camera for Rear View Monitor is Abnormal
DESCRIPTION
The video signal of the rear television camera assembly is transmitted
to the navigation receiver assembly*1 or radio and display receiver assembly*2.
*1: for Navigation System
*2: for Audio and Visual System
WIRING DIAG ...
Problem Symptoms Table
PROBLEM SYMPTOMS TABLE
HINT:
Use the table below to help determine the cause of problem symptoms. If multiple
suspected areas are listed, the potential causes of the symptoms are listed in order
of probability in the "Suspected Area" column of ...
Inspection
INSPECTION
PROCEDURE
1. INSPECT FRONT NO. 2 SPEAKER ASSEMBLY (for 6 Speakers)
(a) With the speaker installed, check that there is no looseness or other abnormalities.
(b) Check that there is no foreign matter in the speaker, no tears on the speaker
cone ...

0.169