Toyota Venza: Removal
REMOVAL
PROCEDURE
1. DISCONNECT CABLE FROM NEGATIVE BATTERY TERMINAL
NOTICE:
When disconnecting the cable, some systems need to be initialized after the cable
is reconnected (See page .gif) ).
).
2. REMOVE REAR DOOR INSIDE HANDLE BEZEL PLUG
3. REMOVE REAR POWER WINDOW REGULATOR SWITCH ASSEMBLY WITH REAR DOOR ARMREST BASE PANEL
4. REMOVE REAR DOOR TRIM BOARD SUB-ASSEMBLY
5. REMOVE REAR DOOR INSIDE HANDLE SUB-ASSEMBLY
6. REMOVE REAR DOOR SERVICE HOLE COVER
7. REMOVE REAR DOOR CHECK ASSEMBLY
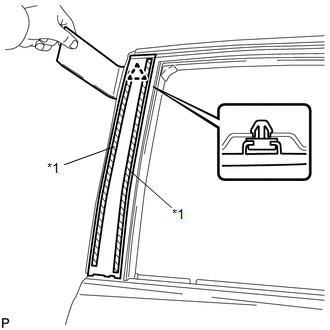
8. REMOVE REAR DOOR WEATHERSTRIP
9. REMOVE REAR DOOR GLASS RUN
10. REMOVE REAR DOOR WINDOW DIVISION BAR SUB-ASSEMBLY
11. REMOVE REAR DOOR GLASS SUB-ASSEMBLY
12. REMOVE REAR DOOR BELT MOULDING
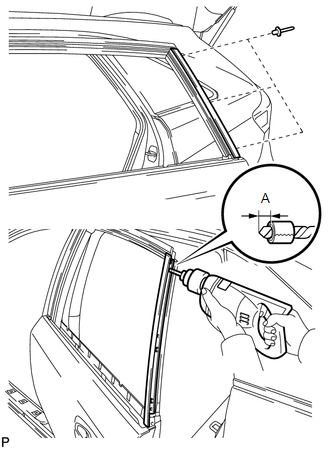
13. REMOVE REAR DOOR FRONT WINDOW FRAME MOULDING
HINT:
When removing the rear door front window frame moulding, heat the vehicle body and rear door front window frame moulding using a heat light.
Heating Temperature|
Item |
Temperature |
|---|---|
|
Vehicle Body |
40 to 60°C (104 to 140°F) |
|
Moulding |
20 to 30°C (68 to 86°F) |
NOTICE:
Do not heat the vehicle body or moulding excessively.
(a) Using a heat light, heat the rear door front window frame moulding.
|
(b) Using a moulding remover, remove the clip and rear door front window frame moulding. Text in Illustration
|
|
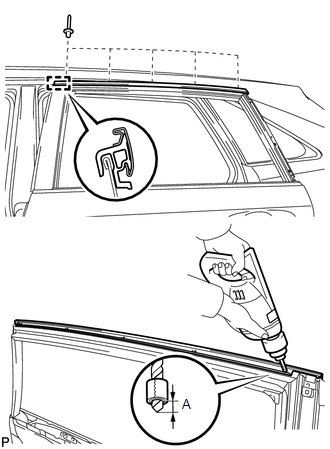
14. REMOVE REAR DOOR REAR WINDOW FRAME MOULDING
(a) Insert a 4.0 mm (0.157 in.) drill bit into a drill.
|
(b) Tape the 4.0 mm (0.157 in.) drill bit 5.0 mm (0.197 in.) from the tip as shown in the illustration.
NOTICE: Tape the 4.0 mm (0.157 in.) drill bit to prevent the drill bit from going too deep. |
|
(c) Lightly press the drill bit against the rivets to drill off the rivet flanges, and remove the 3 rivets.
NOTICE:
- Pressing the drill too firmly will cause the rivet to turn and result in the rivet not being drilled through.
- Prying the rivets with the drill may damage the rivet installation holes or drill bit.
- Be careful of the drilled rivets, as they may be hot.
(d) Using a vacuum cleaner, remove the rivet fragments and shavings from the drilled areas.
(e) Disengage the guide and remove the rear door rear window frame moulding from the door frame.
15. REMOVE REAR DOOR UPPER WINDOW FRAME MOULDING
(a) Insert a 4.0 mm (0.157 in.) drill bit into a drill.
|
(b) Tape the 4.0 mm (0.157 in.) drill bit 5.0 mm (0.197 in.) from the tip as shown in the illustration.
NOTICE: Tape the 4.0 mm (0.157 in.) drill bit to prevent the drill bit from going too deep. |
|
(c) Lightly press the drill bit against the rivets to drill off the rivet flanges, and remove the 5 rivets.
NOTICE:
- Pressing the drill too firmly will cause the rivet to turn and result in the rivet not being drilled through.
- Prying the rivets with the drill may damage the rivet installation holes or drill bit.
- Be careful of the drilled rivets, as they may be hot.
(d) Using a vacuum cleaner, remove the rivet fragments and shavings from the drilled areas.
(e) Disengage the guide and remove the rear door upper window frame moulding from the door frame.
 Components
COMPONENTS
ILLUSTRATION
ILLUSTRATION
ILLUSTRATION
...
 Installation
INSTALLATION
PROCEDURE
1. INSTALL REAR DOOR UPPER WINDOW FRAME MOULDING
(a) Engage the guide and install the rear door upper window frame moulding
to the door frame.
...
Other materials about Toyota Venza:
Power Back Door Warning Buzzer
Components
COMPONENTS
ILLUSTRATION
Inspection
INSPECTION
PROCEDURE
1. INSPECT POWER BACK DOOR WARNING BUZZER
(a) Measure the resistance according to the value(s) in the table below.
HINT:
If battery voltage is applied directly to ...
Door Courtesy Switch Circuit
DESCRIPTION
The main body ECU (driver side junction block assembly) detects the condition
of the door courtesy light switch.
WIRING DIAGRAM
PROCEDURE
1.
READ VALUE USING TECHSTREAM
(a) Connect the Techstream to the DLC3 ...
Installation
INSTALLATION
PROCEDURE
1. INSTALL DOOR CONTROL RECEIVER
(a) Install the door control receiver with the bolt.
(b) Connect the connector.
2. INSTALL ROOF SIDE INNER GARNISH ASSEMBLY RH
HINT:
Use th ...

0.165