
Toyota Venza: On-vehicle Inspection
ON-VEHICLE INSPECTION
PROCEDURE
1. INSPECT COOLING FAN MOTOR
|
(a) Check that the motor operates smoothly when the battery is connected to the cooling fan motor connector. Text in Illustration
If the motor does not operate smoothly, replace the cooling fan motor. |
|
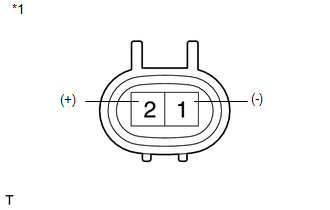
(b) Connect the pickup of a clamp-on ammeter over one of the 2 wires for the cooling fan motor.
(c) Measure the current while the motor is operating.
Standard Current:
|
Item |
Condition |
Specified Condition |
|---|---|---|
|
Cooling fan motor (w/o Towing package) |
20°C (68°F) |
11.8 to 14.8 A at 12 V |
|
Cooling fan motor (w/ Towing package) |
20°C (68°F) |
7.9 to 10.9 A at 12 V |
If the result is not as specified, replace the cooling fan motor.
2. INSPECT NO. 2 COOLING FAN MOTOR
|
(a) Check that the motor operates smoothly when the battery is connected to the No. 2 cooling fan motor connector. Text in Illustration
If the motor does not operate smoothly, replace the No. 2 cooling fan motor. |
|
(b) Connect the pickup of a clamp-on ammeter over one of the 2 wires for the No. 2 cooling fan motor.
(c) Measure the current while the motor is operating.
Standard Current:
|
Item |
Condition |
Specified Condition |
|---|---|---|
|
No. 2 cooling fan motor (w/o Towing package) |
20°C (68°F) |
7.9 to 10.9 A at 12 V |
|
No. 2 cooling fan motor (w/ Towing package) |
20°C (68°F) |
7.9 to 10.9 A at 12 V |
If the result is not as specified, replace the No. 2 cooling fan motor.
 Components
COMPONENTS
ILLUSTRATION
...
 Removal
REMOVAL
PROCEDURE
1. REMOVE RADIATOR ASSEMBLY AND FAN ASSEMBLY WITH MOTOR
HINT:
See page
2. REMOVE FAN
(a) Remove the nut and fan.
3. ...
Other materials about Toyota Venza:
Clearance Sonar Main Switch
Components
COMPONENTS
ILLUSTRATION
Removal
REMOVAL
PROCEDURE
1. REMOVE FRONT DOOR SCUFF PLATE LH
2. REMOVE COWL SIDE TRIM SUB-ASSEMBLY LH
3. REMOVE LOWER NO. 1 INSTRUMENT PANEL FINISH PANEL
4. REMOVE CLEARANCE SONAR MAIN SWITCH
...
XM Tuner Malfunction (B15BA)
DESCRIPTION
This DTC is stored when a malfunction occurs in the stereo component tuner assembly.
DTC No.
DTC Detection Condition
Trouble Area
B15BA
When either of the following conditions is met:
...
Removal
REMOVAL
PROCEDURE
1. REMOVE UPPER CONSOLE PANEL SUB-ASSEMBLY (w/o Seat Heater System)
2. REMOVE UPPER CONSOLE PANEL SUB-ASSEMBLY (w/ Seat Heater System)
3. REMOVE NO. 2 CONSOLE BOX CARPET
4. REMOVE CONSOLE BOX ASSEMBLY
5. REMOVE AIR CONDITION ...

0.1617