
Toyota Venza: LVDS Signal Malfunction (from Extension Module) (B1532)
DESCRIPTION
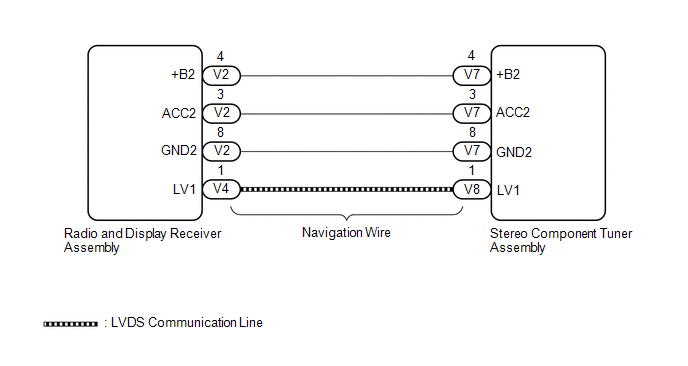
The stereo component tuner assembly and the radio and display receiver assembly are connected by an LVDS communication line.
This DTC is stored when an LVDS communication error occurs between the stereo component tuner assembly and the radio and display receiver assembly.
|
DTC No. |
DTC Detection Condition |
Trouble Area |
|---|---|---|
|
B1532 |
When any of the following conditions is met:
|
|
HINT:
Even if no malfunction is present, this DTC may be stored depending on the battery condition or engine start voltage.
WIRING DIAGRAM
CAUTION / NOTICE / HINT
NOTICE:
After replacing the stereo component tuner assembly of vehicles subscribed to pay-type satellite radio broadcasts, XM radio ID registration is necessary.
PROCEDURE
|
1. |
CHECK NAVIGATION WIRE (STEREO COMPONENT TUNER ASSEMBLY POWER SOURCE) |
(a) Disconnect the V7 stereo component tuner assembly connector.
(b) Measure the resistance according to the value(s) in the table below.
Standard Resistance:
|
Tester Connection |
Condition |
Specified Condition |
|---|---|---|
|
V7-8 (GND2) - Body ground |
Always |
Below 1 Ω |
(c) Measure the voltage according to the value(s) in the table below.
Standard Voltage:
|
Tester Connection |
Condition |
Specified Condition |
|---|---|---|
|
V7-4 (+B2) - V7-8 (GND2) |
Always |
11 to 14 V |
|
V7-3 (ACC2) - V7-8 (GND2) |
Ignition switch ACC |
11 to 14 V |
| NG | .gif) |
GO TO STEP 4 |
|
.gif)
|
2. |
REPLACE NAVIGATION WIRE |
(a) Replace the navigation wire with a new or known good one (See page
.gif) ).
).
(b) Clear the DTCs (See page ).
(c) Recheck for DTCs and check that no DTCs are output.
OK:
No DTCs are output.
| OK | |
END |
|
|
3. |
REPLACE STEREO COMPONENT TUNER ASSEMBLY |
(a) Replace the stereo component tuner assembly with a new or known good one
(See page ).
(b) Clear the DTCs (See page ).
(c) Recheck for DTCs and check that no DTCs are output.
OK:
No DTCs are output.
| OK | |
END |
| NG | |
REPLACE RADIO AND DISPLAY RECEIVER ASSEMBLY |
|
4. |
CHECK NAVIGATION WIRE |
(a) Disconnect the V2 radio and display receiver assembly connector.
(b) Disconnect the V7 stereo component tuner assembly connector.
(c) Measure the resistance according to the value(s) in the table below.
Standard Resistance:
|
Tester Connection |
Condition |
Specified Condition |
|---|---|---|
|
V2-4 (+B2) - V7-4 (+B2) |
Always |
Below 1 Ω |
|
V2-3 (ACC2) - V7-3 (ACC2) |
Always |
Below 1 Ω |
|
V2-8 (GND2) - V7-8 (GND2) |
Always |
Below 1 Ω |
|
V2-4 (+B2) - Body ground |
Always |
10 kΩ or higher |
|
V2-3 (ACC2) - Body ground |
Always |
10 kΩ or higher |
|
V2-8 (GND2) - Body ground |
Always |
10 kΩ or higher |
| OK | |
REPLACE RADIO AND DISPLAY RECEIVER ASSEMBLY |
| NG | |
REPLACE NAVIGATION WIRE |
 USB Device Malfunction (B1585)
DESCRIPTION
This DTC is stored when a malfunction occurs in a connected device.
DTC No.
DTC Detection Condition
Trouble Area
B1585
When a ...
 HD Radio Tuner Malfunction (B1551,B158D,B15A0,B15B0,B15B3,B15B4,B15B7)
DESCRIPTION
These DTCs are stored when a malfunction occurs in the radio and display receiver
assembly.
DTC No.
DTC Detection Condition
Trouble Area
...
Other materials about Toyota Venza:
Installation
INSTALLATION
PROCEDURE
1. INSTALL ATF TEMPERATURE SENSOR ASSEMBLY
(a) Coat a new O-ring with ATF and install it to the ATF temperature
sensor assembly.
Text in Illustration
*1
O-ring
...
Front Brake Flexible Hose
Components
COMPONENTS
ILLUSTRATION
Installation
INSTALLATION
CAUTION / NOTICE / HINT
NOTICE:
Because the left and right hoses are not interchangeable, verify the
part number when installing the flexible hoses.
If the hoses are to b ...
Removal
REMOVAL
PROCEDURE
1. REMOVE REAR SEAT HEADREST ASSEMBLY
2. REMOVE REAR SEAT CENTER HEADREST ASSEMBLY
3. REMOVE REAR SEAT INNER TRACK BRACKET COVER
4. REMOVE REAR SEAT OUTER TRACK BRACKET COVER
5. DISCONNECT REAR SEAT RECLINING CONTROL CABLE S ...

0.1439