Toyota Venza: Initialization
INITIALIZATION
NOTICE:
- Initialize the headlight leveling ECU assembly (set the zero point of the height control sensor in the headlight leveling ECU assembly) after the vehicle height changes due to replacement of the suspension or after performing such operations as removal and reinstallation or replacement of the rear height control sensor sub-assembly RH.
- When the headlight leveling ECU assembly is replaced, initialization is also necessary.
- Adjust the headlight aim after initializing the headlight leveling ECU
assembly (See page
.gif) ).
). - When a malfunction is detected in the automatic headlight beam level control system, height control sensor signal initialization is impossible. Perform troubleshooting before initialization.
1. 1.PREPARE VEHICLE FOR INITIALIZATION
(a) Unload the vehicle and its trunk, ensuring that the spare tire, tools and jack are in their original positions.
(b) Check that there are no passengers in the vehicle.
(c) Turn off the headlights.
(d) Stop the vehicle on a level surface and keep the vehicle height unchanged.
|
Proceed to |
|---|
|
NEXT |
2. 2.CHECK HEADLIGHT BEAM LEVEL CONTROL INDICATOR LIGHT
(a) Turn the ignition switch to ON, and check the indicator light.
OK:
|
Condition |
Specified Condition |
|---|---|
|
The headlight leveling ECU assembly is replaced with a new one. |
Indicator light continuously blinks 6 times at 2 Hz. |
|
Removal and reinstallation of the headlight leveling ECU assembly, replacement of the rear height control sensor sub-assembly RH, removal and reinstallation of the rear height control sensor sub-assembly RH, replacement of the suspension, etc. is performed. |
Indicator light comes on for approximately 3 seconds, and then goes off (bulb check function). |
HINT:
If the indicator light does not come on when turning the ignition switch to ON,
inspect and repair it according to Problem Symptoms Table (See page
).
|
Result |
Proceed to |
|---|---|
|
NG |
GO TO PROBLEM SYMPTOMS TABLE |
|
OK |
GO TO STEP 3 |
3. 3.INITIALIZATION
(a) Connect terminals 4 (CG) and 8 (LVL) of the DLC3 using SST.
.png)
SST: 09843-18040
(b) Turn the low beam headlights on and off using the light control switch within 20 seconds after connecting the terminals.
HINT:
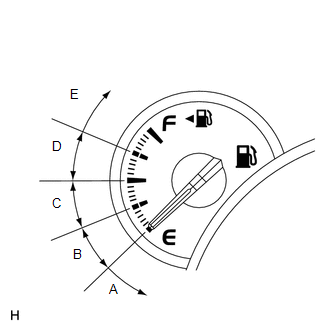
The number of times the low beam headlights need to be turned on and off is determined by the present fuel level as shown below.
|
Fuel Level |
Number of Times to Turn Low Beam Headlights on and off |
|---|---|
|
Fuel level is within A range. |
1 |
|
Fuel level is within B range. |
2 |
|
Fuel level is within C range. |
3 |
|
Fuel level is within D range. |
4 |
|
Fuel level is within E range. |
5 |
NOTICE:
- Turn the low beam headlights on and off at approximately 1-second intervals.
- Be sure to operate the light control switch from outside the vehicle.
(c) Check the indicator light.
OK:
|
Condition |
Specified Condition |
|---|---|
|
The headlight leveling ECU assembly is replaced with a new one. |
Blinks 6 times at 2 Hz → Continuously blinks N*1 times at 2 Hz. |
|
Removal and reinstallation of the headlight leveling ECU assembly, replacement of the rear height control sensor sub-assembly RH, removal and reinstallation of the rear height control sensor sub-assembly RH, replacement of the suspension, etc. is performed. |
Off → Continuously blinks N*1 times at 2 Hz. |
HINT:
- *1: The number of times that the indicator blinks is determined by the number of times the low beam headlights are turned on and off.
- If initialization cannot be finished normally, disconnect SST from the DLC3 and turn the ignition switch off. Then, restart from procedure 1.
|
Result |
Proceed to |
|---|---|
|
NG |
GO TO PROBLEM SYMPTOMS TABLE |
|
OK |
TURN IGNITION SWITCH OFF (END) |
 Customize Parameters
CUSTOMIZE PARAMETERS
1. CUSTOMIZE LIGHTING SYSTEM (EXT)
HINT:
The following items can be customized.
NOTICE:
When the customer requests a change in a function, first make sure that
th ...
 Problem Symptoms Table
PROBLEM SYMPTOMS TABLE
Use the table below to help determine the cause of problem symptoms. If multiple
suspected areas are listed, the potential causes of the symptoms are listed in order
of pro ...
Other materials about Toyota Venza:
Open in Driver Side Electrical Antenna Circuit (B27A1)
DESCRIPTION
The certification ECU (smart key ECU assembly) generates a request signal and
sends it to the electrical key oscillator built into the front door outside handle
assembly (for driver side) at 0.25-second intervals. To detect a key near the driv ...
On-vehicle Inspection
ON-VEHICLE INSPECTION
PROCEDURE
1. INSPECT SHIFT LOCK CONTROL UNIT ASSEMBLY
(a) Inspect the shift lock operation.
(1) Move the shift lever to P.
(2) Turn the ignition switch off.
(3) Check that the shift lever cannot be moved from P to any other position ...
On-vehicle Inspection
ON-VEHICLE INSPECTION
PROCEDURE
1. INSPECT COOLER CONDENSER ASSEMBLY
(a) If the cooler condenser assembly fins are dirty, clean them with water and
dry with compressed air.
NOTICE:
Do not damage the cooler condenser assembly fins.
(b) If any cooler con ...

0.1489