Toyota Venza: Differential Oil
Replacement
REPLACEMENT
CAUTION / NOTICE / HINT
HINT:
Stop the vehicle on a level surface.
PROCEDURE
1. DRAIN DIFFERENTIAL OIL
|
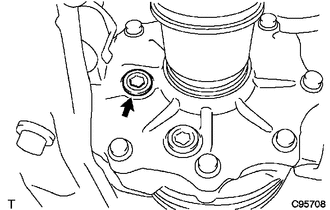
(a) Using a 10 mm hexagon wrench, remove the rear differential carrier cover plug and gasket. |
|
|
(b) Using a 10 mm hexagon wrench, remove the rear differential drain plug and gasket to drain the differential oil. |
|
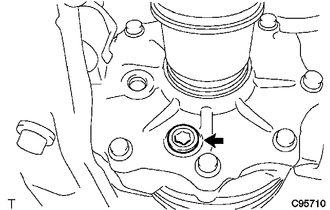
2. INSTALL REAR DIFFERENTIAL DRAIN PLUG
|
(a) Using a 10 mm hexagon wrench, install a new gasket and the rear differential drain plug. Torque: 39 N·m {398 kgf·cm, 29 ft·lbf} |
|
3. ADD DIFFERENTIAL OIL
|
(a) Add differential oil so that the oil level is between 0 and 5 mm (0 to 0.196 in.) from the bottom lip of the rear differential carrier cover plug opening. Oil Type: Toyota genuine differential gear oil LT 75W-85 GL-5 or equivalent Standard Differential Oil Capacity: 0.45 to 0.55 liters (0.48 to 0.58 US qts., 0.40 to 0.48 Imp. qts.) NOTICE:
|
|
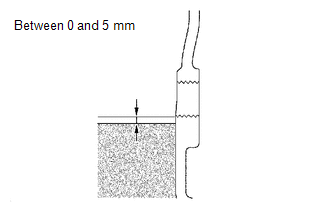
4. INSPECT DIFFERENTIAL OIL
|
(a) Check that the oil level is between 0 and 5 mm (0 and 0.196 in.) from the bottom lip of the rear differential carrier cover plug opening. |
|
(b) Inspect for oil leaks if the oil level is low.
5. INSTALL REAR DIFFERENTIAL CARRIER COVER PLUG
|
(a) Using a 10 mm hexagon wrench, install a new gasket and the rear differential carrier cover plug. Torque: 39 N·m {398 kgf·cm, 29 ft·lbf} |
|
 Differential Mount Cushion
Components
COMPONENTS
ILLUSTRATION
Installation
INSTALLATION
PROCEDURE
1. INSTALL REAR NO. 1 DIFFERENTIAL MOUNT CUSHION
(a) Using SST, install a new rear No. 1 differential mount cushion. ...
 Differential System
Precaution
PRECAUTION
Before disassembly, clean the outside of the differential assembly and
remove any sand or mud to prevent it from entering the inside of the assembly
during dis ...
Other materials about Toyota Venza:
Door Side Airbag Sensor LH Malfunction (B1695/16)
DESCRIPTION
The side collision sensor LH circuit (to determine deployment of the front seat
side airbag assembly LH and curtain shield airbag assembly LH) is composed of the
center airbag sensor assembly, rear airbag sensor LH and side airbag sensor LH.
...
Actuator Check
ACTUATOR CHECK
1. ACTUATOR CHECK
(a) Start the engine and warm it up.
(b) Perform the indicator check (See page
).
(c) Press the "Recirculation/Fresh" switch to perform the actuator check.
HINT:
Be sure to perform the actuator check after ...
How To Proceed With Troubleshooting
CAUTION / NOTICE / HINT
HINT:
Use the following procedure to troubleshoot the start function.
*: Use the Techstream.
PROCEDURE
1.
VEHICLE BROUGHT TO WORKSHOP
NEXT
...

0.1649