
Toyota Venza: Calibration
CALIBRATION
1. DESCRIPTION
(a) Follow the chart below to perform calibration.
|
Parts to be Replaced |
Necessary Operation |
|---|---|
|
Brake actuator assembly (Skid control ECU) |
Perform engine variant learning |
2. ENGINE VARIANT LEARNING (When Using the Techstream)
(a) Perform Engine Variant Learning
HINT:
Engine variant learning is automatically performed immediately after the Test Mode is entered.
(1) Turn the ignition switch off.
(2) Connect the Techstream to the DLC3.
(3) Turn the ignition switch to ON.
(4) Turn the Techstream on.
(5) Select the skid control ECU to Test Mode using the Techstream. Enter the following menus: Chassis / ABS/VSC/TRAC / Utility / Test Mode.
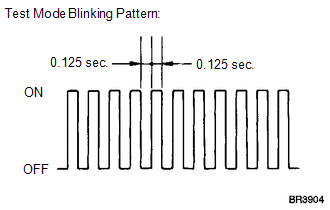
(6) Check that the ABS warning and slip indicator lights blink in Test Mode.
HINT:
If learning has not yet been performed, the ABS warning and slip indicator lights will remain on and DTC C1288 (ECU Version Miss Match) will be stored.
(7) Turn the ignition switch off and disconnect the Techstream.
3. ENGINE VARIANT LEARNING (When not Using the Techstream)
(a) Perform Engine Variant Learning
HINT:
Engine variant learning is automatically performed immediately after the Test Mode is entered.
(1) Turn the ignition switch off.
(2) Using SST, connect terminals TS and CG of the DLC3.
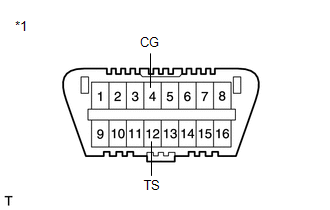
SST: 09843-18040
Text in Illustration|
*1 |
Front view of DLC3 |
(3) Turn the ignition switch to ON.
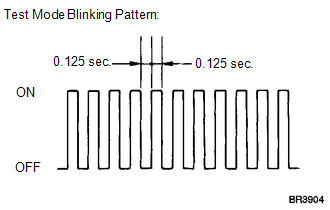
(4) Check that the ABS warning and slip indicator lights blink in Test Mode.
HINT:
If learning has not yet been performed, the ABS warning and slip indicator lights will remain on and DTC 88 (ECU Version Miss Match) will be stored.
(5) Turn the ignition switch off and disconnect SST from the DLC3.
 How To Proceed With Troubleshooting
CAUTION / NOTICE / HINT
HINT:
*: Use the Techstream.
PROCEDURE
1.
VEHICLE BROUGHT TO WORKSHOP
NEXT
...
 Check For Intermittent Problems
CHECK FOR INTERMITTENT PROBLEMS
1. CHECK FOR INTERMITTENT PROBLEMS
HINT:
A momentary interruption (open circuit) in the connectors and/or wire harness
between the sensors and ECUs can be detected ...
Other materials about Toyota Venza:
Driver Side Door Entry Unlock Function does not Operate
DESCRIPTION
If the driver door entry lock function operates normally, but its entry unlock
function does not, this means that the request code from the driver door is being
output normally. In this case, a malfunction in the touch sensor circuit (from the ...
Installation
INSTALLATION
PROCEDURE
1. INSTALL DRIVER SIDE KNEE AIRBAG ASSEMBLY
(a) Check that the ignition switch is off.
(b) Check that the cable is disconnected from the negative (-) battery terminal.
CAUTION:
Wait at least 90 seconds after disconnecting the cable ...
Throttle Actuator Control Motor Circuit Low (P2102,P2103)
DESCRIPTION
The throttle actuator is operated by the ECM and opens and closes the throttle
valve using gears.
The opening angle of the throttle valve is detected by the throttle position
sensor, which is mounted on the throttle body. The throttle positio ...

0.1447