Toyota Venza: Removal
REMOVAL
CAUTION / NOTICE / HINT
HINT:
- Use the same procedure for the LH side and RH side.
- The following procedure listed is for the LH side.
PROCEDURE
1. REMOVE REAR WHEEL
2. DRAIN BRAKE FLUID
NOTICE:
If brake fluid leaks onto any painted surface, immediately wash it off.
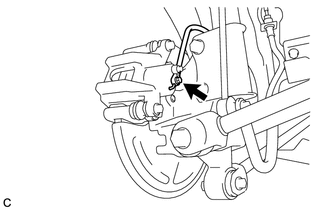
3. SEPARATE REAR FLEXIBLE HOSE
|
(a) Remove the union bolt and gasket, and disconnect the rear flexible hose from the rear disc brake cylinder assembly. |
|
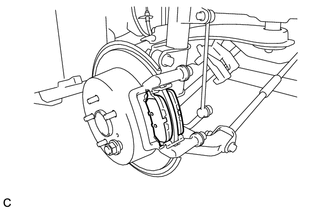
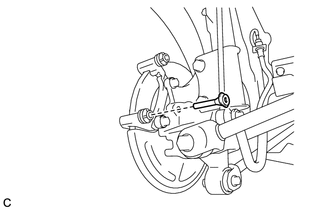
4. REMOVE REAR DISC BRAKE CYLINDER ASSEMBLY
|
(a) Remove the 2 bolts and the rear disc brake cylinder assembly from the rear disc brake cylinder mounting. |
|

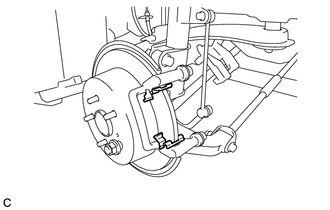
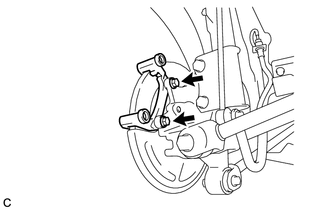
5. REMOVE REAR DISC BRAKE PAD
|
(a) Remove the 2 rear disc brake pads from the rear disc brake cylinder mounting. |
|
6. REMOVE REAR ANTI-SQUEAL SHIM
(a) Remove the 2 rear anti-squeal shims and the pad wear indicator from the inner pad.
7. REMOVE REAR DISC BRAKE PAD SUPPORT PLATE
|
(a) Remove the 2 rear disc brake pad support plates from the rear disc brake cylinder mounting. |
|
8. REMOVE NO. 1 REAR DISC BRAKE CYLINDER SLIDE PIN
|
(a) Remove the No. 1 rear disc brake cylinder slide pin from the rear disc brake cylinder mounting. |
|
9. REMOVE NO. 2 REAR DISC BRAKE CYLINDER SLIDE PIN
|
(a) Remove the No. 2 rear disc brake cylinder slide pin from the rear disc brake cylinder mounting. |
|
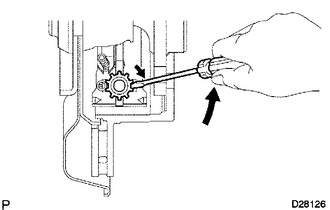
10. REMOVE REAR DISC BRAKE CYLINDER SLIDE BUSHING
|
(a) Using a screwdriver with its tip wrapped with protective tape, remove the rear disc brake cylinder slide bushing from the No. 1 rear disc brake cylinder slide pin. Text in Illustration
NOTICE: Be careful not to damage the No. 1 rear disc brake cylinder slide pin. |
|
.png)
11. REMOVE REAR DISC BRAKE BUSHING DUST BOOT
|
(a) Remove the 2 rear disc brake bushing dust boots from the rear disc brake cylinder mounting. |
|
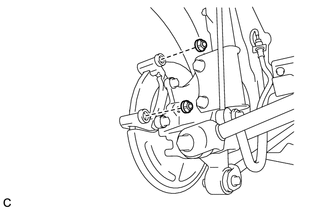
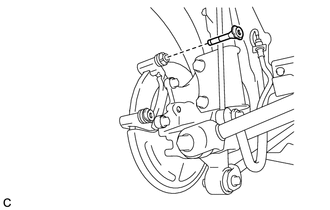
12. REMOVE REAR DISC BRAKE CYLINDER MOUNTING
|
(a) Remove the 2 bolts and the rear disc brake cylinder mounting. |
|
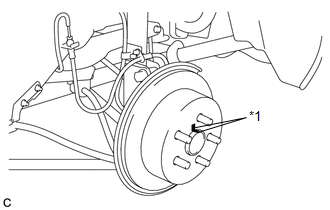
13. REMOVE REAR DISC
|
(a) Put matchmarks on the rear disc and rear axle hub. Text in Illustration
HINT: The above step is not necessary when the rear disc will be replaced. |
|
|
(b) Release the parking brake and remove the rear disc. HINT: If the rear disc cannot be removed easily, insert a screwdriver through the service hole to loosen the parking brake shoes by turning the adjusting screw. |
|
14. REMOVE PARKING BRAKE SHOE ADJUSTING HOLE PLUG
15. REMOVE REAR DISC BRAKE BLEEDER PLUG
(a) Remove the rear disc brake bleeder plug cap.
(b) Remove the rear disc brake bleeder plug.
 Components
COMPONENTS
ILLUSTRATION
ILLUSTRATION
...
 Inspection
INSPECTION
PROCEDURE
1. INSPECT PAD LINING THICKNESS
(a) Using a ruler, measure the pad lining thickness.
Text in Illustration
*1
Ruler
...
Other materials about Toyota Venza:
Initialization
INITIALIZATION
1. Inspection After Repair
Perform learning value reset and idle learning after replacing or servicing parts
related to engine operation. Details on procedures required are indicated by an
asterisk and a number, and are explained in detail ...
Disassembly
DISASSEMBLY
PROCEDURE
1. REMOVE STEERING RACK BOOT CLIP (for LH Side)
(a) Using pliers, remove the steering rack boot clip.
2. REMOVE STEERING RACK BOOT CLIP (for RH Side)
HINT:
Perform the same procedure as for the LH side.
3. REMOVE NO. 2 STEERING RAC ...
Installation
INSTALLATION
PROCEDURE
1. INSTALL STEREO COMPONENT TUNER ASSEMBLY
2. INSTALL NAVIGATION WIRE
(a) Connect the 3 connectors to install the navigation wire.
3. INSTALL STEREO COMPONENT TUNER ASSEMBLY WITH WIRE
(a) Install the stereo component tuner assembly ...

0.1561