Toyota Venza: Removal
REMOVAL
CAUTION / NOTICE / HINT
HINT:
- Use the same procedure for the LH side and RH side.
- The following procedure listed is for the LH side.
PROCEDURE
1. REMOVE FRONT WHEEL
2. DRAIN BRAKE FLUID
NOTICE:
If brake fluid leaks onto any painted surface, immediately wash it off.
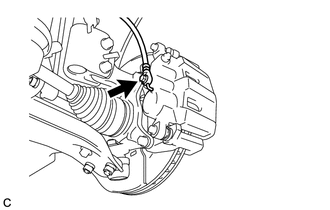
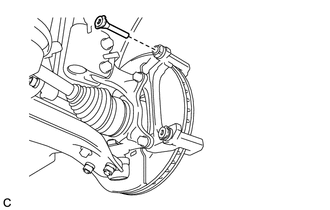
3. SEPARATE FRONT FLEXIBLE HOSE
|
(a) Remove the union bolt and gasket, and separate the front flexible hose from the front disc brake cylinder assembly. |
|
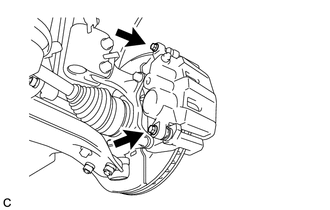
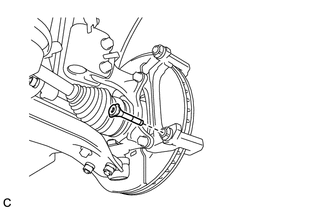
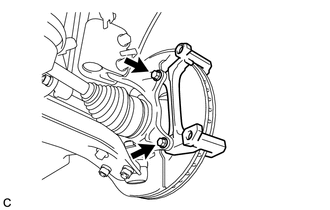
4. REMOVE FRONT DISC BRAKE CYLINDER ASSEMBLY
|
(a) Remove the 2 bolts and the front disc brake cylinder assembly from the front disc brake cylinder mounting. |
|
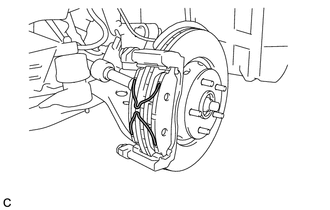
5. REMOVE FRONT DISC BRAKE PAD
|
(a) Remove the 2 anti-squeal springs from the front disc brake pads. |
|
|
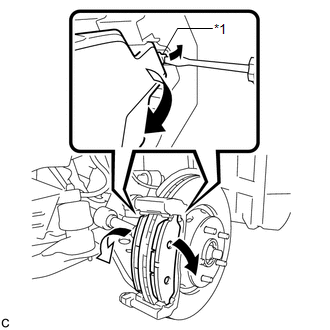
(b) Using a screwdriver, push the protrusion of the front disc brake pad support plate as shown in the illustration and remove the 2 front disc brake pads from the front disc brake cylinder mounting. Text in Illustration
NOTICE: When remove the front disc brake pad, replace the front disc brake pad support plates with new ones. |
|
6. REMOVE FRONT ANTI-SQUEAL SHIM
(a) Remove the 2 front anti-squeal shims from the front disc brake pads.
7. REMOVE FRONT DISC BRAKE PAD SUPPORT PLATE
|
(a) Remove the 2 front disc brake pad support plates from the front disc brake cylinder mounting. |
|

8. REMOVE FRONT DISC BRAKE CYLINDER SLIDE PIN
|
(a) Remove the front disc brake cylinder slide pin from the front disc brake cylinder mounting. |
|
9. REMOVE NO. 2 FRONT DISC BRAKE CYLINDER SLIDE PIN
|
(a) Remove the No. 2 front disc brake cylinder slide pin from the front disc brake cylinder mounting. |
|
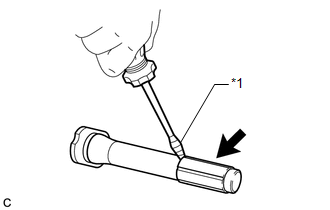
10. REMOVE FRONT DISC BRAKE CYLINDER SLIDE BUSHING
|
(a) Using a screwdriver with its tip wrapped with protective tape, remove the front disc brake cylinder slide bushing from the No. 2 front disc brake cylinder slide pin. Text in Illustration
NOTICE: Be careful not to damage the No. 2 front disc brake cylinder slide pin. |
|
11. REMOVE FRONT DISC BRAKE BUSHING DUST BOOT
|
(a) Remove the 2 front disc brake bushing dust boots from the front disc brake cylinder mounting. |
|
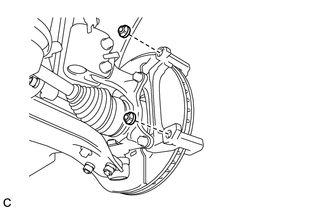
12. REMOVE FRONT DISC BRAKE CYLINDER MOUNTING
|
(a) Remove the 2 bolts and the front disc brake cylinder mounting. |
|
13. REMOVE FRONT DISC
|
(a) Put matchmarks on the front disc and front axle hub. Text in Illustration
HINT: The above step is not necessary when the front disc will be replaced. |
|
(b) Remove the front disc.
14. REMOVE FRONT DISC BRAKE BLEEDER PLUG
(a) Remove the front disc brake bleeder plug cap.
(b) Remove the front disc brake bleeder plug.
 Components
COMPONENTS
ILLUSTRATION
ILLUSTRATION
...
 Inspection
INSPECTION
PROCEDURE
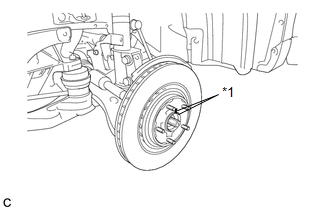
1. INSPECT PAD LINING THICKNESS
(a) Using a ruler, measure the pad lining thickness.
Text in Illustration
*1
Ruler
...
Other materials about Toyota Venza:
System Description
SYSTEM DESCRIPTION
1. GENERAL
This system has the following functions: manual slide open and close; auto slide
open; manual tilt up and down; auto tilt up; jam protection; key off operation.
2. FUNCTION OF MAIN COMPONENT
Component
O ...
Reassembly
REASSEMBLY
PROCEDURE
1. INSTALL COOLER DRYER
(a) Using pliers, install a new cooler dryer to the modulator.
(b) Apply sufficient compressor oil to the O-ring and fitting surfaces
of t ...
Locking the driver’s doors from the outside without a key
Move the inside lock button to the
lock position.
Close the door.
►Vehicles with smart key system
The door cannot be locked if the “ENGINE START STOP” switch is in ACCESSORY or IGNITION
ON mode, or the electronic key is left inside the vehic ...

0.1183