Toyota Venza: Rear Door LH ECU Communication Stop (B2324)
DESCRIPTION
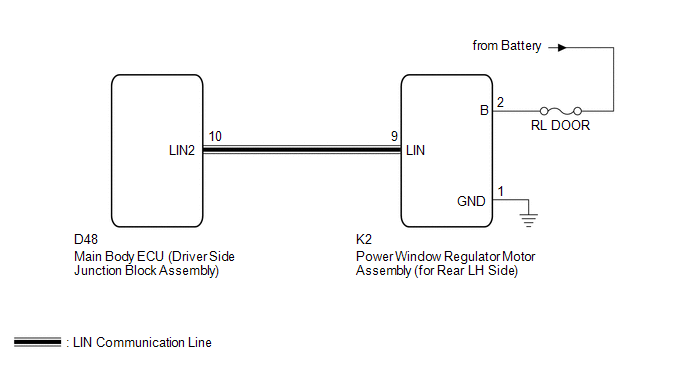
This DTC is stored when LIN communication between the power window regulator motor assembly (for rear LH side) and main body ECU (driver side junction block assembly) stops for more than 10 seconds.
|
DTC No. |
DTC Detection Condition |
Trouble Area |
|---|---|---|
|
B2324 |
No communication between the power window regulator motor assembly (for rear LH side) and main body ECU (driver side junction block assembly) for more than 10 seconds. |
|
WIRING DIAGRAM
CAUTION / NOTICE / HINT
NOTICE:
- When the power window regulator motor assembly (for rear LH side) is
replaced or removed and reinstalled, it requires initialization (See page
.gif) ).
). - When using the Techstream to troubleshoot with the ignition switch off:
Connect the Techstream to the DLC3, and turn the courtesy switch on and off at 1.5-second intervals until communication between the Techstream and vehicle begins.
PROCEDURE
|
1. |
CHECK HARNESS AND CONNECTOR (POWER WINDOW REGULATOR MOTOR - BATTERY AND BODY GROUND) |
|
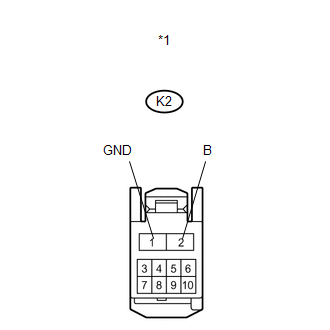
(a) Disconnect the K2 motor connector. |
|
(b) Measure the resistance and voltage according to the value(s) in the table below.
Standard Resistance:
|
Tester Connection |
Condition |
Specified Condition |
|---|---|---|
|
K2-1 (GND) - Body ground |
Always |
Below 1 Ω |
Standard Voltage:
|
Tester Connection |
Condition |
Specified Condition |
|---|---|---|
|
K2-2 (B) - Body ground |
Always |
11 to 14 V |
|
*1 |
Front view of wire harness connector (to Power Window Regulator Motor Assembly (for Rear LH Side)) |
| NG | .gif) |
REPAIR OR REPLACE HARNESS OR CONNECTOR |
|
.gif)
|
2. |
CHECK HARNESS AND CONNECTOR (MAIN BODY ECU - POWER WINDOW REGULATOR MOTOR ASSEMBLY) |
|
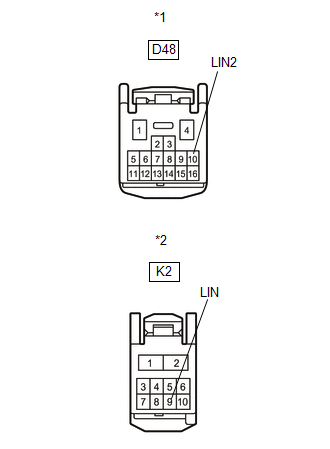
(a) Disconnect the D48 ECU connector. |
|
(b) Measure the resistance according to the value(s) in the table below.
Standard Resistance:
|
Tester Connection |
Condition |
Specified Condition |
|---|---|---|
|
D48-10 (LIN2) - K2-9 (LIN) |
Always |
Below 1 Ω |
|
D48-10 (LIN2) - Body ground |
Always |
10 kΩ or higher |
|
*1 |
Front view of wire harness connector (to Main Body ECU (Driver Side Junction Block Assembly)) |
|
*2 |
Front view of wire harness connector (to Power Window Regulator Motor Assembly (for Rear LH Side)) |
| NG | |
REPAIR OR REPLACE HARNESS OR CONNECTOR |
|
|
3. |
REPLACE POWER WINDOW REGULATOR MOTOR ASSEMBLY (for REAR LH SIDE) |
(a) Replace the power window regulator motor assembly (for rear LH side) (See
page ).
|
|
4. |
CHECK DTC OUTPUT |
(a) Clear the DTC (See page ).
(b) Recheck for DTCs.
OK:
DTC B2324 is not output.
| OK | |
END (POWER WINDOW REGULATOR MOTOR ASSEMBLY WAS DEFECTIVE) |
| NG | |
REPLACE MAIN BODY ECU (DRIVER SIDE JUNCTION BLOCK ASSEMBLY) |
 Communication Malfunction between ECUs Connected by LIN (B2785)
DESCRIPTION
This DTC is stored when LIN communication from the certification ECU stops for
a certain amount of time.
DTC No.
DTC Detection Condition
Trouble Area
...
 LIN Communication Bus Malfunction (B2325)
DESCRIPTION
The main body ECU (driver side junction block assembly) monitors communication
between all the ECUs connected to the door bus lines. When the main body ECU (driver
side junction block ...
Other materials about Toyota Venza:
Diagnostic Trouble Code Chart
DIAGNOSTIC TROUBLE CODE CHART
Navigation System
DTC Code
Detection Item
See page
B1532
LVDS Signal Malfunction (from Extension Module)
B1551
HD Radio Tuner ...
Data List / Active Test
DATA LIST / ACTIVE TEST
1. DATA LIST
HINT:
Using the Techstream to read the Data List allows the values or states of switches,
sensors, actuators and other items to be read without removing any parts. This non-intrusive
inspection can be very useful bec ...
Automatic transmission
Select a shift position appropriate for the driving conditions.
- Shifting the shift lever
Vehicles with smart key system:
While the “ENGINE START STOP” switch is in IGNITION ON mode, depress the brake
pedal and move the shift lever.
Vehicles ...

0.1533