Toyota Venza: Disposal
DISPOSAL
CAUTION / NOTICE / HINT
CAUTION:
Before performing pre-disposal deployment of any SRS component, review and closely follow all applicable environmental and hazardous material regulations. Pre-disposal deployment may be considered hazardous material treatment.
HINT:
When scrapping vehicles equipped with a seat belt pretensioner or disposing of a front seat outer belt (with a seat belt pretensioner), always deploy the seat belt pretensioner first in accordance with the procedure described below. If any abnormality occurs during deployment of the seat belt pretensioner, contact the SERVICE DEPARTMENT of TOYOTA MOTOR SALES, U.S.A., INC.
PROCEDURE
1. DISPOSE OF FRONT SEAT OUTER BELT ASSEMBLY (WHEN INSTALLED IN VEHICLE)
NOTICE:
- Never dispose of a front seat outer belt assembly with a pretensioner that has not been deployed.
- The seat belt pretensioner produces an exploding sound when it deploys, so perform the operation outdoors where it will not disturb local residents.
- When deploying a front seat outer belt (with a seat belt pretensioner), perform the operation at least 10 m (33 ft.) away from the front seat outer belt.
- Use gloves and safety glasses when handling a front seat outer belt with a deployed pretensioner.
- Always wash your hands with water after completing the operation.
- Do not apply water, etc. to a front seat outer belt with a deployed pretensioner.
- When deploying the seat belt pretensioner, always use the specified SST (SRS airbag deployment tool). Perform the operation in a place away from electrical interference.
- Be sure to follow the procedure listed below when deploying the seat belt pretensioner.
(a) Check the function of SST.
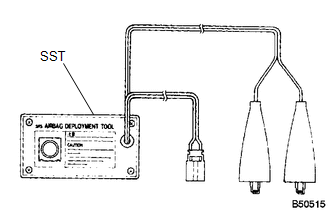
SST: 09082-00700
CAUTION:
When deploying the seat belt pretensioner, always use the specified SST.
|
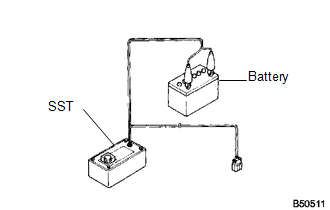
(1) Connect the red clip of SST to a battery positive (+) terminal and the black clip to a battery negative (-) terminal. HINT: At this time, do not connect the yellow connector. It will be connected to the seat belt pretensioner in later step. |
|
|
(2) Press the SST deployment switch and check that the LED of the SST deployment switch illuminates. CAUTION: If the LED is illuminated when the deployment switch is not pressed, SST may be malfunctioning. In this case, do not use the malfunctioning SST. |
|
(b) Connect SST.
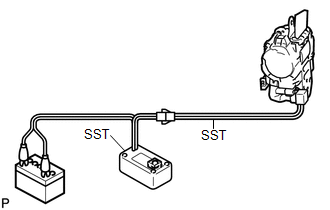
(1) Connect 2 SST, and then connect them to the front seat outer belt pretensioner.
SST: 09082-00700
SST: 09082-00770
NOTICE:
To avoid damaging the SST connector and wire harness, do not lock the secondary lock of the pretensioner connector.
|
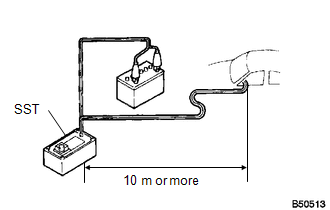
(2) Move SST at least 10 m (33 ft.) away from the front of the vehicle. |
|
(3) Close all the doors and windows of the vehicle.
NOTICE:
Do not damage the SST wire harness.
(c) Deploy the front seat outer belt pretensioner.
(1) Confirm that no one is inside the vehicle or within a 10 m (33 ft.) radius of the vehicle.
(2) Connect the red clip of SST to a battery positive (+) terminal and the black clip to a negative (-) terminal.
(3) Press the SST deployment switch to deploy the front seat outer belt pretensioner.
HINT:
The seat belt pretensioner will deploy at the same time as SST LED illuminates.
|
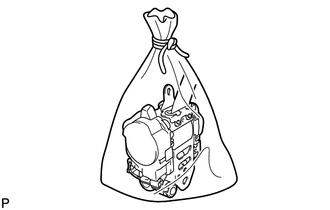
(d) Dispose of the front seat outer belt assembly. (1) Remove the front seat outer belt assembly and SST. (2) Dispose of the front seat outer belt assembly in accordance with local regulations. CAUTION:
HINT: When scrapping the vehicle, deploy the front seat outer belt pretensioners, and then scrap the vehicle with the deployed outer belt installed. |
|
2. DISPOSE OF FRONT SEAT OUTER BELT ASSEMBLY (WHEN NOT INSTALLED IN VEHICLE)
NOTICE:
- Never dispose of a front seat outer belt assembly with a pretensioner that has not been deployed.
- The seat belt pretensioner produces an exploding sound when it deploys, so perform the operation outdoors where it will not disturb local residents.
- When deploying a front seat outer belt (with a seat belt pretensioner), perform the operation at least 10 m (33 ft.) away from the front seat outer belt.
- Use gloves and safety glasses when handling a front seat outer belt with a deployed pretensioner.
- Always wash your hands with water after completing the operation.
- Do not apply water, etc. to a front seat outer belt with a deployed pretensioner.
- When disposing of a pretensioner equipped front seat outer belt, never deploy the belt in the customer's vehicle.
- Be sure to follow the procedure listed below when deploying the seat belt pretensioner.
(a) Check the function of SST.
SST: 09082-00700
CAUTION:
When deploying the seat belt pretensioner, always use the specified SST.
|
(1) Connect the red clip of SST to a battery positive (+) terminal and the black clip to a battery negative (-) terminal. HINT: At this time, do not connect the yellow connector. It will be connected to the seat belt pretensioner in later step. |
|
|
(2) Press the SST deployment switch and check that the LED of the SST deployment switch illuminates. CAUTION: If the LED is illuminated when the deployment switch is not pressed, SST may be malfunctioning. In this case, do not use the malfunctioning SST. |
|
(b) Connect SST.
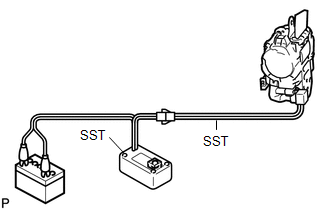
(1) Connect 2 SST, and then connect them to the front seat outer belt pretensioner.
SST: 09082-00700
SST: 09082-00770
NOTICE:
To avoid damaging the SST connector and wire harness, do not lock the secondary lock of the pretensioner connector.
|
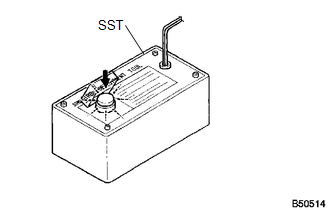
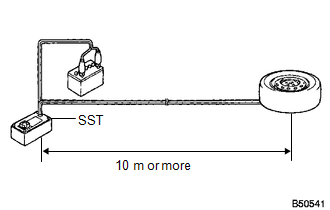
(2) Place the outer belt on the ground and cover it with a tire and wheel assembly. NOTICE: Position the front seat outer belt assembly as shown in the illustration. |
|
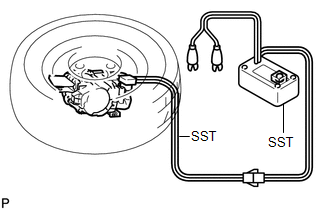
(3) Position and hold SST at least 10 m (33 ft.) away from the wheel.
NOTICE:
Do not damage the SST wire harness.
|
(c) Deploy the front seat outer belt pretensioner. (1) Check that no one is within a 10 m (33 ft.) radius of the wheel. (2) Connect the red clip of SST to a battery positive (+) terminal and the black clip to a battery negative (-) terminal. (3) Press the SST deployment switch to deploy the front seat outer belt pretensioner. HINT: The seat belt pretensioner will deploy at the same time as SST LED illuminates. |
|
|
(d) Dispose of the front seat outer belt assembly. (1) Remove the wheel and SST. (2) Dispose of the front seat outer belt assembly in accordance with local regulations. CAUTION:
HINT: When scrapping the vehicle, deploy the front seat outer belt pretensioners, and then scrap the vehicle with the deployed outer belt installed. |
|
 Installation
INSTALLATION
PROCEDURE
1. INSTALL FRONT SHOULDER BELT ANCHOR ADJUSTER ASSEMBLY
(a) Engage the adjuster positioning hole with the guide and install the
front shoulder belt anchor adju ...
 Rear Center Seat Inner Belt Assembly
Components
COMPONENTS
ILLUSTRATION
Removal
REMOVAL
PROCEDURE
1. REMOVE REAR SEAT HEADREST ASSEMBLY
2. REMOVE REAR SEAT INNER TRACK BRACKET COVER
3. REMOVE REAR SEAT OUTER TRACK BRA ...
Other materials about Toyota Venza:
Front Passenger Side Door Entry Unlock Function does not Operate
DESCRIPTION
If the front passenger door entry lock function operates normally, but its entry
unlock function does not, this means that the request code from the front passenger
door is being output normally. In this case, a malfunction in the touch sensor ...
Removal
REMOVAL
PROCEDURE
1. DISCONNECT CABLE FROM NEGATIVE BATTERY TERMINAL
NOTICE:
When disconnecting the cable, some systems need to be initialized after the cable
is reconnected (See page ).
2. REMOVE COOL AIR INTAKE DUCT SEAL
3. REMOVE NO. 1 ENGINE CO ...
Light bulbs
You may replace the following bulbs yourself. The difficulty level of replacement
varies depending on the bulb. If necessary bulb replacement seems difficult to perform,
contact your Toyota dealer.
For more information about replacing other light bulbs, c ...

0.1297