
Toyota Venza: Removal
REMOVAL
CAUTION / NOTICE / HINT
HINT:
- Use the same procedure for the RH and LH sides.
- The procedure described below is for the LH side.
PROCEDURE
1. PRECAUTION (for HID Headlight)
(See page .gif) )
)
NOTICE:
After turning the ignition switch off, waiting time may be required before disconnecting
the cable from the negative (-) battery terminal. Therefore, make sure to read the
disconnecting the cable from the negative (-) battery terminal notices before proceeding
with work (See page ).
2. DISCONNECT CABLE FROM NEGATIVE BATTERY TERMINAL (for HID Headlight)
NOTICE:
When disconnecting the cable, some systems need to be initialized after the cable
is reconnected (See page ).
3. REMOVE FRONT BUMPER ASSEMBLY
(See page )
4. REMOVE HEADLIGHT ASSEMBLY
|
(a) Remove the bolt and 3 screws. |
|
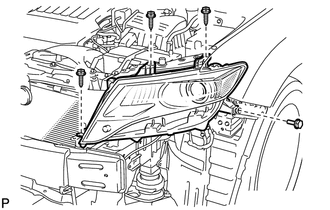
(b) Disconnect each connector and remove the headlight assembly.
 Disassembly
DISASSEMBLY
PROCEDURE
1. REMOVE NO. 2 HEADLIGHT BULB (for Halogen Headlight)
(a) Turn the No. 2 headlight bulb in the direction indicated by the arrow
shown in the illustration, and ...
 Adjustment
ADJUSTMENT
CAUTION / NOTICE / HINT
HINT:
It is possible that a bulb is incorrectly installed, affecting headlight aim.
Bulb installation should be considered prior to performing the adjustment pr ...
Other materials about Toyota Venza:
Cup holders
► Front
► Rear
Pull down the armrest and open the lid.
- Adjusting size of the front cup holder
Remove the adapter.
CAUTION
- Items unsuitable for the cup holder
Do not place anything other than cups or aluminum cans in the ...
Precaution
PRECAUTION
NOTICE:
When disconnecting the cable from the negative (-) battery terminal, initialize
the following system after the cable is reconnected.
System Name
See Procedure
Back Door Closer System
...
Terminals Of Ecu
TERMINALS OF ECU
1. POWER WINDOW REGULATOR MASTER SWITCH ASSEMBLY
(a) Disconnect the I6 power window regulator master switch assembly connector.
(b) Measure the voltage and resistance according to the value(s) in the table
below.
HINT:
Measure the val ...

0.1289