Toyota Venza: Removal
REMOVAL
PROCEDURE
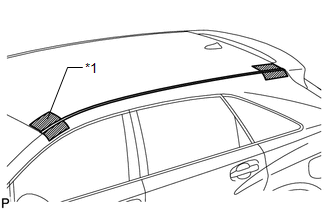
1. REMOVE ROOF DRIP CENTER SIDE FINISH MOULDING (w/o Sliding Roof)
|
(a) Put protective tape around the roof drip center side finish moulding. Text in Illustration
|
|
|
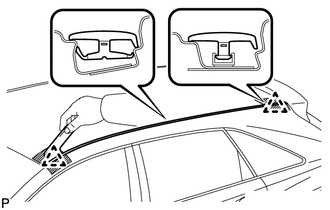
(b) Using a moulding remover, disengage the 2 clips and remove the roof drip center side finish moulding. NOTICE:
|
|
2. REMOVE ROOF DRIP CENTER SIDE FINISH MOULDING (w/ Sliding Roof)
|
(a) Put protective tape around the roof drip center side finish moulding. Text in Illustration
|
|

|
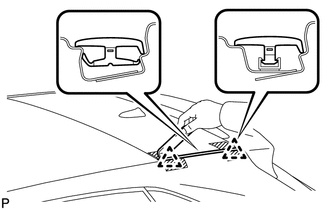
(b) Using a moulding remover, disengage the 2 clips and remove the roof drip center side finish moulding. NOTICE:
|
|
 Components
COMPONENTS
ILLUSTRATION
...
 Installation
INSTALLATION
PROCEDURE
1. INSTALL ROOF DRIP SIDE FINISH MOULDING CLIP (w/o Sliding Roof)
NOTICE:
If reusing the clips, do not remove the double-sided tape remaining
on the clips and wh ...
Other materials about Toyota Venza:
Motor Circuit Malfunction (C1522-C1555)
DESCRIPTION
The power steering ECU supplies current to the power steering motor through the
motor circuit.
DTC No.
DTC Detection Condition
Trouble Area
C1522
Motor current sensor malfunction
...
On-vehicle Inspection
ON-VEHICLE INSPECTION
PROCEDURE
1. PERFORM SPARK TEST
(a) Check for DTCs (See page ).
NOTICE:
If any DTC is output, perform troubleshooting procedures for that DTC.
(b) Remove the ignition coils and spark plugs (See page
).
(c) Disconnect ...
System Description
SYSTEM DESCRIPTION
1. PUSH-BUTTON START DESCRIPTION
(a) The push-button start uses a push-type engine switch, which the driver can
operate by merely carrying the electrical key. This system consists primarily of
the power management control ECU, engine s ...

0.1605