
Toyota Venza: Interior Light Auto Cut Circuit
DESCRIPTION
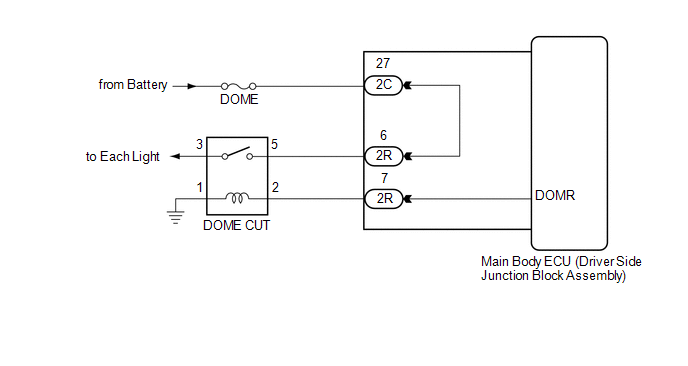
When battery saving control operates while the interior lights are on, the main body ECU (driver side junction block assembly) opens the DOME CUT relay to turn off the lights.
WIRING DIAGRAM
CAUTION / NOTICE / HINT
NOTICE:
Inspect the fuses for circuits related to this system before performing the following inspection procedure.
PROCEDURE
|
1. |
INSPECT DOME CUT RELAY |
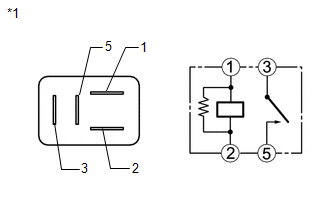
(a) Remove the DOME CUT relay.
|
(b) Measure the resistance according to the value(s) in the table below. Standard Resistance:
|
|
| OK | .gif) |
PROCEED TO NEXT SUSPECTED AREA SHOWN IN PROBLEM SYMPTOMS TABLE |
| NG | |
REPLACE DOME CUT RELAY |
 Interior Light Circuit
DESCRIPTION
The illuminated entry system controls the roof console box assembly, step or
spot light assembly and transponder key amplifier*1.
HINT:
*1: w/o Smart Key System
WIRING DIAGRAM
PRO ...
 Engine Switch Illumination Circuit
DESCRIPTION
The illuminated entry system controls the engine switch illumination.
WIRING DIAGRAM
PROCEDURE
1.
PERFORM ACTIVE TEST USING TECHSTREAM
(a) Connect th ...
Other materials about Toyota Venza:
Calibration
CALIBRATION
1. ROTATION ANGLE SENSOR INITIALIZATION AND TORQUE SENSOR ZERO POINT CALIBRATION
NOTICE:
Clear the rotation angle sensor calibration value, initialize the rotation angle
sensor, and calibrate the torque sensor zero point if any of the followin ...
Disposal
DISPOSAL
CAUTION / NOTICE / HINT
CAUTION:
Before performing pre-disposal deployment of any SRS part, review and closely
follow all applicable environmental and hazardous material regulations. Pre-disposal
deployment may be considered hazardous material ...
Installation
INSTALLATION
PROCEDURE
1. INSTALL HEATED OXYGEN SENSOR
2. INSTALL FRONT EXHAUST PIPE ASSEMBLY
(a) Using a vernier caliper, measure the free length of the compression
springs.
Minimum Free Length:
41.5 mm (1.63 in.)
If the free l ...

0.131