Toyota Venza: Tires
Replace or rotate tires in accordance with maintenance schedules and treadwear.
- Checking tires
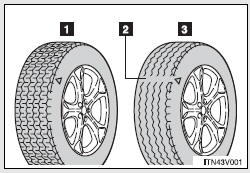
1. New tread
2. Treadwear indicator
3. Worn tread
The location of treadwear indicators is shown by the “TWI” or “Δ” marks, etc., molded on the sidewall of each tire.
Check spare tire condition and inflation pressure if not rotated.
- Tire rotation
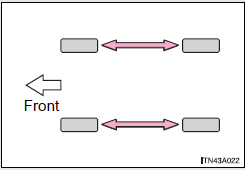
Rotate the tires in the order shown.
To equalize tire wear and extend tire life, Toyota recommends that tire rotation is carried out at the same interval as tire inspection.
- The tire pressure warning system
Your Toyota is equipped with a tire pressure warning system that uses tire pressure warning valves and transmitters to detect low tire inflation pressure before serious problems arise. The compact spare tire is not equipped with a tire pressure warning valve and transmitter.
 Washer fluid
If any washer does not work or the low windshield washer fluid level warning
light comes on, the washer tank may be empty. Add washer fluid.
CAUTION
- When refilling the washer fluid
Do n ...
 Installing tire pressure warning valves and transmitters
When replacing tires or wheels, tire pressure warning valves and transmitters
must also be installed.
When new tire pressure warning valves and transmitters are installed, new tire
pressure warni ...
Other materials about Toyota Venza:
Unlock Warning Switch Circuit
DESCRIPTION
The key unlock warning switch assembly turns on when the ignition key is inserted
into the ignition key cylinder and turns off when the ignition key is removed.
The main body ECU (driver side junction block assembly) operates the key confinemen ...
Registered Device cannot be Deleted
PROCEDURE
1.
DELETE OPERATION
(a) Check if a registered portable player can be deleted normally.
OK:
Registered portable player can be deleted normally.
OK
END
NG
PROCEED TO ...
Tire information
Typical tire symbols
►Standard tire
►Compact spare tire
1. Tire size
2. DOT and Tire Identification Number (TIN)
3. Location of treadwear indicators
4. Tire ply composition and materials Plies are layers of rubber-coated parallel
cords ...

0.1564