
Toyota Venza: Steering Pad Switch Circuit
DESCRIPTION
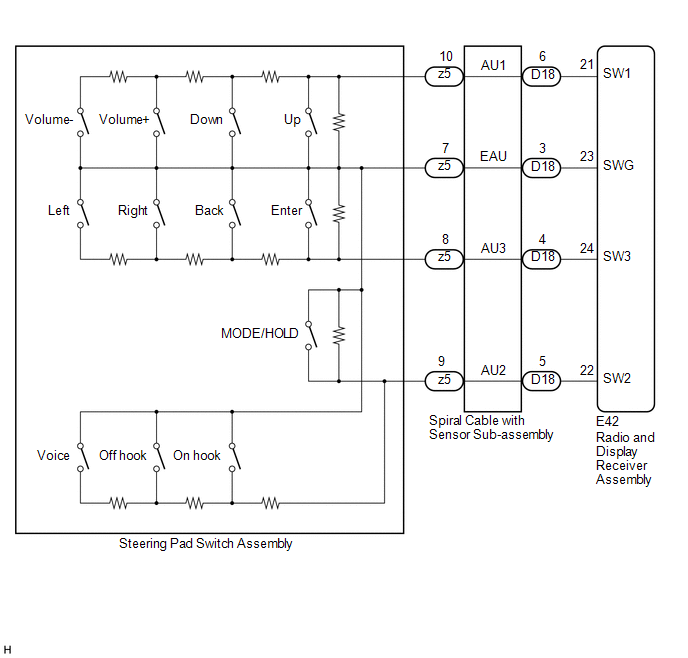
This circuit sends an operation signal from the steering pad switch assembly to the radio and display receiver assembly.
If there is an open in the circuit, the audio system cannot be operated using the steering pad switch assembly.
If there is a short in the circuit, the same condition as when a switch is continuously depressed occurs.
Therefore, the radio and display receiver assembly cannot be operated using the steering pad switch assembly, and the radio and display receiver assembly itself will not function.
WIRING DIAGRAM
CAUTION / NOTICE / HINT
NOTICE:
The vehicle is equipped with a Supplemental Restraint System (SRS) which includes
components such as airbags. Before servicing (including removal or installation
of parts), be sure to read the precaution for Supplemental Restraint System (See
page .gif) ).
).
PROCEDURE
|
1. |
CHECK HARNESS AND CONNECTOR (STEERING PAD SWITCH SIGNAL) |
(a) Disconnect the E42 radio and display receiver assembly connector.
(b) Measure the resistance according to the value(s) in the table below.
Standard Resistance:
|
Tester Connection |
Condition |
Specified Condition |
|---|---|---|
|
E42-21 (SW1) - E42-23 (SWG) |
No switch pushed |
95 to 105 kΩ |
|
Up switch pushed |
Below 2.5 Ω |
|
|
Down switch pushed |
313 to 345 Ω |
|
|
Volume+ switch pushed |
950 to 1050 Ω |
|
|
Volume- switch pushed |
2955 to 3265 Ω |
|
|
E42-22 (SW2) - E42-23 (SWG) |
No switch pushed |
95 to 105 kΩ |
|
MODE/HOLD switch pushed |
Below 2.5 Ω |
|
|
On hook switch pushed |
313 to 345 Ω |
|
|
Off hook switch pushed |
950 to 1050 Ω |
|
|
Voice switch pushed |
2955 to 3265 Ω |
|
|
E42-24 (SW3) - E42-23 (SWG) |
No switch pushed |
95 to 105 kΩ |
|
Enter switch pushed |
Below 2.5 Ω |
|
|
Back switch pushed |
313 to 345 Ω |
|
|
Right switch pushed |
950 to 1050 Ω |
|
|
Left switch pushed |
2955 to 3265 Ω |
| OK | .gif) |
PROCEED TO NEXT SUSPECTED AREA SHOWN IN PROBLEM SYMPTOMS TABLE |
|
.gif)
|
2. |
INSPECT STEERING PAD SWITCH ASSEMBLY |
(a) Remove the steering pad switch assembly (See page
).
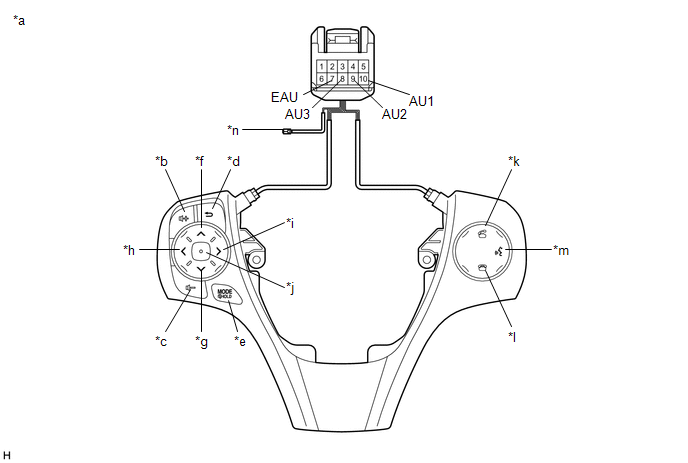 Text in Illustration
|
*a |
Component without harness connected (Steering Pad Switch Assembly) |
*b |
Volume+ |
|
*c |
Volume- |
*d |
Back |
|
*e |
MODE/HOLD |
*f |
Up |
|
*g |
Down |
*h |
Left |
|
*i |
Right |
*j |
Enter |
|
*k |
Off hook |
*l |
On hook |
|
*m |
Voice |
- |
- |
(b) Measure the resistance according to the value(s) in the table below.
Standard Resistance:
|
Tester Connection |
Condition |
Specified Condition |
|---|---|---|
|
10 (AU1) - 7 (EAU) |
No switch pushed |
95 to 105 kΩ |
|
Up switch pushed |
Below 2.5 Ω |
|
|
Down switch pushed |
313 to 345 Ω |
|
|
Volume+ switch pushed |
950 to 1050 Ω |
|
|
Volume- switch pushed |
2955 to 3265 Ω |
|
|
9 (AU2) - 7 (EAU) |
No switch pushed |
95 to 105 kΩ |
|
MODE/HOLD switch pushed |
Below 2.5 Ω |
|
|
On hook switch pushed |
313 to 345 Ω |
|
|
Off hook switch pushed |
950 to 1050 Ω |
|
|
Voice switch pushed |
2955 to 3265 Ω |
|
|
8 (AU3) - 7 (EAU) |
No switch pushed |
95 to 105 kΩ |
|
Enter switch pushed |
Below 2.5 Ω |
|
|
Back switch pushed |
313 to 345 Ω |
|
|
Right switch pushed |
950 to 1050 Ω |
|
|
Left switch pushed |
2955 to 3265 Ω |
| NG | |
REPLACE STEERING PAD SWITCH ASSEMBLY |
|
|
3. |
INSPECT SPIRAL CABLE WITH SENSOR SUB-ASSEMBLY |
(a) Remove the spiral cable with sensor sub-assembly (See page
).
|
(b) Measure the resistance according to the value(s) in the table below. Standard Resistance:
|
|
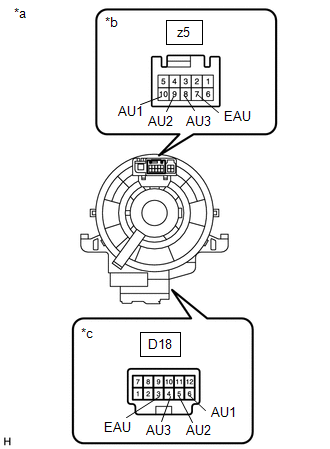
(c) After setting the spiral cable with sensor sub-assembly to the center position, rotate the spiral cable with sensor sub-assembly 2.5 times clockwise. Then while rotating the spiral cable with sensor sub-assembly 5 times counterclockwise, measure the resistance according to the value(s) in the table below.
Standard Resistance:
|
Tester Connection |
Condition |
Specified Condition |
|---|---|---|
|
z5-7 (EAU) - D18-3 (EAU) |
Always |
3 Ω or less |
|
z5-10 (AU1) - D18-6 (AU1) |
Always |
3 Ω or less |
|
z5-9 (AU2) - D18-5 (AU2) |
Always |
3 Ω or less |
|
z5-8 (AU3) - D18-4 (AU3) |
Always |
3 Ω or less |
NOTICE:
- The spiral cable with sensor sub-assembly is an important part of the SRS airbag system. Incorrect removal or installation of the spiral cable with sensor sub-assembly may prevent the airbag from deploying.
- As the spiral cable with sensor sub-assembly may break, do not rotate the spiral cable with sensor sub-assembly more than the specified amount.
|
*a |
Component without harness connected (Spiral Cable with Sensor Sub-assembly) |
|
*b |
Steering Pad Switch Assembly Side |
|
*c |
Vehicle Side |
| OK | |
REPAIR OR REPLACE HARNESS OR CONNECTOR (RADIO AND DISPLAY RECEIVER ASSEMBLY - SPIRAL CABLE WITH SENSOR SUB-ASSEMBLY) |
| NG | |
REPLACE SPIRAL CABLE WITH SENSOR SUB-ASSEMBLY |
 Vehicle Speed Signal Circuit between Radio Receiver and Combination Meter
DESCRIPTION
for Automatic Sound Levelizer (ASL):
This circuit is necessary for the Automatic Sound Levelizer (ASL) built
into the radio and display receiver assembly.
The Automatic So ...
 Illumination Circuit
DESCRIPTION
Power is supplied to the radio and display receiver assembly and steering pad
switch assembly illumination when the light control switch is in the tail or head
position.
WIRING DIAGR ...
Other materials about Toyota Venza:
Precaution
PRECAUTION
1. TROUBLESHOOTING PRECAUTION
NOTICE:
Be sure to read the supplemental restraint system precautions thoroughly
before servicing the brake system (See page
).
Care must be taken to replace each part properly as it could affect ...
Reverse Signal Circuit
DESCRIPTION
The radio and display receiver assembly receives a reverse signal from the park/neutral
position switch assembly.
WIRING DIAGRAM
PROCEDURE
1.
CHECK BACK-UP LIGHT
(a) Move the shift lever to R and check if th ...
Problem Symptoms Table
PROBLEM SYMPTOMS TABLE
HINT:
Use the table below to help determine the cause of problem symptoms. If multiple
suspected areas are listed, the potential causes of the symptoms are listed in order
of probability in the "Suspected Area" column of ...

0.1474