Toyota Venza: Installation
INSTALLATION
CAUTION / NOTICE / HINT
HINT:
When installing the mouldings, heat the vehicle body and mouldings using a heat light.
Heating Temperature|
Item |
Temperature |
|---|---|
|
Vehicle Body |
40 to 60°C (104 to 140°F) |
|
Emblem, Name Plate |
20 to 30°C (68 to 86°F) |
NOTICE:
Do not heat the vehicle body or mouldings excessively.
PROCEDURE
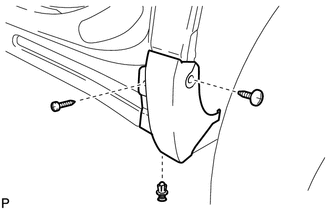
1. INSTALL REAR ROCKER PANEL MOULDING END COVER
(a) Clean the vehicle body surface.
(1) Using a heat light, heat the vehicle body surface.
(2) Remove the double-sided tape from the vehicle body.
(3) Wipe off any tape adhesive residue with cleaner.
|
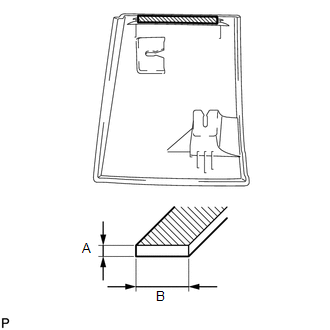
(b) Clean the rear rocker panel moulding end cover.
(1) Using a heat light, heat the rear rocker panel moulding end cover. (2) Remove the double-sided tape from the rear rocker panel moulding end cover. (3) Wipe off any tape adhesive residue with cleaner. (4) Apply new double-sided tape to the rear rocker panel moulding end cover. |
|
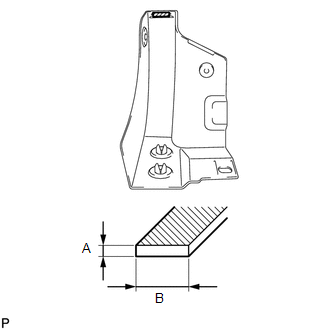
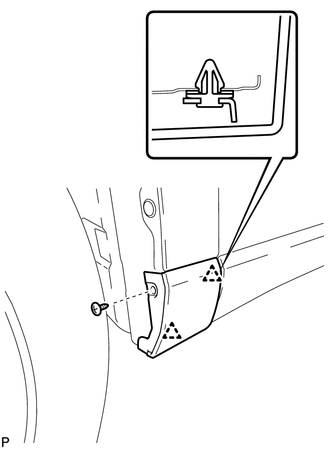
(c) Install the 2 grommets to the rear rocker panel moulding end cover.
|
(d) Install the rear rocker panel moulding end cover. (1) Using a heat light, heat the vehicle body and rear rocker panel moulding end cover. (2) Remove the release paper from the rear rocker panel moulding end cover. HINT: After removing the release paper, keep the exposed adhesive free from foreign matter. (3) Install the rear rocker panel moulding end cover with the 2 screws and clip. |
|
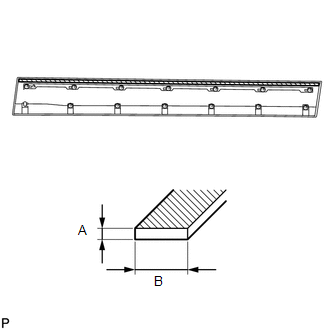
2. INSTALL NO. 2 ROCKER PANEL MOULDING PROTECTOR
.gif)
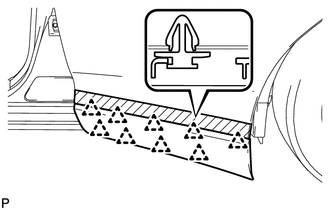
3. INSTALL REAR DOOR OUTSIDE MOULDING
(a) Clean the vehicle body surface.
(1) Using a heat light, heat the vehicle body surface.
(2) Remove the double-sided tape from the vehicle body.
(3) Wipe off any tape adhesive residue with cleaner.
|
(b) Clean the rear door outside moulding.
(1) Using a heat light, heat the rear door outside moulding. (2) Remove the double-sided tape from the rear door outside moulding. (3) Wipe off any tape adhesive residue with cleaner. (4) Apply new double-sided tape to the rear door outside moulding. |
|
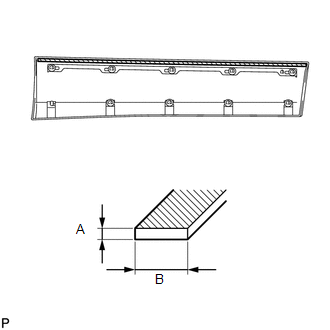
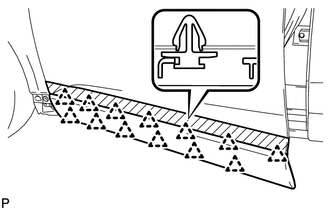
(c) Install 9 new clips (No. 1 outside moulding clip) to the rear door outside moulding.
(d) Install the outside moulding retainer to the rear door outside moulding.
|
(e) Install the rear door outside moulding. (1) Using a heat light, heat the vehicle body and rear door outside moulding. (2) Remove the release paper from the rear door outside moulding. HINT: After removing the release paper, keep the exposed adhesive free from foreign matter. (3) Engage the 9 clips and install the rear door outside moulding. |
|
|
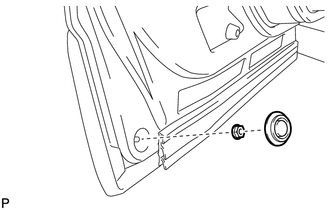
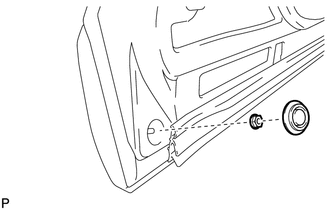
(f) Install the nut and hole plug. |
|
4. INSTALL FRONT DOOR OUTSIDE MOULDING
(a) Clean the vehicle body surface.
(1) Using a heat light, heat the vehicle body surface.
(2) Remove the double-sided tape from the vehicle body.
(3) Wipe off any tape adhesive residue with cleaner.
|
(b) Clean the front door outside moulding.
(1) Using a heat light, heat the front door outside moulding. (2) Remove the double-sided tape from the front door outside moulding. (3) Wipe off any tape adhesive residue with cleaner. (4) Apply new double-sided tape to the front door outside moulding. |
|
(c) Install 13 new clips (No. 1 outside moulding clip) to the front door outside moulding.
(d) Install the outside moulding retainer to the front door outside moulding.
|
(e) Install the front door outside moulding. (1) Using a heat light, heat the vehicle body and front door outside moulding. (2) Remove the release paper from the front door outside moulding. HINT: After removing the release paper, keep the exposed adhesive free from foreign matter. (3) Engage the 13 clips and install the front door outside moulding. |
|
|
(f) Install the nut and hole plug. |
|
5. INSTALL FRONT FENDER OUTSIDE MOULDING
(a) Clean the vehicle body surface.
(1) Using a heat light, heat the vehicle body surface.
(2) Remove the double-sided tape from the vehicle body.
(3) Wipe off any tape adhesive residue with cleaner.
|
(b) Clean the front fender outside moulding.
(1) Using a heat light, heat the front fender outside moulding. (2) Remove the double-sided tape from the front fender outside moulding. (3) Wipe off any tape adhesive residue with cleaner. (4) Apply new double-sided tape to the front fender outside moulding. |
|
(c) Install 2 new clips (No. 1 outside moulding clip) to the front fender outside moulding.
|
(d) Install the front fender outside moulding. (1) Using a heat light, heat the vehicle body and front fender outside moulding. (2) Remove the release paper from the front fender outside moulding. HINT: After removing the release paper, keep the exposed adhesive free from foreign matter. (3) Engage the 2 clips and install the front fender outside moulding. |
|
(e) Install the screw.
 Components
COMPONENTS
ILLUSTRATION
...
 Horn
Horn
...
Other materials about Toyota Venza:
Disassembly
DISASSEMBLY
PROCEDURE
1. REMOVE NO. 2 ANTENNA CORD SUB-ASSEMBLY (w/o Sliding Roof)
2. REMOVE NO. 2 ANTENNA CORD SUB-ASSEMBLY (w/ Sliding Roof)
3. REMOVE VANITY LIGHT ASSEMBLY
(a) Remove the vanity light assembly (See page
).
HINT:
Use the same p ...
Data List / Active Test
DATA LIST / ACTIVE TEST
1. DATA LIST
NOTICE:
In the table below, the values listed under "Normal Condition" are reference
values. Do not depend solely on these reference values when deciding whether a part
is faulty or not.
HINT:
Using the T ...
Diagnosis System
DIAGNOSIS SYSTEM
1. DESCRIPTION
(a) The power back door ECU (power back door motor unit)*1 or back door closer
ECU (multiplex network door ECU)*2 controls the vehicle's back door closer system
functions. Back door closer system data and Diagnostic Tr ...

0.1759