
Toyota Venza: Inspection
INSPECTION
PROCEDURE
1. INSPECT INNER REAR VIEW MIRROR ASSEMBLY
(a) Inspect operation of the electrochromic inner mirror.
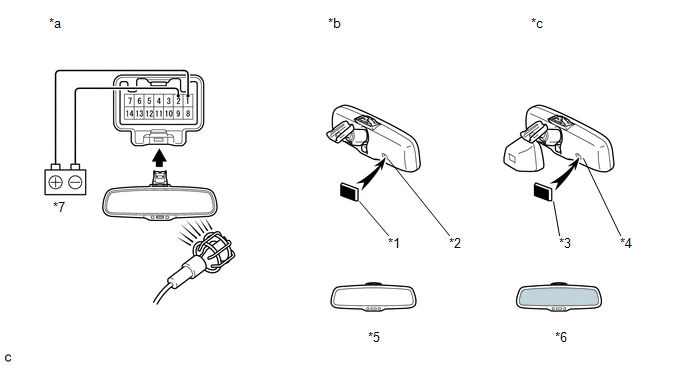
(1) Connect a positive (+) lead from the battery to terminal 1 and a negative (-) lead to terminal 2.
(2) Press the AUTO switch.
(3) Attach black colored tape to the forward sensor to prevent it from sensing.
(4) Light up the mirror with an electric light, and check that the mirror surface changes from bright to dark.
Standard:
Mirror surface changes from bright to dark.
Text in Illustration|
*a |
Component without harness connected |
*b |
w/o Automatic High Beam System |
|
*c |
w/ Automatic High beam System |
*1 |
Block colored Tape |
|
*2 |
Forward Sensor |
*3 |
Block colored Tape |
|
*4 |
Forward Sensor |
*5 |
Bright |
|
*6 |
Dark |
*7 |
Battery |
If the result is not as specified, replace the mirror assembly.
 Problem Symptoms Table
PROBLEM SYMPTOMS TABLE
Use the table below to help determine the cause of problem symptoms. If multiple
suspected areas are listed, the potential causes of the symptoms are listed in order
of pro ...
 Removal
REMOVAL
PROCEDURE
1. REMOVE INNER REAR VIEW MIRROR STAY HOLDER COVER
(a) Disengage the 2 claws and slide the inner rear view mirror stay holder
cover as shown in the illustration.
...
Other materials about Toyota Venza:
Inspection
INSPECTION
PROCEDURE
1. INSPECT STARTER ASSEMBLY
NOTICE:
These tests must be performed within 3 to 5 seconds to avoid burning out the
coil.
(a) Perform a pull-in test.
(1) Remove the nut and disconnect the lead wire from terminal C.
(2) Con ...
Charge Warning Light Comes ON while Driving
PROCEDURE
1.
CHECK LOCK FUNCTION OF GENERATOR CLUTCH PULLEY
(a) Check the lock function with the pulley installed in the vehicle.
(1) Visually check that the rotor in the generator operates with the engine running.
(b) Check ...
Installation
INSTALLATION
CAUTION / NOTICE / HINT
NOTICE:
When disconnecting the steering intermediate shaft assembly and pinion shaft
of the steering gear assembly, be sure to place matchmarks before servicing.
PROCEDURE
1. INSTALL TIE ROD ASSEMBLY LH
( ...

0.1672