Toyota Venza: Removal
REMOVAL
PROCEDURE
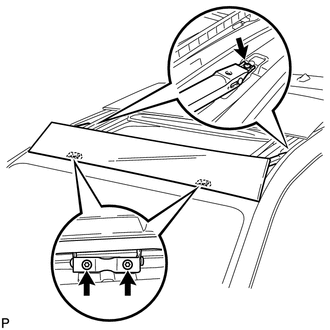
1. REMOVE NO. 1 SLIDING ROOF GLASS SUB-ASSEMBLY
(a) Fully open the No. 2 sliding roof glass sub-assembly.
|
(b) Using a T20 "TORX" socket wrench, remove the 6 screws and No. 1 sliding roof glass sub-assembly. |
|
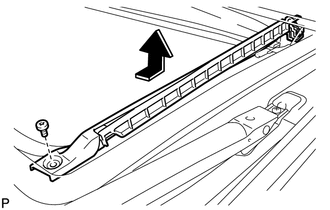
2. REMOVE SLIDING ROOF SIDE GARNISH LH
|
(a) Using a T25 "TORX" socket wrench, remove the screw and sliding roof side garnish LH as shown in the illustration. |
|
3. REMOVE SLIDING ROOF SIDE GARNISH RH
HINT:
Use the same procedure for the RH side and the LH side.
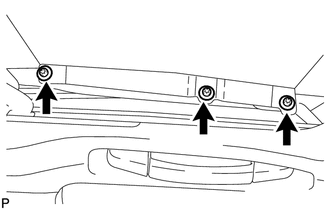
4. REMOVE NO. 2 SLIDING ROOF GLASS SUB-ASSEMBLY
(a) Fully close the No. 2 sliding roof glass sub-assembly.
|
(b) Using a T25 "TORX" socket wrench, remove the 3 screws. HINT: Use the same procedure for the RH side and the LH side. |
|
(c) Remove the No. 2 sliding roof glass sub-assembly.
5. REMOVE ROOF HEADLINING ASSEMBLY
HINT:
Refer to the procedure up to Remove Roof Headlining Assembly (See page
.gif) ).
).
6. REMOVE CURTAIN SHIELD AIRBAG ASSEMBLY LH
7. REMOVE CURTAIN SHIELD AIRBAG ASSEMBLY RH
HINT:
Use the same procedure for the RH side and the LH side.
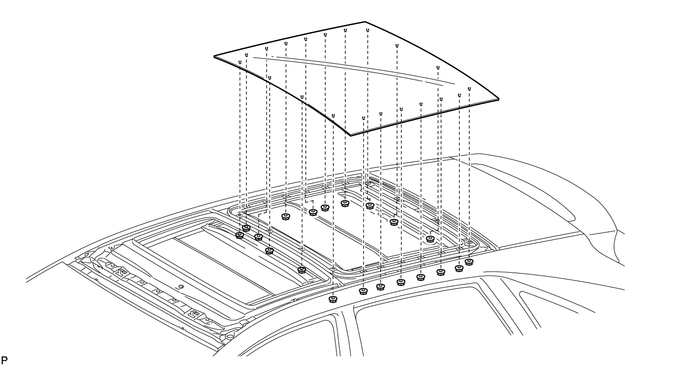
8. REMOVE NO. 3 SLIDING ROOF GLASS SUB-ASSEMBLY
(a) Remove the 20 nuts and No. 3 sliding roof glass sub-assembly.
9. REMOVE SLIDING ROOF DRIVE GEAR SUB-ASSEMBLY
|
(a) Remove the bolt, nut and room light bracket. |
|
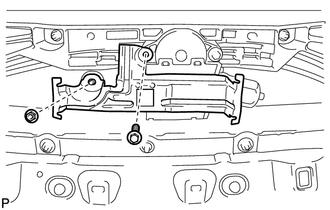
|
(b) Remove the bolt and sliding roof drive gear sub-assembly. |
|

10. REMOVE FRONT SLIDING ROOF HOUSING MOUNTING BRACKET LH
|
(a) Remove the 2 bolts, 2 nuts and front sliding roof housing mounting bracket LH. |
|
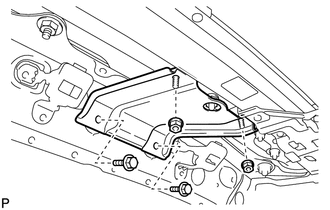
11. REMOVE FRONT SLIDING ROOF HOUSING MOUNTING BRACKET RH
HINT:
Use the same procedure for the RH side and the LH side.
12. REMOVE CENTER SLIDING ROOF HOUSING MOUNTING BRACKET LH
|
(a) Remove the 3 bolts, 3 nuts and center sliding roof housing mounting bracket LH. |
|
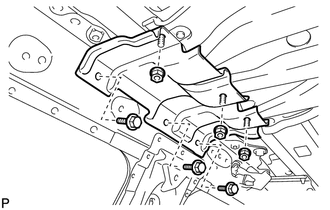
13. REMOVE CENTER SLIDING ROOF HOUSING MOUNTING BRACKET RH
HINT:
Use the same procedure for the RH side and the LH side.
14. REMOVE REAR SLIDING ROOF HOUSING MOUNTING BRACKET LH
|
(a) Remove the bolt, nut and rear sliding roof housing mounting bracket LH. |
|
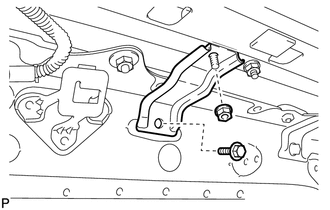
15. REMOVE REAR SLIDING ROOF HOUSING MOUNTING BRACKET RH
HINT:
Use the same procedure for the RH side and the LH side.
16. REMOVE SLIDING ROOF HOUSING ASSEMBLY
(a) Remove the 18 nuts and sliding roof housing assembly.
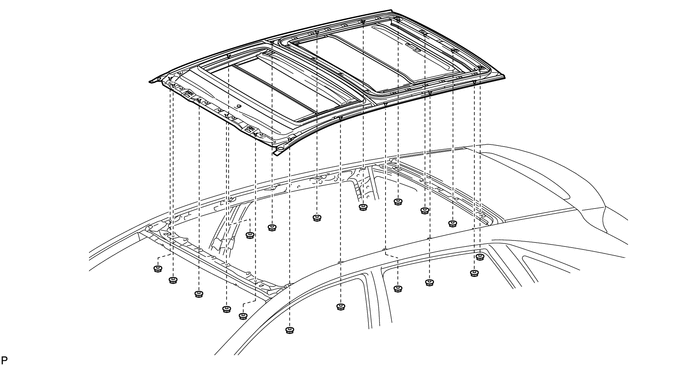
NOTICE:
- When removing the housing, be careful not to damage the vehicle.
- Perform this step with 2 or more technicians.
 Components
COMPONENTS
ILLUSTRATION
ILLUSTRATION
ILLUSTRATION
ILLUSTRATION
...
 Disassembly
DISASSEMBLY
PROCEDURE
1. REMOVE SLIDING ROOF HOUSING CENTER FRAME
(a) Remove the 2 nuts and sliding roof housing center frame.
2. REMOVE N ...
Other materials about Toyota Venza:
Installation
INSTALLATION
PROCEDURE
1. REPAIR INSTRUCTION
(a) Clean the vehicle body surface.
(1) Using a heat light, heat the vehicle body surface.
Heating Temperature
Item
Temperature
Vehicle Body
40 to 60°C (104 t ...
Steering Pad Switch Circuit
DESCRIPTION
This circuit sends an operation signal from the steering pad switch assembly
to the radio and display receiver assembly.
If there is an open in the circuit, the audio system cannot be operated using
the steering pad switch assembly.
If there ...
Inspection
INSPECTION
PROCEDURE
1. INSPECT STEERING PAD SWITCH ASSEMBLY
(a) Measure the resistance according to the value(s) in the table below.
Standard Resistance:
Tester Connection
Condition
Specified Condition
...

0.1579