Toyota Venza: Positioning a floor jack
When raising your vehicle with a floor jack, position the jack correctly.
Improper placement may damage your vehicle or cause injury.
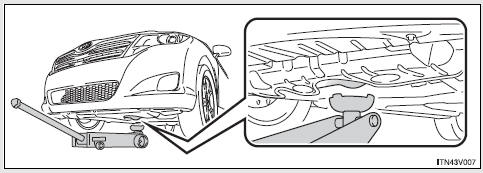
►Front
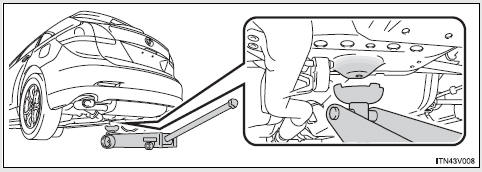
►Rear (2WD models)
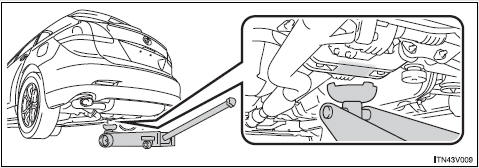
►Rear (AWD models)
CAUTION
- When raising your vehicle
Make sure to observe the following to reduce the possibility of death or serious injury.
• Lift up the vehicle using a floor jack such as the one shown in the illustration.
• When using a floor jack, follow the instructions of the manual provided with the jack.
• Do not use the jack that was supplied with your vehicle.
• Do not put any part of your body or get underneath the vehicle supported only by the floor jack.
• Always use floor jack and/or automotive jack stands on a solid, flat, level surface.
• Do not start the engine while the vehicle is supported by the floor jack.
• Stop the vehicle on level firm ground, firmly set the parking brake and put the shift lever in “P”.
• Make sure to set the floor jack properly at the jack point.
Raising the vehicle with an improperly positioned floor jack will damage the vehicle and may cause the vehicle to fall off the floor jack.
• Do not raise the vehicle while someone is in the vehicle.
• When raising the vehicle, do not place any objects on top of or underneath the floor jack.
 Hood
Hood
Release the lock from the inside of the vehicle to open the hood.
Pull the hood release lever.
The hood will pop up slightly.
Lift the hood catch and lift the hood.
Hold the hood open by ins ...
 Engine compartment
► 2GR-FE engine
1. Engine coolant reservoir
2. Engine oil filler cap
3. Engine oil level dipstick
4. Brake fluid reservoir
5. Battery
6. Fuse box
7. Electric cooling fans
8. Condenser
...
Other materials about Toyota Venza:
Reassembly
REASSEMBLY
PROCEDURE
1. INSTALL TRANSFER DRIVEN PINION REAR BEARING
(a) Using SST and a press, press the transfer driven pinion rear bearing
(outer race) to the case.
SST: 09950-60010
09951-00620
SST: 09950-70010
09951-07150
NO ...
Installation
INSTALLATION
CAUTION / NOTICE / HINT
NOTICE:
When disconnecting the steering intermediate shaft assembly and pinion shaft
of steering gear assembly, be sure to place matchmarks before servicing.
PROCEDURE
1. INSTALL TIE ROD ASSEMBLY LH
(a) I ...
Data List / Active Test
DATA LIST / ACTIVE TEST
1. DATA LIST
HINT:
Using the Techstream to read the Data List allows the values or states of switches,
sensors, actuators and other items to be read without removing any parts. This non-intrusive
inspection can be very useful bec ...

0.1282