
Toyota Venza: LIN Communication Bus Malfunction (B2325)
DESCRIPTION
The main body ECU (driver side junction block assembly) monitors communication between all the ECUs connected to the door bus lines. When the main body ECU (driver side junction block assembly) detects errors in communication with all the ECUs connected to the door bus lines at 2.6-second intervals and 3 times in a row, DTC B2325 will be stored.
|
DTC No. |
DTC Detection Condition |
Trouble Area |
|---|---|---|
|
B2325 |
The main body ECU (driver side junction block assembly) detects errors in communication with the ECUs connected to the door bus lines 3 times in a row. |
|
WIRING DIAGRAM
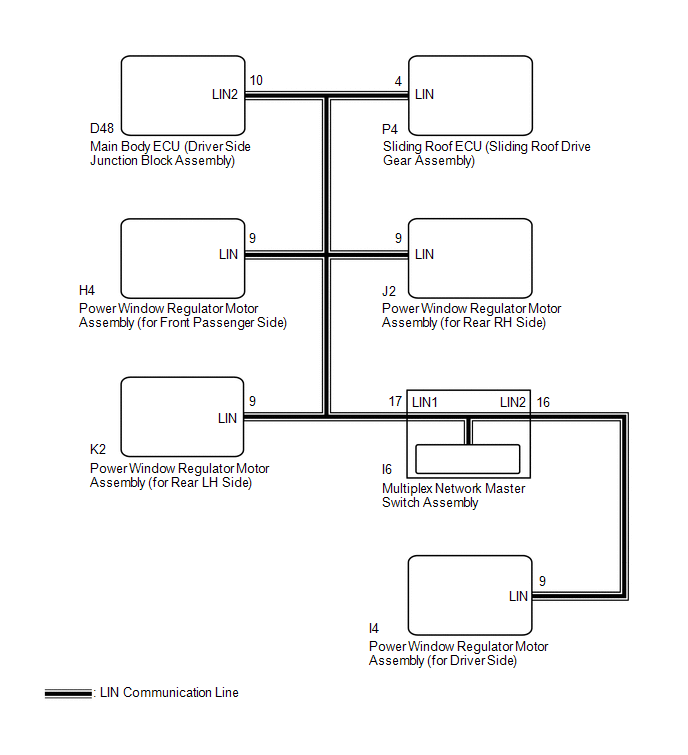
CAUTION / NOTICE / HINT
NOTICE:
- When the sliding roof ECU (sliding roof drive gear sub-assembly) is
replaced or removed and reinstalled, it requires initialization (See page
.gif) ).
). - When a power window regulator motor assembly is replaced or removed
and reinstalled, it requires initialization (See page
).
- When using the Techstream to troubleshoot with the ignition switch off:
Connect the Techstream to the DLC3, and turn the courtesy switch on and off at 1.5-second intervals until communication between the Techstream and vehicle begins.
PROCEDURE
|
1. |
CHECK HARNESS AND CONNECTOR (MASTER SWITCH - DRIVER SIDE POWER WINDOW REGULATOR MOTOR) |
|
(a) Disconnect the I6 switch connector. |
|
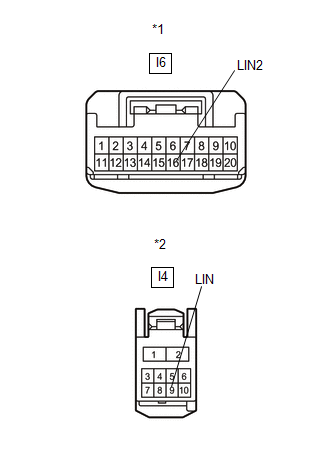
(b) Disconnect the I4 motor connector.
(c) Measure the resistance according to the value(s) in the table below.
Standard Resistance:
|
Tester Connection |
Condition |
Specified Condition |
|---|---|---|
|
I6-16 (LIN2) - I4-9 (LIN) |
Always |
Below 1 Ω |
|
I6-16 (LIN2) - Body ground |
Always |
10 kΩ or higher |
|
*1 |
Front view of wire harness connector (to Multiplex Network Master Switch Assembly) |
|
*2 |
Front view of wire harness connector (to Power Window Regulator Motor Assembly (for Driver Side)) |
| NG | .gif) |
REPAIR OR REPLACE HARNESS OR CONNECTOR |
|
.gif)
|
2. |
CHECK HARNESS AND CONNECTOR (MAIN BODY ECU - EACH ECU) |
(a) Disconnect the D48 and P4 ECU connectors.
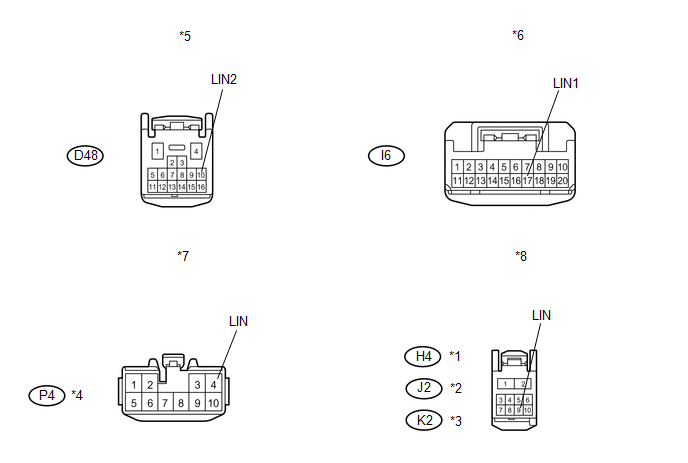 Text in Illustration
|
*1 |
for Front Passenger Side |
*2 |
for Rear RH Side |
|
*3 |
for Rear LH Side |
*4 |
w/ Sliding Roof |
|
*5 |
Front view of wire harness connector (to Main Body ECU (Driver Side Junction Block Assembly)) |
*6 |
Front view of wire harness connector (to Multiplex Network Master Switch Assembly) |
|
*7 |
Front view of wire harness connector (to Sliding Roof ECU (Sliding Roof Drive Gear Sub-assembly)) |
*8 |
Front view of wire harness connector (to Power Window Regulator Motor Assembly (for Each Door)) |
(b) Disconnect the H4, J2 and K2 motor connectors.
(c) Measure the resistance and voltage according to the value(s) in the table below.
Standard Resistance:
|
Tester Connection |
Condition |
Specified Condition |
|---|---|---|
|
D48-10 (LIN2) - I6-17 (LIN1) |
Always |
Below 1 Ω |
|
D48-10 (LIN2) - H4-9 (LIN) |
Always |
Below 1 Ω |
|
D48-10 (LIN2) - K2-9 (LIN) |
Always |
Below 1 Ω |
|
D48-10 (LIN2) - J2-9 (LIN) |
Always |
Below 1 Ω |
|
D48-10 (LIN2) - P4-4 (LIN) |
Always |
Below 1 Ω |
|
D48-10 (LIN2) - Body ground |
Always |
10 kΩ or higher |
Standard Voltage:
|
Tester Connection |
Condition |
Specified Condition |
|---|---|---|
|
D48-10 (LIN2) - Body ground |
Always |
Below 1 V |
| NG | |
REPAIR OR REPLACE HARNESS OR CONNECTOR |
|
|
3. |
CHECK DTC OUTPUT (POWER WINDOW REGULATOR MOTOR ASSEMBLY (for DRIVER SIDE)) |
(a) Reconnect the D48 and P4 ECU connectors.
(b) Reconnect the H4, J2 and K2 motor connectors.
(c) Reconnect the I6 switch connector.
(d) Clear the DTC (See page ).
(e) Recheck for DTCs.
|
Result |
Proceed to |
|---|---|
|
DTC B2325 is output |
A |
|
DTC B2325 is not output |
B |
| B | |
REPLACE POWER WINDOW REGULATOR MOTOR ASSEMBLY (for DRIVER SIDE) |
|
|
4. |
CHECK DTC OUTPUT (POWER WINDOW REGULATOR MOTOR ASSEMBLY (for FRONT PASSENGER SIDE)) |
(a) Reconnect the I4 motor connector.
(b) Disconnect the H4 motor connector.
(c) Clear the DTC (See page ).
(d) Recheck for DTCs.
|
Result |
Proceed to |
|---|---|
|
DTC B2325 is output |
A |
|
DTC B2325 is not output |
B |
| B | |
REPLACE POWER WINDOW REGULATOR MOTOR ASSEMBLY (for FRONT PASSENGER SIDE) |
|
|
5. |
CHECK DTC OUTPUT (POWER WINDOW REGULATOR MOTOR ASSEMBLY (for REAR RH SIDE)) |
(a) Reconnect the H4 motor connector.
(b) Disconnect the J2 motor connector.
(c) Clear the DTC (See page ).
(d) Recheck for DTCs.
|
Result |
Proceed to |
|---|---|
|
DTC B2325 is output |
A |
|
DTC B2325 is not output |
B |
| B | |
REPLACE POWER WINDOW REGULATOR MOTOR ASSEMBLY (for REAR RH SIDE) |
|
|
6. |
CHECK DTC OUTPUT (POWER WINDOW REGULATOR MOTOR ASSEMBLY (for REAR LH SIDE)) |
(a) Reconnect the J2 motor connector.
(b) Disconnect the K2 motor connector.
(c) Clear the DTC (See page ).
(d) Recheck for DTCs.
|
Result |
Proceed to |
|---|---|
|
DTC B2325 is output |
A |
|
DTC B2325 is not output |
B |
| B | |
REPLACE POWER WINDOW REGULATOR MOTOR ASSEMBLY (for REAR LH SIDE) |
|
|
7. |
CHECK DTC OUTPUT (MULTIPLEX NETWORK MASTER SWITCH ASSEMBLY) |
(a) Reconnect the K2 motor connector.
(b) Disconnect the I6 switch connector.
(c) Clear the DTC (See page ).
(d) Recheck for DTCs.
|
Result |
Proceed to |
|---|---|
|
DTC B2325 is output |
A |
|
DTC B2325 is not output |
B |
| B | |
REPLACE MULTIPLEX NETWORK MASTER SWITCH ASSEMBLY |
|
|
8. |
CHECK DTC OUTPUT (SLIDING ROOF ECU (SLIDING ROOF DRIVE GEAR ASSEMBLY)) |
(a) Reconnect the I6 switch connector.
(b) Disconnect the P4 ECU connector.
(c) Clear the DTC (See page ).
(d) Recheck for DTCs.
|
Result |
Proceed to |
|---|---|
|
DTC B2325 is output |
A |
|
DTC B2325 is not output |
B |
| A | |
REPLACE MAIN BODY ECU (DRIVER SIDE JUNCTION BLOCK ASSEMBLY) |
| B | |
REPLACE SLIDING ROOF ECU (SLIDING ROOF DRIVE GEAR SUB-ASSEMBLY) |
 Rear Door LH ECU Communication Stop (B2324)
DESCRIPTION
This DTC is stored when LIN communication between the power window regulator
motor assembly (for rear LH side) and main body ECU (driver side junction block
assembly) stops for more t ...
 Front Passenger Side Door ECU Communication Stop (B2322)
DESCRIPTION
This DTC is stored when LIN communication between the power window regulator
motor assembly (for front passenger side) and main body ECU (driver side junction
block assembly) stops fo ...
Other materials about Toyota Venza:
Portable Player cannot be Connected Manually/Automatically
CAUTION / NOTICE / HINT
HINT:
Some versions of "Bluetooth" compatible audio players may not function properly,
or the functions may be limited using the radio and display receiver assembly, even
if the portable audio player itself can play file ...
Diagnosis System
DIAGNOSIS SYSTEM
1. DESCRIPTION
(a) The power back door ECU (power back door motor unit) controls the power back
door system functions. Power back door system data and Diagnostic Trouble Code (DTC)
can be read through the Data Link Connector 3 (DLC3).
W ...
TC and CG Terminal Circuit
DESCRIPTION
DTC output mode is set by connecting terminals 13 (TC) and 4 (CG) of the DLC3.
The DTCs are indicated by the blinking pattern of the tire pressure warning light.
WIRING DIAGRAM
HINT:
When various warning lights blink continuously, a ground ...

0.1354