
Toyota Venza: Installation
INSTALLATION
PROCEDURE
1. INSTALL POWER DISTRIBUTION
|
(a) Connect the 3 connectors. |
|
.png)
|
(b) Engage the 2 claws to temporarily install the power distribution as shown in the illustration. |
|
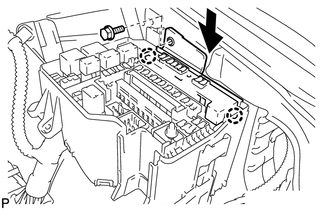
(c) Install the power distribution with the bolt.
 Removal
REMOVAL
PROCEDURE
1. REMOVE POWER DISTRIBUTION
(a) Remove the bolt.
(b) Disengage the 2 claws and disconnect the power distribution from t ...
 Main Body Ecu
Components
COMPONENTS
ILLUSTRATION
Removal
REMOVAL
PROCEDURE
1. REMOVE UPPER INSTRUMENT PANEL
HINT:
Refer to the procedure up to Remove Upper Instrument Panel Sub-assembly (See
page ) ...
Other materials about Toyota Venza:
Reverse Shift-linked Function of Power Mirrors does not Operate
SYSTEM DESCRIPTION
On receiving a reverse signal from the park/neutral position switch assembly,
the ECM sends the reverse signal to the main body ECU (driver side junction block
assembly) via CAN communication. When receiving the reverse signal, the main ...
Transmitter Battery(w/o Smart Key System)
Replacement
REPLACEMENT
PROCEDURE
1. REMOVE TRANSMITTER HOUSING COVER
(a) Using a precision screwdriver with its tip wrapped in protective
tape, pry open the transmitter housing cover.
NOTICE:
Do not forcibly pry the cover.
HINT:
...
Brake
General Maintenance
GENERAL MAINTENANCE
PROCEDURE
1. INSPECT BRAKE LINE PIPES AND HOSES
HINT:
Work in a well-lighted area. Turn the front wheels fully to the right or left
before beginning the inspection.
(a) Using a mirror, check the entire circum ...

0.1361