
Toyota Venza: Horn System
Precaution
PRECAUTION
NOTICE:
When disconnecting the cable from the negative (-) battery terminal, initialize the following system after the cable is reconnected.
|
System Name |
See Procedure |
|---|---|
|
Back Door Closer System |
|
|
Power Back Door System |
.gif)
1. EXPRESSIONS OF IGNITION SWITCH
The type of ignition switch used on this model differs according to the specifications of the vehicle. The expressions listed in the table below are used in this section.
|
Expression |
Switch Type |
|
|---|---|---|
|
Ignition Switch (Position) |
Engine Switch (Condition) |
|
|
Ignition Switch off |
LOCK |
Off |
|
Ignition Switch ON |
ON |
On (IG) |
|
Ignition Switch ACC |
ACC |
On (ACC) |
|
Engine Start |
START |
On (Start) |
Parts Location
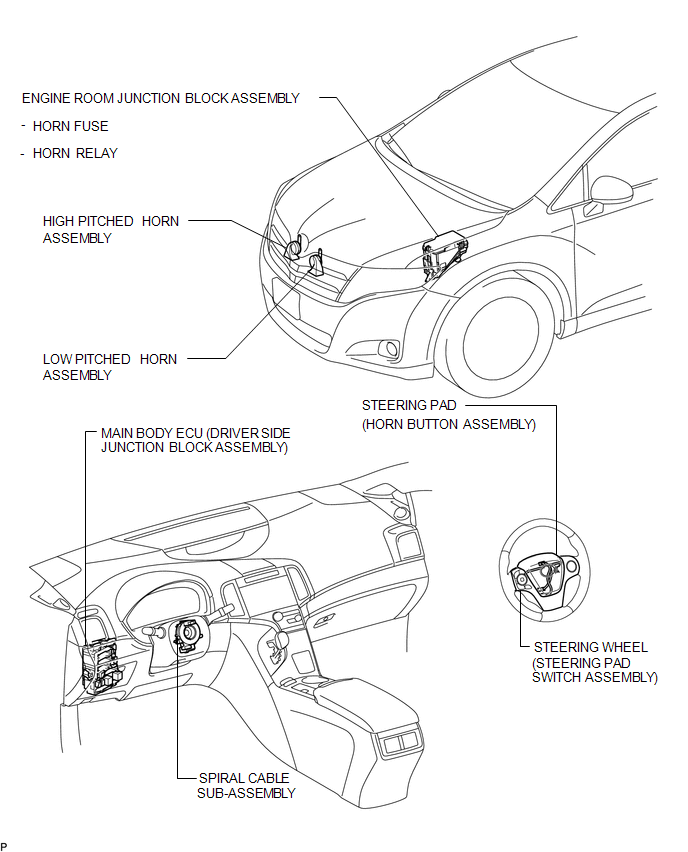
PARTS LOCATION
ILLUSTRATION
System Diagram
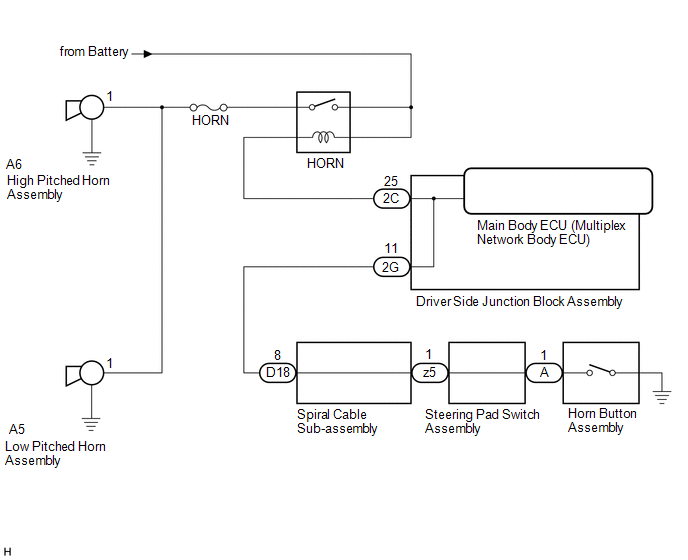
SYSTEM DIAGRAM
Problem Symptoms Table
PROBLEM SYMPTOMS TABLE
HINT:
Use the table below to help determine the cause of problem symptoms. If multiple suspected areas are listed, the potential causes of the symptoms are listed in order of probability in the "Suspected Area" column of the table. Check each symptom by checking the suspected areas in the order they are listed. Replace parts as necessary.
HORN SYSTEM|
Symptom |
Suspected Area |
See page |
|---|---|---|
|
Horn does not sound |
HORN fuse |
- |
|
HORN relay (Engine room junction block assembly) |
|
|
|
Horn button assembly |
|
|
|
Steering pad switch assembly |
|
|
|
Spiral cable sub-assembly |
|
|
|
Wire harness |
- |
|
|
Horn sounds all the time |
HORN relay (Engine room junction block assembly) |
|
|
Horn button assembly |
|
|
|
Steering pad switch assembly |
|
|
|
Spiral cable sub-assembly |
|
|
|
Wire harness |
- |
|
|
Low pitched horn operates but high pitched horn does not operate |
High pitched horn assembly |
|
|
Wire harness |
- |
|
|
High pitched horn operates but low pitched horn does not operate |
Low pitched horn assembly |
|
|
Wire harness |
- |
.gif)
 Horn
Horn
Components
COMPONENTS
ILLUSTRATION
Inspection
INSPECTION
PROCEDURE
1. INSPECT LOW PITCHED HORN ASSEMBLY
(a) Apply battery voltage and check the operation of the low pitched
...
 Relay
Relay
On-vehicle Inspection
ON-VEHICLE INSPECTION
PROCEDURE
1. INSPECT HORN RELAY (ENGINE ROOM JUNCTION BLOCK ASSEMBLY)
(a) Remove the engine room junction block assembly from the engine ro ...
Other materials about Toyota Venza:
Installation
INSTALLATION
CAUTION / NOTICE / HINT
HINT:
Perform "Inspection After Repair" after replacing the camshaft, No. 2 camshaft,
camshaft timing gear assembly or camshaft timing exhaust gear assembly (See page
).
PROCEDURE
1. INSTALL NO. 2 CAMSHAF ...
Stereo Jack Adapter Assembly
Components
COMPONENTS
ILLUSTRATION
Removal
REMOVAL
PROCEDURE
1. REMOVE UPPER CONSOLE PANEL SUB-ASSEMBLY (w/o Seat Heater System)
2. REMOVE UPPER CONSOLE PANEL SUB-ASSEMBLY (w/ Seat Heater System)
3. REMOVE NO. 2 CONSOLE BOX CARPET
4. RE ...
Reassembly
REASSEMBLY
PROCEDURE
1. INSTALL FRONT OIL PUMP OIL SEAL
(a) Using SST and a hammer, install a new oil seal to the oil pump body.
SST: 09350-32014
09351-32140
Oil seal driven in depth:
-0.25 to 0.25 mm (-0.00984 to 0.00984 in.)
...

0.1562