
Toyota Venza: Fuel Tank Cap
Inspection
INSPECTION
PROCEDURE
1. INSPECT FUEL TANK CAP ASSEMBLY
|
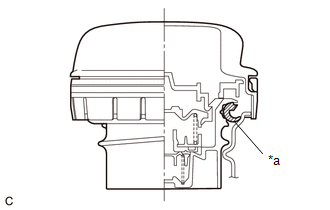
(a) Visually check that the fuel tank cap assembly and gasket are not deformed or damaged. Text in Illustration
If the result is not as specified, replace the fuel tank cap assembly. |
|
|
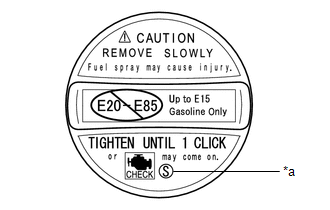
(b) Confirm that ID mark S is printed on the fuel tank cap assembly. Text in Illustration
CAUTION: Make sure to use a fuel tank cap assembly that has the same ID mark, or a malfunction may occur in the fuel system. |
|
 Emission Control System
Parts Location
PARTS LOCATION
ILLUSTRATION
On-vehicle Inspection
ON-VEHICLE INSPECTION
PROCEDURE
1. INSPECT FUEL CUT-OFF RPM
(a) Increase the engine speed to at least 3500 rpm.
...
 Pcv Valve
Components
COMPONENTS
ILLUSTRATION
Removal
REMOVAL
PROCEDURE
1. REMOVE INTAKE MANIFOLD
(a) Remove the intake manifold (See page ).
2. REMOVE VENTILATION VALVE SUB-ASSEMBLY
( ...
Other materials about Toyota Venza:
Installing child restraints using a seat belt (child restraint lock function
belt)
- Rear-facing -- Infant seat/convertible seat
Place the child restraint system on the rear seat facing the rear of the vehicle.
Run the seat belt through the child restraint system and insert the plate into
the buckle. Make sure that the belt is ...
Camshaft Position "A" - Timing Over-Advanced or System Performance (Bank 1)
(P0011,P0012)
DESCRIPTION
Refer to DTC P0010 (See page ).
DTC No.
DTC Detection Condition
Trouble Area
P0011
The valve timing is stuck at a certain value when in the advance range
(1 trip detection logic).
...
System Description
SYSTEM DESCRIPTION
1. GENERAL
(a) This system uses ultrasonic sensors to detect any obstacles at the corners
and the rear of the vehicle. The system then informs the driver of the distance
between the sensors and an obstacle as well as their positions by ...

0.1753