Toyota Venza: Installation
INSTALLATION
PROCEDURE
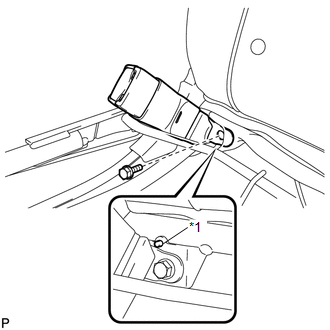
1. INSTALL REAR SEAT INNER BELT ASSEMBLY LH
|
(a) Install the rear seat inner belt assembly LH with the bolt. Text in Illustration
Torque: 42 N·m {428 kgf·cm, 31 ft·lbf} NOTICE: Do not allow the anchor part of the rear seat outer belt assembly to overlap the protruding part of the floor panel. |
|
2. INSTALL REAR SEAT CUSHION COVER WITH PAD
.gif)
3. INSTALL REAR SEAT INNER RECLINING COVER LH
4. INSTALL REAR SEAT RECLINING COVER LH
5. INSTALL REAR SEAT RECLINING RELEASE LEVER LH
6. INSTALL SEAT ADJUSTER COVER CAP LH
7. INSTALL REAR SEAT ASSEMBLY LH
8. CONNECT REAR SEAT NO. 2 RECLINING CONTROL CABLE SUB-ASSEMBLY
9. INSTALL REAR SEAT OUTER TRACK BRACKET COVER
10. INSTALL REAR SEAT INNER TRACK BRACKET COVER
11. INSTALL REAR SEAT HEADREST ASSEMBLY
 Removal
REMOVAL
PROCEDURE
1. REMOVE REAR SEAT HEADREST ASSEMBLY
2. REMOVE REAR SEAT INNER TRACK BRACKET COVER
3. REMOVE REAR SEAT OUTER TRACK BRACKET COVER
4. DISCONNECT REAR SEAT NO. 2 RECLININ ...

Other materials about Toyota Venza:
Problem Symptoms Table
PROBLEM SYMPTOMS TABLE
HINT:
Use the table below to help determine the cause of problem symptoms.
If multiple suspected areas are listed, the potential causes of the symptoms
are listed in order of probability in the "Suspected Area" ...
Removal
REMOVAL
CAUTION / NOTICE / HINT
HINT:
Use the same procedure for the LH side and RH side.
The following procedure is for the LH side.
If the sensor rotor needs to be replaced, replace it together with the
rear drive shaft assembly.
...
Installation
INSTALLATION
PROCEDURE
1. INSTALL FRONT SHOULDER BELT ANCHOR ADJUSTER ASSEMBLY
(a) Engage the adjuster positioning hole with the guide and install the
front shoulder belt anchor adjuster assembly with the 2 bolts.
Torque:
42 N·m {428 ...

0.1521