Toyota Venza: Installation
INSTALLATION
CAUTION / NOTICE / HINT
HINT:
When installing the mouldings, heat the vehicle body and mouldings using a heat light.
Heating Temperature|
Item |
Temperature |
|---|---|
|
Vehicle Body |
40 to 60°C (104 to 140°F) |
|
Emblem, Name Plate |
20 to 30°C (68 to 86°F) |
NOTICE:
Do not heat the vehicle body or mouldings excessively.
PROCEDURE
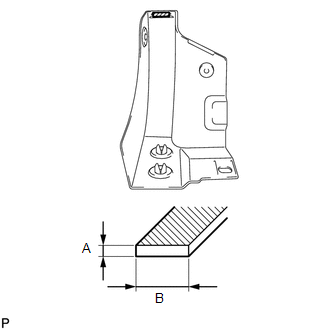
1. INSTALL REAR ROCKER PANEL MOULDING END COVER
(a) Clean the vehicle body surface.
(1) Using a heat light, heat the vehicle body surface.
(2) Remove the double-sided tape from the vehicle body.
(3) Wipe off any tape adhesive residue with cleaner.
|
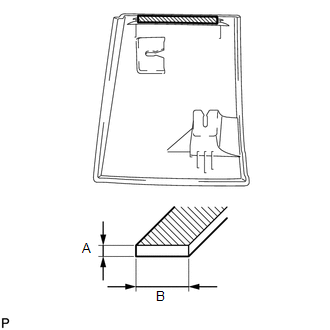
(b) Clean the rear rocker panel moulding end cover.
(1) Using a heat light, heat the rear rocker panel moulding end cover. (2) Remove the double-sided tape from the rear rocker panel moulding end cover. (3) Wipe off any tape adhesive residue with cleaner. (4) Apply new double-sided tape to the rear rocker panel moulding end cover. |
|
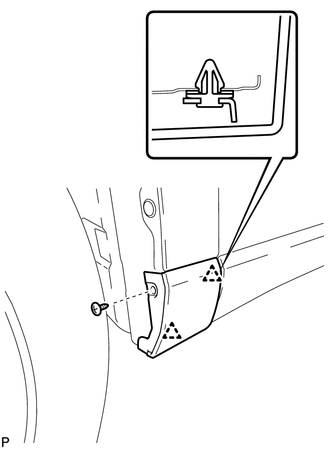
(c) Install the 2 grommets to the rear rocker panel moulding end cover.
|
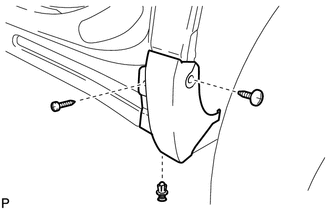
(d) Install the rear rocker panel moulding end cover. (1) Using a heat light, heat the vehicle body and rear rocker panel moulding end cover. (2) Remove the release paper from the rear rocker panel moulding end cover. HINT: After removing the release paper, keep the exposed adhesive free from foreign matter. (3) Install the rear rocker panel moulding end cover with the 2 screws and clip. |
|
2. INSTALL NO. 2 ROCKER PANEL MOULDING PROTECTOR
.gif)
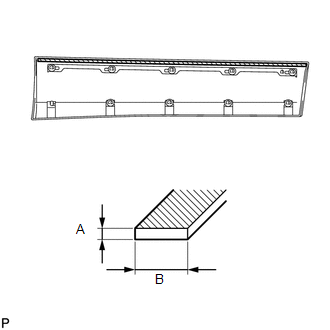
3. INSTALL REAR DOOR OUTSIDE MOULDING
(a) Clean the vehicle body surface.
(1) Using a heat light, heat the vehicle body surface.
(2) Remove the double-sided tape from the vehicle body.
(3) Wipe off any tape adhesive residue with cleaner.
|
(b) Clean the rear door outside moulding.
(1) Using a heat light, heat the rear door outside moulding. (2) Remove the double-sided tape from the rear door outside moulding. (3) Wipe off any tape adhesive residue with cleaner. (4) Apply new double-sided tape to the rear door outside moulding. |
|
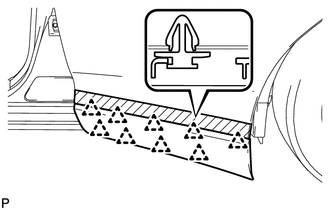
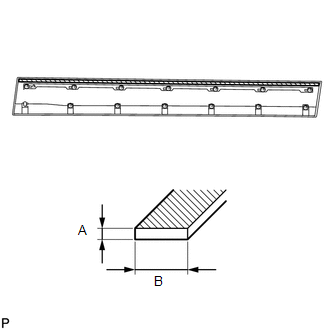
(c) Install 9 new clips (No. 1 outside moulding clip) to the rear door outside moulding.
(d) Install the outside moulding retainer to the rear door outside moulding.
|
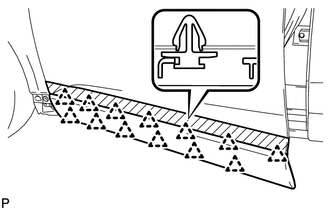
(e) Install the rear door outside moulding. (1) Using a heat light, heat the vehicle body and rear door outside moulding. (2) Remove the release paper from the rear door outside moulding. HINT: After removing the release paper, keep the exposed adhesive free from foreign matter. (3) Engage the 9 clips and install the rear door outside moulding. |
|
|
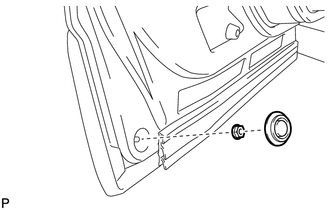
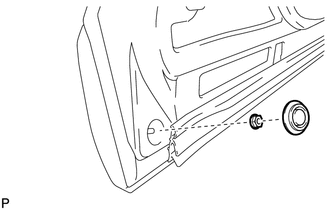
(f) Install the nut and hole plug. |
|
4. INSTALL FRONT DOOR OUTSIDE MOULDING
(a) Clean the vehicle body surface.
(1) Using a heat light, heat the vehicle body surface.
(2) Remove the double-sided tape from the vehicle body.
(3) Wipe off any tape adhesive residue with cleaner.
|
(b) Clean the front door outside moulding.
(1) Using a heat light, heat the front door outside moulding. (2) Remove the double-sided tape from the front door outside moulding. (3) Wipe off any tape adhesive residue with cleaner. (4) Apply new double-sided tape to the front door outside moulding. |
|
(c) Install 13 new clips (No. 1 outside moulding clip) to the front door outside moulding.
(d) Install the outside moulding retainer to the front door outside moulding.
|
(e) Install the front door outside moulding. (1) Using a heat light, heat the vehicle body and front door outside moulding. (2) Remove the release paper from the front door outside moulding. HINT: After removing the release paper, keep the exposed adhesive free from foreign matter. (3) Engage the 13 clips and install the front door outside moulding. |
|
|
(f) Install the nut and hole plug. |
|
5. INSTALL FRONT FENDER OUTSIDE MOULDING
(a) Clean the vehicle body surface.
(1) Using a heat light, heat the vehicle body surface.
(2) Remove the double-sided tape from the vehicle body.
(3) Wipe off any tape adhesive residue with cleaner.
|
(b) Clean the front fender outside moulding.
(1) Using a heat light, heat the front fender outside moulding. (2) Remove the double-sided tape from the front fender outside moulding. (3) Wipe off any tape adhesive residue with cleaner. (4) Apply new double-sided tape to the front fender outside moulding. |
|
(c) Install 2 new clips (No. 1 outside moulding clip) to the front fender outside moulding.
|
(d) Install the front fender outside moulding. (1) Using a heat light, heat the vehicle body and front fender outside moulding. (2) Remove the release paper from the front fender outside moulding. HINT: After removing the release paper, keep the exposed adhesive free from foreign matter. (3) Engage the 2 clips and install the front fender outside moulding. |
|
(e) Install the screw.
 Components
COMPONENTS
ILLUSTRATION
...
 Horn
Horn
...
Other materials about Toyota Venza:
Installation
INSTALLATION
PROCEDURE
1. INSTALL FUEL PRESSURE REGULATOR ASSEMBLY
(a) Apply a light coat of gasoline to 2 new O-rings, and install them
onto the fuel pressure regulator.
Text in Illustration
*1
New O-r ...
Poor Sound Quality in All Modes (Low Volume)
PROCEDURE
1.
CHECK AUDIO SETTINGS
(a) Set treble, middle and bass to the initial values and check that the sound
is normal.
OK:
The sound returns to normal.
HINT:
Sound quality adjustment measures vary according to the ...
Checking Monitor Status
CHECKING MONITOR STATUS
The purpose of the monitor result (mode 06) is to allow access to the results
of on-board diagnostic monitoring tests of specific components/systems that are
not continuously monitored. Examples are catalysts and evaporative emissi ...

0.1684