
Toyota Venza: Door Control Transmitter(w/ Smart Key System)
Components
COMPONENTS
ILLUSTRATION
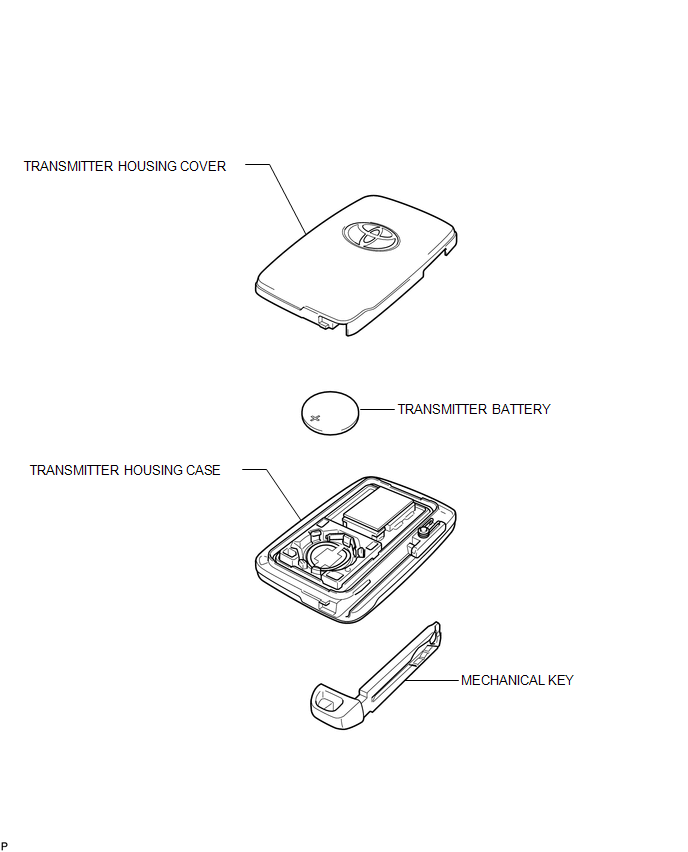
Removal
REMOVAL
PROCEDURE
1. REMOVE TRANSMITTER BATTERY
.gif)
Inspection
INSPECTION
PROCEDURE
1. INSPECT DOOR CONTROL TRANSMITTER
(a) Inspect operation of the transmitter.
(1) Remove the battery (lithium battery) from the transmitter (See page
.gif) ).
).
|
(2) Install a new or normal battery (lithium battery). HINT: If a new or normal battery is not available, first connect 2 new 1.5 V batteries in series. Then connect leads to the batteries and apply 3 V to the transmitter, as shown in the illustration. |
|
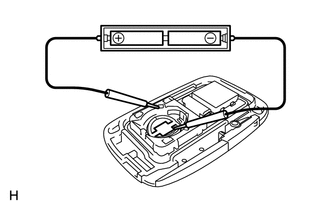
(3) From outside the vehicle, approximately 1 m (3.28 ft.) away from the driver side outside door handle, test the transmitter by pointing its key plate at the vehicle and pressing a transmitter switch.
OK:
The door lock can be operated via the transmitter.
The LED comes on more than once.
- The operational area differs depending on the user, the way the transmitter is held, and the location.
- The transmitter's faint electric waves may be affected if the area has strong electric waves or noise. The transmitter's operation area may be shortened or the transmitter may not function.
(b) Inspect the battery capacity.
(1) Remove the battery from the electrical key transmitter that does not operate.
Attach a lead wire (0.6 mm (0.0236 in.) in diameter or less including wire sheath)
with tape or equivalent to the negative terminal (see page
).
NOTICE:
Do not wrap the lead wire around a terminal, wedge it between the terminals, or solder it. A terminal may be deformed or damaged, and the battery will not be able to be installed correctly.
|
(2) Carefully pull the lead wire out from the position shown in the illustration and install the previously removed transmitter battery. |
|
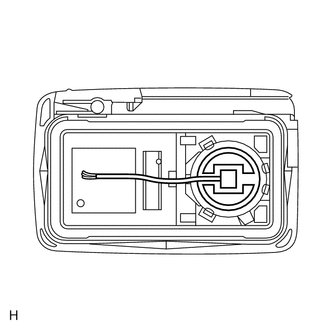
(3) Using an oscilloscope, check the transmitter battery voltage waveform.
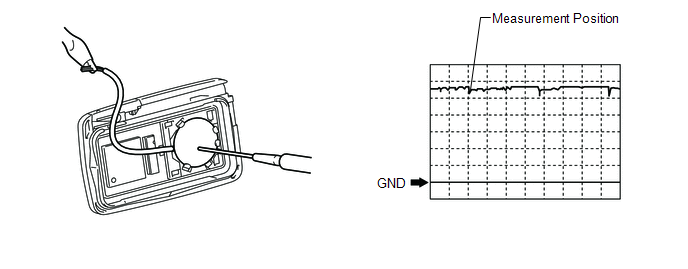
HINT:
When measuring the battery voltage, while operating the lock sensor of a door
handle, bring the electrical key transmitter within the entry operating range to
perform the measurement. For the entry operating range, refer to SYSTEM DESCRIPTION
(See page ).
Standard voltage:
|
Item |
Content |
|---|---|
|
Tester Connection |
Battery positive (+) - Battery negative (-) |
|
Tool Setting |
0.5 V/DIV., 100 ms/DIV. |
|
Condition |
Engine switch OFF, all doors closed and lock sensor touched |
|
Specified Condition |
2.2 to 3.2 V (Refer to the waveform) |
If the result is not as specified, replace the transmitter battery.
Installation
INSTALLATION
PROCEDURE
1. INSTALL TRANSMITTER BATTERY
.gif)
 Door Control Switch
Components
COMPONENTS
ILLUSTRATION
Inspection
INSPECTION
PROCEDURE
1. INSPECT DOOR CONTROL SWITCH ASSEMBLY
(a) Measure the resistance according to the value(s) in the table bel ...
 Door Control Transmitter(w/o Smart Key System)
Components
COMPONENTS
ILLUSTRATION
Removal
REMOVAL
PROCEDURE
1. REMOVE TRANSMITTER HOUSING COVER
2. REMOVE DOOR CONTROL TRANSMITTER MODULE
Inspection
INSPECTION
PROCEDURE
1. I ...
Other materials about Toyota Venza:
Security Indicator Light Circuit
DESCRIPTION
The security indicator light blinks continuously due to a continuous signal received
from the transponder key ECU assembly while in the armed state.
WIRING DIAGRAM
CAUTION / NOTICE / HINT
NOTICE:
If the transponder key ECU assembly is repl ...
Precaution
PRECAUTION
1. BEFORE WORKING ON FUEL SYSTEM
(a) When disconnecting a fuel line, fuel will splash. So observe the following
precautions:
(1) Do not smoke or work near fire when handling the fuel system.
(2) Keep gasoline away from rubber or leather parts. ...
Disassembly
DISASSEMBLY
PROCEDURE
1. REMOVE TRANSMISSION WIRE
2. REMOVE ATF TEMPERATURE SENSOR ASSEMBLY
(a) Remove the 4 bolts, ATF temperature sensor assembly and clamp from
the valve body assembly.
Text in Illustration
*1
...

0.1513