
Toyota Venza: Cruise Main Indicator Light Circuit
DESCRIPTION
- The ECM detects a cruise control main switch signal and sends it to the combination meter assembly through CAN. Then the CRUISE main indicator light comes on.
- The CRUISE main indicator light circuit uses CAN for communication. If there is a malfunction in this circuit, check for DTCs in the CAN communication system before troubleshooting this circuit.
WIRING DIAGRAM
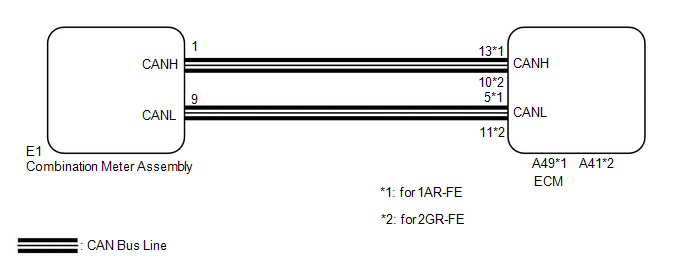
PROCEDURE
|
1. |
PERFORM ACTIVE TEST USING TECHSTREAM |
(a) Connect the Techstream to the DLC3.
(b) Turn the ignition switch to ON.
(c) Turn the Techstream on.
(d) Enter the following menus: Body / Combination Meter / Active Test.
(e) Check the CRUISE main indicator light by performing the Active Test.
Combination Meter|
Tester Display |
Test Part |
Control Range |
Diagnostic Note |
|---|---|---|---|
|
Indicat. Lamp Cruise |
CRUISE main indicator light |
OFF or ON |
Confirm that the vehicle is stopped with the engine idling |
OK:
The CRUISE main indicator light blinks or goes off according to Techstream operation.
| NG | .gif) |
REPLACE COMBINATION METER ASSEMBLY |
|
.gif)
|
2. |
READ VALUE USING TECHSTREAM |
(a) Connect the Techstream to the DLC3.
(b) Turn the ignition switch to ON.
(c) Turn the Techstream on.
(d) Enter the following menus: Powertrain / Cruise Control / Data List.
(e) Check the Data List for proper functioning of the CRUISE main indicator light.
Cruise Control (ECM)|
Tester Display |
Measurement Item/Range |
Normal Condition |
Diagnostic Note |
|---|---|---|---|
|
CCS Indicator M-CPU |
CRUISE main indicator signal (Main CPU) / ON or OFF |
ON: CRUISE main indicator light on OFF: CRUISE main indicator light off |
- |
OK:
The display changes as shown above according to cruise control main switch operation.
|
Result |
Proceed to |
|---|---|
|
OK |
A |
|
NG (for 1AR-FE) |
B |
|
NG (for 2GR-FE) |
C |
| A | |
PROCEED TO NEXT SUSPECTED AREA SHOWN IN PROBLEM SYMPTOMS TABLE |
| B | |
REPLACE ECM |
| C | |
REPLACE ECM |
 Cruise Control Switch Circuit
DESCRIPTION
The cruise control main switch operates 7 functions: SET, -, TAP-DOWN, RES, +,
TAP-UP, and CANCEL. The SET, TAP-DOWN, and - functions, and the RES, TAP-UP, and
+ functions are operate ...
 Cruise SET Indicator Light Circuit
DESCRIPTION
The ECM detects a cruise control switch signal and sends it to the combination
meter assembly through CAN. Then the SET indicator light comes on.
The SET indicator light ci ...
Other materials about Toyota Venza:
Reassembly
REASSEMBLY
PROCEDURE
1. INSTALL NO. 1 REAR BUMPER REINFORCEMENT
(a) Install the No. 1 rear bumper reinforcement with the 6 nuts.
Torque:
68 N·m {693 kgf·cm, 50 ft·lbf}
2. INSTALL REAR BUMP ...
Horn Circuit
DESCRIPTION
When the theft deterrent system is switched from the armed state to the alarm
sounding state, the main body ECU (driver side junction block assembly) transmits
a signal to cause the horn to sound at intervals of 0.4 seconds.
WIRING DIAGRAM
...
Relay
On-vehicle Inspection
ON-VEHICLE INSPECTION
PROCEDURE
1. INSPECT TAILLIGHT RELAY (TAIL)
(a) Remove the taillight relay from the main body ECU (driver side junction
block assembly).
(b) Measur ...

0.1714