Toyota Venza: Replacement
REPLACEMENT
CAUTION / NOTICE / HINT
NOTICE:
- Move the shift lever to P and apply the parking brake before bleeding the brakes.
- Add brake fluid to keep the level between the MIN and MAX lines of the reservoir while bleeding the brakes.
- If brake fluid leaks onto any painted surface, immediately wash it off.
- If replacing is performed with the engine running or the engine switch on (IG), DTC C1441 will be stored. Make sure to clear the DTCs when work is complete.
HINT:
If any work is performed on the brake system or if air in the brake lines is suspected, bleed the brake system.
PROCEDURE
1. FILL RESERVOIR WITH BRAKE FLUID
|
(a) Remove the brake master cylinder reservoir filler cap. |
|
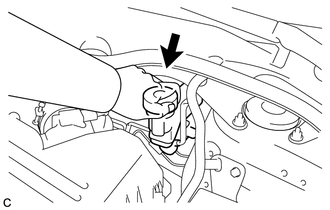
(b) Fill the reservoir with brake fluid.
Brake Fluid:
SAE J1703 or FMVSS No. 116 DOT 3
NOTICE:
- Make sure that there is sufficient brake fluid in the reservoir.
- Do not remove the filter from the brake master cylinder reservoir and be sure to fill with new brake fluid to avoid any potential contamination of the brake system. Contamination, for example by dirt particles or mineral oil, could lead to functional brake problem.
2. BLEED BRAKE LINE
NOTICE:
Bleed the brake line of the wheel farthest from the master cylinder first.
(a) Connect a vinyl tube to the bleeder plug.
(b) Depress the brake pedal several times, and while holding down the brake pedal, loosen the bleeder plug*1.
(c) When fluid stops coming out, tighten the bleeder plug and release the brake pedal*2.
(d) Repeat steps *1 and *2 until all the air in the brake fluid is completely bled out and the new brake fluid comes out.
(e) Tighten the bleeder plug completely.
Torque:
13 N·m {133 kgf·cm, 10 ft·lbf}
(f) Repeat the above steps to replace the brake fluid of the brake lines for each wheel.
3. INSPECT FOR BRAKE FLUID LEAK
4. INSPECT FLUID LEVEL IN RESERVOIR
.gif)
5. CHECK AND CLEAR DTC
(See page )
 On-vehicle Inspection
ON-VEHICLE INSPECTION
PROCEDURE
1. INSPECT FLUID LEVEL
(a) Check the fluid level.
Text in Illustration
*1
MAX Line
*2
...
 Bleeding
BLEEDING
CAUTION / NOTICE / HINT
NOTICE:
Do not allow brake fluid to adhere to any painted surface such as the
vehicle body. If brake fluid leaks onto any painted surface, immediately
...
Other materials about Toyota Venza:
On-vehicle Inspection
ON-VEHICLE INSPECTION
PROCEDURE
1. CHECK RADIATOR CAP SUB-ASSEMBLY
(a) Measure the valve opening pressure.
(1) If there are water stains or foreign matter on rubber packings 1, 2 or 3,
clean the part(s) with water and finger scouring.
(2) Check that r ...
Problem Symptoms Table
PROBLEM SYMPTOMS TABLE
Use the table below to help determine the cause of problem symptoms.
If multiple suspected areas are listed, the potential causes of the symptoms
are listed in order of probability in the "Suspected Area" column ...
Position Initialization Incomplete (B2343)
DESCRIPTION
This DTC is output when the sliding roof ECU (sliding roof drive gear sub-assembly)
has not been initialized.
DTC Code
DTC Detection Condition
Trouble Area
B2343
Sliding roof ECU (sli ...

0.1491