Toyota Venza: Transfer Case Front Oil Seal(for Rh Side)
Components
COMPONENTS
ILLUSTRATION

Replacement
REPLACEMENT
PROCEDURE
1. DRAIN TRANSFER OIL
(a) Remove the transfer drain plug and gasket to drain the transfer oil.
(b) Install a new gasket and the transfer drain plug.
Torque:
49 N·m {500 kgf·cm, 36 ft·lbf}
2. REMOVE FRONT DRIVE SHAFT ASSEMBLY RH
(See page .gif) ).
).
3. REMOVE TRANSFER CASE FRONT OIL SEAL
|
(a) Using SST, remove the transfer case front oil seal from the transfer case. SST: 09308-00010 NOTICE: Do not damage the oil seal contact surface on the case. |
|

4. INSTALL TRANSFER CASE FRONT OIL SEAL
|
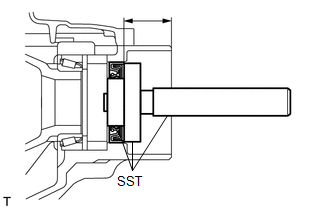
(a) Using SST, drive in a new transfer case front oil seal into the transfer case until it reaches the position shown in the illustration. SST: 09950-60010 09951-00350 09951-00580 09952-06010 SST: 09950-70010 09951-07150 Drive in depth: 33.5 to 34.5 mm (1.319 to 1.358 in.) NOTICE: Do not tilt the oil seal during installation. |
|
(b) Apply a small amount of MP grease to the lip of the oil seal.
5. INSTALL FRONT DRIVE SHAFT ASSEMBLY RH
(See page ).
6. ADD TRANSFER OIL
7. INSPECT TRANSFER OIL
 Transfer Case Front Oil Seal(when Using The Engine Support Bridge)
Components
COMPONENTS
ILLUSTRATION
Replacement
REPLACEMENT
PROCEDURE
1. REMOVE TRANSFER ASSEMBLY
See page
2. REMOVE TRANSFER CASE FRONT OIL SEAL
(a) Using SST, remove the t ...
 Transfer Case Rear Oil Seal
Components
COMPONENTS
ILLUSTRATION
ILLUSTRATION
Replacement
REPLACEMENT
PROCEDURE
1. REMOVE TAIL EXHAUST PIPE ASSEMBLY
2. REMOVE CENTER EXHAUST PIPE ASSEMBLY
3. REMOVE PROPELLER ...
Other materials about Toyota Venza:
System Diagram
SYSTEM DIAGRAM
Communication Table
Sender
Receiver
Signal
Communication Method
Center airbag sensor assembly
Combination meter assembly
Front seat inner belt buckl ...
Diagnosis System
DIAGNOSIS SYSTEM
1. DESCRIPTION
(a) Lighting system data and the Diagnostic Trouble Codes (DTCs) can be read
from the Data Link Connector 3 (DLC3) of the vehicle. When the system seems to be
malfunctioning, use the Techstream to check for malfunctions an ...
Data List / Active Test
DATA LIST / ACTIVE TEST
1. DATA LIST
HINT:
Using the Techstream to read the Data List allows the values or states of switches,
sensors, actuators and other items to be read without removing any parts. This non-intrusive
inspection can be very useful bec ...

0.1199