Toyota Venza: Removal
REMOVAL
PROCEDURE
1. REMOVE WINDSHIELD WIPER MOTOR AND LINK
(a) Remove the windshield wiper motor and link (See page
.gif) ).
).
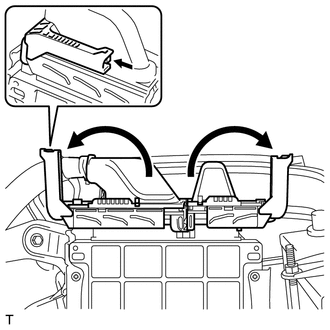
2. REMOVE OUTER COWL TOP PANEL SUB-ASSEMBLY
3. REMOVE COOL AIR INTAKE DUCT SEAL
4. REMOVE NO. 1 ENGINE COVER SUB-ASSEMBLY
5. DISCONNECT CABLE FROM NEGATIVE BATTERY TERMINAL
NOTICE:
When disconnecting the cable, some systems need to be initialized after the cable
is reconnected (See page ).
6. REMOVE NO. 1 VACUUM SWITCHING VALVE ASSEMBLY
7. REMOVE AIR CLEANER CAP SUB-ASSEMBLY
8. REMOVE AIR CLEANER FILTER ELEMENT SUB-ASSEMBLY
9. REMOVE AIR CLEANER CASE SUB-ASSEMBLY
10. REMOVE AIR CLEANER BRACKET
|
(a) Remove the 2 bolts and air cleaner bracket. |
|
.png)
11. REMOVE ECM
|
(a) Separate the 3 wire harness clamps. |
|
.png)
|
(b) Raise the 2 levers while pushing the locks on the levers, and disconnect the 2 ECM connectors. NOTICE: After disconnecting each connector, make sure that dirt, water or other foreign matter does not contact the connecting part of the connector. |
|
|
(c) Remove the 3 bolts and the ECM with bracket. |
|
.png)
|
(d) Remove the 5 screws and the ECM bracket. |
|
.png)
 Installation
INSTALLATION
PROCEDURE
1. INSTALL ECM
(a) Install the bracket to the ECM with the 5 screws.
(b) Install the ECM with the 3 bolt ...

Other materials about Toyota Venza:
Multi-information display (LCD type)
The multi-information display presents the driver with a variety of driving-related
data, including the clock and current outside temperature.
• Clock
Indicates and sets the time.
• Outside temperature
Indicates the outside temperature.
The temper ...
Engine immobilizer system
The vehicle’s keys have built-in transponder chips that prevent the engine
from starting if the key has not been previously registered in the vehicle’s on-board
computer.
Never leave the keys inside the vehicle when you leave the vehicle.
Vehicles ...
How To Proceed With Troubleshooting
CAUTION / NOTICE / HINT
HINT:
Use these procedure to troubleshoot the sliding roof system.
*: Use the Techstream.
PROCEDURE
1.
VEHICLE BROUGHT TO WORKSHOP
NEXT
...

0.1303