Toyota Venza: Removal
REMOVAL
PROCEDURE
1. REMOVE AUTOMATIC TRANSAXLE ASSEMBLY (for 2WD)
When Not Using the Engine Support Bridge: (See page
.gif) )
)
When Using the Engine Support Bridge: (See page
)
2. REMOVE AUTOMATIC TRANSAXLE ASSEMBLY (for AWD)
When Not Using the Engine Support Bridge: (See page
)
When Using the Engine Support Bridge: (See page
)
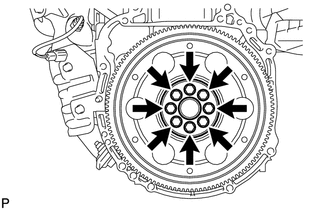
3. REMOVE DRIVE PLATE AND RING GEAR SUB-ASSEMBLY
|
(a) Using SST, hold the crankshaft pulley. SST: 09213-54015 SST: 09330-00021 HINT: Part number of installation bolt for SST (crankshaft pulley holding tool): 91551-80650 (quantity: 2) |
|
.png)
|
(b) Remove the 8 bolts, front drive plate spacer, drive plate and ring gear sub-assembly, and rear drive plate spacer. |
|
4. REMOVE REAR ENGINE OIL SEAL
|
(a) Using a knife, cut off the lip of the oil seal. Text in Illustration
|
|
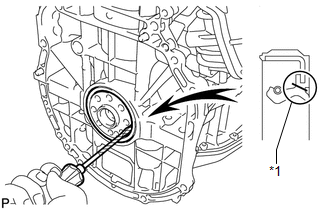
(b) Using a screwdriver, pry out the oil seal.
HINT:
Tape the screwdriver tip before use.
NOTICE:
Do not damage the surface of the oil seal press fit hole or the crankshaft.
 Components
COMPONENTS
ILLUSTRATION
...
 Installation
INSTALLATION
PROCEDURE
1. INSTALL REAR ENGINE OIL SEAL
(a) Apply MP grease to the lip of a new oil seal.
NOTICE:
Do not allow foreign matter to contact the lip of the oil seal.
Do not ...
Other materials about Toyota Venza:
SD Card Communication Malfunction (B158C)
DESCRIPTION
The navigation receiver assembly stores this DTC when the SD card (disc player
disc) cannot be mounted when inserted into the SD card (disc player disc) slot.
DTC No.
DTC Detection Condition
Trouble Area
...
Using the automatic mode
Press
.
The air conditioning system will begin to operate. In outside air or recirculated
air mode, air outlets, fan speed and air conditioning on/ off are automatically
adjusted according to the temperature setting.
“AUTO” will be displayed on th ...
Data List / Active Test
DATA LIST / ACTIVE TEST
1. DATA LIST
HINT:
Using the Techstream to read the Data List allows the values or states of switches,
sensors, actuator and other items to be read without removing any parts. This non-intrusive
inspection can be very useful beca ...

0.1144