Toyota Venza: Installation
INSTALLATION
CAUTION / NOTICE / HINT
HINT:
When installing the mouldings, heat the vehicle body and mouldings using a heat light.
Heating Temperature|
Item |
Temperature |
|---|---|
|
Vehicle Body |
40 to 60°C (104 to 140°F) |
|
Emblem, Name Plate |
20 to 30°C (68 to 86°F) |
NOTICE:
Do not heat the vehicle body or mouldings excessively.
PROCEDURE
1. INSTALL REAR ROCKER PANEL MOULDING END COVER
(a) Clean the vehicle body surface.
(1) Using a heat light, heat the vehicle body surface.
(2) Remove the double-sided tape from the vehicle body.
(3) Wipe off any tape adhesive residue with cleaner.
|
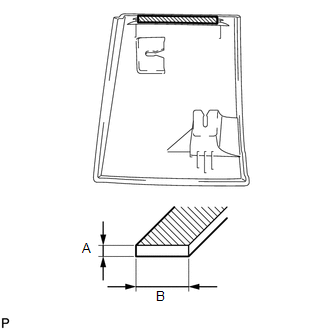
(b) Clean the rear rocker panel moulding end cover.
(1) Using a heat light, heat the rear rocker panel moulding end cover. (2) Remove the double-sided tape from the rear rocker panel moulding end cover. (3) Wipe off any tape adhesive residue with cleaner. (4) Apply new double-sided tape to the rear rocker panel moulding end cover. |
|
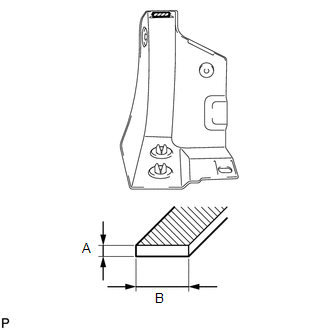
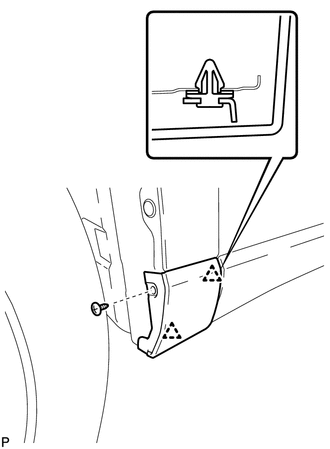
(c) Install the 2 grommets to the rear rocker panel moulding end cover.
|
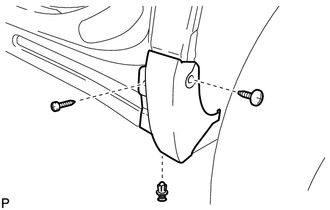
(d) Install the rear rocker panel moulding end cover. (1) Using a heat light, heat the vehicle body and rear rocker panel moulding end cover. (2) Remove the release paper from the rear rocker panel moulding end cover. HINT: After removing the release paper, keep the exposed adhesive free from foreign matter. (3) Install the rear rocker panel moulding end cover with the 2 screws and clip. |
|
2. INSTALL NO. 2 ROCKER PANEL MOULDING PROTECTOR
.gif)
3. INSTALL REAR DOOR OUTSIDE MOULDING
(a) Clean the vehicle body surface.
(1) Using a heat light, heat the vehicle body surface.
(2) Remove the double-sided tape from the vehicle body.
(3) Wipe off any tape adhesive residue with cleaner.
|
(b) Clean the rear door outside moulding.
(1) Using a heat light, heat the rear door outside moulding. (2) Remove the double-sided tape from the rear door outside moulding. (3) Wipe off any tape adhesive residue with cleaner. (4) Apply new double-sided tape to the rear door outside moulding. |
|
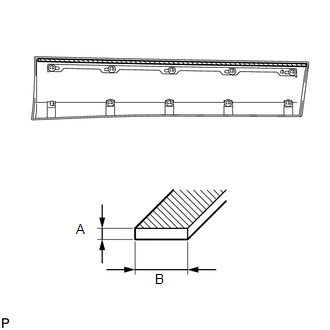
(c) Install 9 new clips (No. 1 outside moulding clip) to the rear door outside moulding.
(d) Install the outside moulding retainer to the rear door outside moulding.
|
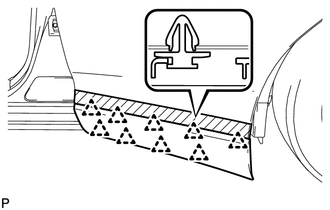
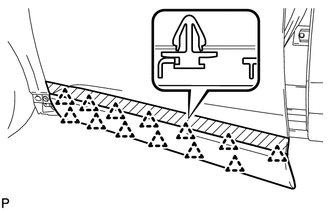
(e) Install the rear door outside moulding. (1) Using a heat light, heat the vehicle body and rear door outside moulding. (2) Remove the release paper from the rear door outside moulding. HINT: After removing the release paper, keep the exposed adhesive free from foreign matter. (3) Engage the 9 clips and install the rear door outside moulding. |
|
|
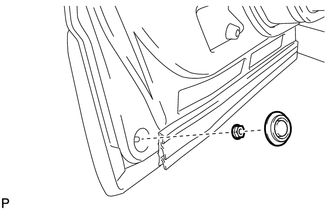
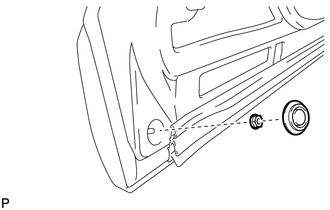
(f) Install the nut and hole plug. |
|
4. INSTALL FRONT DOOR OUTSIDE MOULDING
(a) Clean the vehicle body surface.
(1) Using a heat light, heat the vehicle body surface.
(2) Remove the double-sided tape from the vehicle body.
(3) Wipe off any tape adhesive residue with cleaner.
|
(b) Clean the front door outside moulding.
(1) Using a heat light, heat the front door outside moulding. (2) Remove the double-sided tape from the front door outside moulding. (3) Wipe off any tape adhesive residue with cleaner. (4) Apply new double-sided tape to the front door outside moulding. |
|
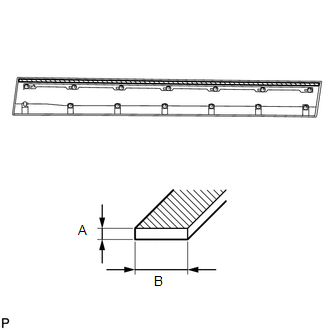
(c) Install 13 new clips (No. 1 outside moulding clip) to the front door outside moulding.
(d) Install the outside moulding retainer to the front door outside moulding.
|
(e) Install the front door outside moulding. (1) Using a heat light, heat the vehicle body and front door outside moulding. (2) Remove the release paper from the front door outside moulding. HINT: After removing the release paper, keep the exposed adhesive free from foreign matter. (3) Engage the 13 clips and install the front door outside moulding. |
|
|
(f) Install the nut and hole plug. |
|
5. INSTALL FRONT FENDER OUTSIDE MOULDING
(a) Clean the vehicle body surface.
(1) Using a heat light, heat the vehicle body surface.
(2) Remove the double-sided tape from the vehicle body.
(3) Wipe off any tape adhesive residue with cleaner.
|
(b) Clean the front fender outside moulding.
(1) Using a heat light, heat the front fender outside moulding. (2) Remove the double-sided tape from the front fender outside moulding. (3) Wipe off any tape adhesive residue with cleaner. (4) Apply new double-sided tape to the front fender outside moulding. |
|
(c) Install 2 new clips (No. 1 outside moulding clip) to the front fender outside moulding.
|
(d) Install the front fender outside moulding. (1) Using a heat light, heat the vehicle body and front fender outside moulding. (2) Remove the release paper from the front fender outside moulding. HINT: After removing the release paper, keep the exposed adhesive free from foreign matter. (3) Engage the 2 clips and install the front fender outside moulding. |
|
(e) Install the screw.
 Components
COMPONENTS
ILLUSTRATION
...
 Horn
Horn
...
Other materials about Toyota Venza:
Removal
REMOVAL
CAUTION / NOTICE / HINT
HINT:
Use the same procedure for the LH side and RH side.
The following procedure is for the LH side.
If the sensor rotor needs to be replaced, replace it together with the
front drive shaft assembly.
...
Precaution
PRECAUTION
1. EXPRESSIONS OF IGNITION SWITCH
(a) The type of ignition switch used on this model differs according to the specifications
of the vehicle. The expressions listed in the table below are used in this section.
Switch Type
I ...
Security Indicator Light Circuit
DESCRIPTION
The security indicator light blinks continuously due to a continuous signal received
from the transponder key ECU assembly while in the armed state.
WIRING DIAGRAM
CAUTION / NOTICE / HINT
NOTICE:
If the transponder key ECU assembly is repl ...

0.1345