Toyota Venza: Inspection
INSPECTION
PROCEDURE
1. INSPECT FRONT POWER WINDOW REGULATOR MOTOR ASSEMBLY LH
|
(a) Apply positive (+) battery voltage to connector terminal 2 (B). NOTICE: Do not apply positive (+) battery voltage to any terminals other than terminal 2 (B) to avoid damaging the pulse sensor inside the motor. |
|
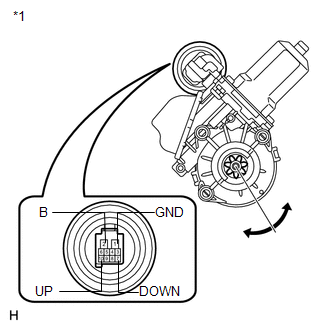
(b) Connect a ground lead to connector terminals 1 (GND) and 7 (DOWN) or 10 (UP).
(c) Check that the motor gear rotates smoothly as follows:
OK:
|
Measurement Condition |
Specified Condition |
|---|---|
|
Motor gear rotates clockwise (Up) |
|
Motor gear rotates counterclockwise (Down) |
|
*1 |
Component without harness connected (to Front Power Window Regulator Motor Assembly LH) |
- If the result is not as specified, replace the front power window regulator motor assembly LH.
CAUTION:
Reset the power window regulator motor (initialize the pulse sensor) after installing the power window regulator motor and regulator assembly onto the door.
2. INSPECT FRONT POWER WINDOW REGULATOR MOTOR ASSEMBLY RH
|
(a) Apply positive (+) battery voltage to connector terminal 2 (B). NOTICE: Do not apply positive (+) battery voltage to any terminals other than terminal 2 (B) to avoid damaging the pulse sensor inside the motor. |
|
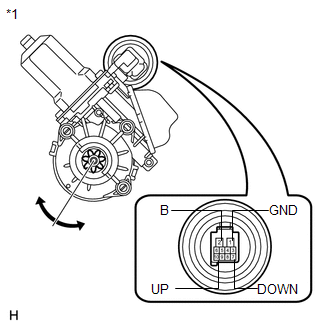
(b) Connect a ground lead to connector terminals 1 (GND) and 7 (DOWN) or 10 (UP).
(c) Check that the motor gear rotates smoothly as follows:
OK:
|
Measurement Condition |
Specified Condition |
|---|---|
|
Motor gear rotates counterclockwise (Up) |
|
Motor gear rotates clockwise (Down) |
|
*1 |
Component without harness connected (to Front Power Window Regulator Motor Assembly RH) |
- If the result is not as specified, replace the front power window regulator motor assembly RH.
CAUTION:
Reset the power window regulator motor (initialize the pulse sensor) after installing the power window regulator motor and regulator assembly onto the door.
 Removal
REMOVAL
CAUTION / NOTICE / HINT
HINT:
Use the same procedure for the RH side and LH side.
The procedure listed below is for the LH side.
PROCEDURE
1. DISCONNECT CABLE FROM NEGAT ...
 Installation
INSTALLATION
CAUTION / NOTICE / HINT
HINT:
Use the same procedure for the RH side and LH side.
The procedure listed below is for the LH side.
PROCEDURE
1. INSTALL FRONT POWER WI ...
Other materials about Toyota Venza:
Registration
REGISTRATION
CAUTION / NOTICE / HINT
HINT:
Register a new recognition code when replacing the door control transmitter
or the door control receiver.
Add mode is used to retain the already registered codes while registering
a new recognit ...
On-vehicle Inspection
ON-VEHICLE INSPECTION
PROCEDURE
1. INSPECT PARK/NEUTRAL POSITION SWITCH ASSEMBLY OPERATION
(a) Apply the parking brake.
(b) Turn the ignition switch to ON.
(c) Depress the brake pedal and check that the engine starts when the shift lever
is in N or P, b ...
Inspection
INSPECTION
PROCEDURE
1. INSPECT OUTER REAR VIEW MIRROR ASSEMBLY RH
(a) Check the operation of the mirror surface.
(1) Disconnect the outer rear view mirror assembly RH connector.
(2) Apply battery ...

0.1532