Toyota Venza: Inspection
INSPECTION
PROCEDURE
1. INSPECT INTAKE AIR CONTROL VALVE (for ACIS)
(a) Inspect the diaphragm.
|
(1) Using a vacuum pump, apply a vacuum of 60 kPa (450 mmHg, 17.7 in.Hg) or higher to the diaphragm chamber. Wait for 1 minute and check that the needle of the vacuum pump does not lower. If the result is not as specified, replace the intake manifold. |
|
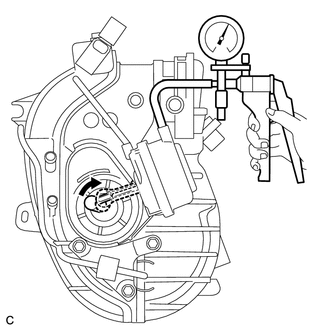
(b) After applying vacuum in the step above, check that the actuator rod operates.
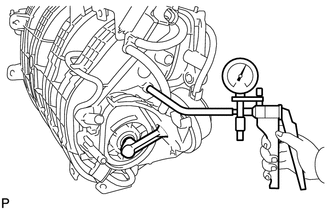
2. INSPECT VACUUM TANK AND CHECK VALVE
|
(a) Disconnect the vacuum hose from the check valve. |
|
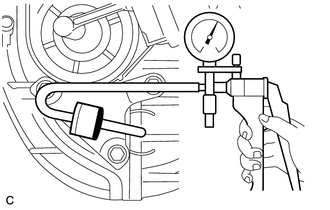
(b) Using a vacuum pump, apply vacuum to the check valve. Wait for 1 minute and check that the needle of the vacuum pump does not lower.
If the result is not as specified, replace the check valve.
(c) Connect the vacuum hose to the check valve.
|
(d) Using a vacuum pump, apply a vacuum of 60 kPa (450 mmHg, 17.7 in.Hg) or higher to the vacuum tank. Wait for 1 minute and check that the needle of the vacuum pump does not lower. If the result is not as specified, replace the intake manifold. |
|
 Removal
REMOVAL
PROCEDURE
1. DISCHARGE FUEL SYSTEM PRESSURE
HINT:
(See page ).
2. DISCONNECT CABLE FROM NEGATIVE BATTERY TERMINAL
CAUTION:
When disconnecting the cable, some systems need to be initial ...
 Installation
INSTALLATION
PROCEDURE
1. INSTALL ENGINE MOUNTING DAMPER
(a) Install the engine mounting damper with the 3 bolts.
Torque:
9.0 N·m {92 kgf·cm, 80 in·lbf}
...
Other materials about Toyota Venza:
Installation
INSTALLATION
PROCEDURE
1. INSTALL RADIO AND DISPLAY RECEIVER ASSEMBLY
2. INSTALL NO. 2 RADIO RECEIVER BRACKET
(a) Install the No. 2 radio receiver bracket with the 4 screws.
Torque:
5.0 N·m {51 kgf·cm, 44 in·lbf}
3. INSTALL NO. 1 RADIO RECEIVER BRAC ...
Precaution
PRECAUTION
1. PRECAUTION FOR DISCONNECTING CABLE FROM NEGATIVE BATTERY TERMINAL
NOTICE:
When disconnecting the cable from the negative (-) battery terminal, initialize
the following system after the terminal is reconnected:
System Name
...
Removal
REMOVAL
PROCEDURE
1. REMOVE FRONT DOOR SCUFF PLATE LH
2. REMOVE COWL SIDE TRIM SUB-ASSEMBLY LH
3. REMOVE LOWER NO. 1 INSTRUMENT PANEL FINISH PANEL
4. REMOVE LOWER STEERING COLUMN COVER
(a) Turn the steering wheel assembly to the right ...

0.1677