Toyota Venza: Differential Oil
Replacement
REPLACEMENT
CAUTION / NOTICE / HINT
HINT:
Stop the vehicle on a level surface.
PROCEDURE
1. DRAIN DIFFERENTIAL OIL
|
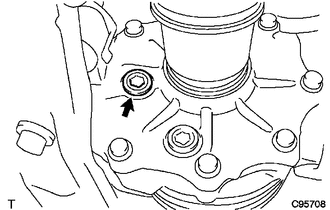
(a) Using a 10 mm hexagon wrench, remove the rear differential carrier cover plug and gasket. |
|
|
(b) Using a 10 mm hexagon wrench, remove the rear differential drain plug and gasket to drain the differential oil. |
|
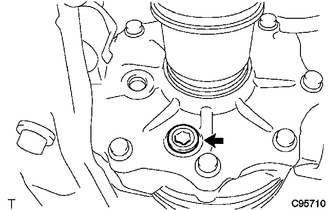
2. INSTALL REAR DIFFERENTIAL DRAIN PLUG
|
(a) Using a 10 mm hexagon wrench, install a new gasket and the rear differential drain plug. Torque: 39 N·m {398 kgf·cm, 29 ft·lbf} |
|
3. ADD DIFFERENTIAL OIL
|
(a) Add differential oil so that the oil level is between 0 and 5 mm (0 to 0.196 in.) from the bottom lip of the rear differential carrier cover plug opening. Oil Type: Toyota genuine differential gear oil LT 75W-85 GL-5 or equivalent Standard Differential Oil Capacity: 0.45 to 0.55 liters (0.48 to 0.58 US qts., 0.40 to 0.48 Imp. qts.) NOTICE:
|
|
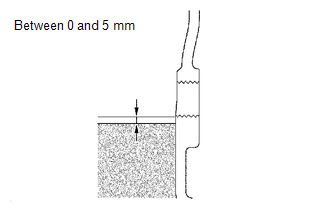
4. INSPECT DIFFERENTIAL OIL
|
(a) Check that the oil level is between 0 and 5 mm (0 and 0.196 in.) from the bottom lip of the rear differential carrier cover plug opening. |
|
(b) Inspect for oil leaks if the oil level is low.
5. INSTALL REAR DIFFERENTIAL CARRIER COVER PLUG
|
(a) Using a 10 mm hexagon wrench, install a new gasket and the rear differential carrier cover plug. Torque: 39 N·m {398 kgf·cm, 29 ft·lbf} |
|
 Differential Mount Cushion
Components
COMPONENTS
ILLUSTRATION
Installation
INSTALLATION
PROCEDURE
1. INSTALL REAR NO. 1 DIFFERENTIAL MOUNT CUSHION
(a) Using SST, install a new rear No. 1 differential mount cushion. ...
 Differential System
Precaution
PRECAUTION
Before disassembly, clean the outside of the differential assembly and
remove any sand or mud to prevent it from entering the inside of the assembly
during dis ...
Other materials about Toyota Venza:
Problem Symptoms Table
PROBLEM SYMPTOMS TABLE
HINT:
Use the table below to help determine the cause of problem symptoms. If multiple
suspected areas are listed, the potential causes of the symptoms are listed in order
of probability in the "Suspected Area" column of ...
Installation
INSTALLATION
PROCEDURE
1. INSTALL CAMSHAFT TIMING OIL CONTROL VALVE ASSEMBLY (for Exhaust Side)
(a) Apply a light coat of engine oil to a new O-ring, and install it
to the oil control valve.
Text in Illustration
*1
...
Open in Occupant Classification ECU Battery Positive Line (B1794)
DESCRIPTION
This circuit consists of the occupant classification ECU and power source circuit
(battery, fuse and wire harness).
DTC B1794 is recorded when a malfunction is detected in the occupant classification
ECU or power source circuit.
HINT:
If DT ...

0.128