Toyota Venza: Removal
REMOVAL
CAUTION / NOTICE / HINT
HINT:
- Use the same procedure for the LH side and RH side.
- The following procedure listed is for the LH side.
PROCEDURE
1. REMOVE FRONT WHEEL
2. DRAIN BRAKE FLUID
NOTICE:
If brake fluid leaks onto any painted surface, immediately wash it off.
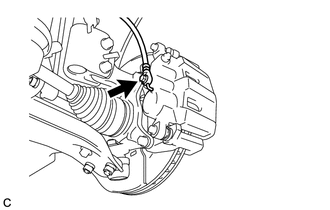
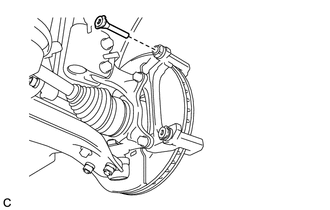
3. SEPARATE FRONT FLEXIBLE HOSE
|
(a) Remove the union bolt and gasket, and separate the front flexible hose from the front disc brake cylinder assembly. |
|
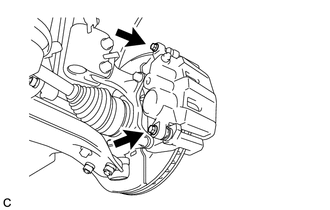
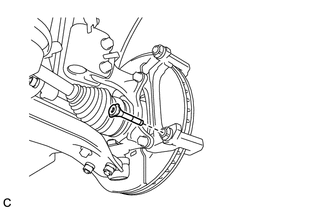
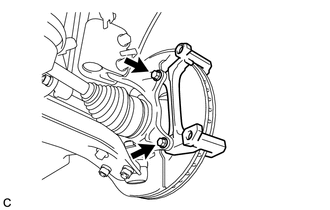
4. REMOVE FRONT DISC BRAKE CYLINDER ASSEMBLY
|
(a) Remove the 2 bolts and the front disc brake cylinder assembly from the front disc brake cylinder mounting. |
|
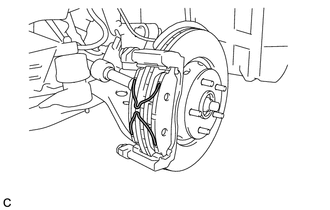
5. REMOVE FRONT DISC BRAKE PAD
|
(a) Remove the 2 anti-squeal springs from the front disc brake pads. |
|
|
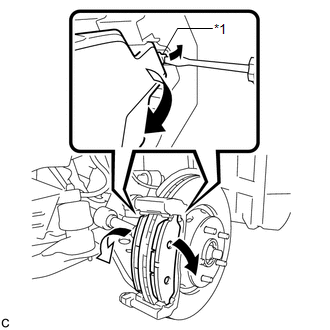
(b) Using a screwdriver, push the protrusion of the front disc brake pad support plate as shown in the illustration and remove the 2 front disc brake pads from the front disc brake cylinder mounting. Text in Illustration
NOTICE: When remove the front disc brake pad, replace the front disc brake pad support plates with new ones. |
|
6. REMOVE FRONT ANTI-SQUEAL SHIM
(a) Remove the 2 front anti-squeal shims from the front disc brake pads.
7. REMOVE FRONT DISC BRAKE PAD SUPPORT PLATE
|
(a) Remove the 2 front disc brake pad support plates from the front disc brake cylinder mounting. |
|

8. REMOVE FRONT DISC BRAKE CYLINDER SLIDE PIN
|
(a) Remove the front disc brake cylinder slide pin from the front disc brake cylinder mounting. |
|
9. REMOVE NO. 2 FRONT DISC BRAKE CYLINDER SLIDE PIN
|
(a) Remove the No. 2 front disc brake cylinder slide pin from the front disc brake cylinder mounting. |
|
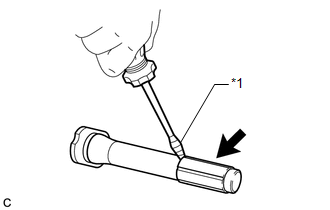
10. REMOVE FRONT DISC BRAKE CYLINDER SLIDE BUSHING
|
(a) Using a screwdriver with its tip wrapped with protective tape, remove the front disc brake cylinder slide bushing from the No. 2 front disc brake cylinder slide pin. Text in Illustration
NOTICE: Be careful not to damage the No. 2 front disc brake cylinder slide pin. |
|
11. REMOVE FRONT DISC BRAKE BUSHING DUST BOOT
|
(a) Remove the 2 front disc brake bushing dust boots from the front disc brake cylinder mounting. |
|
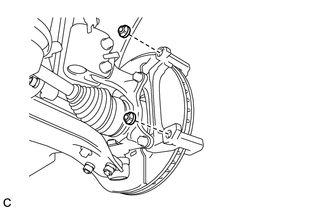
12. REMOVE FRONT DISC BRAKE CYLINDER MOUNTING
|
(a) Remove the 2 bolts and the front disc brake cylinder mounting. |
|
13. REMOVE FRONT DISC
|
(a) Put matchmarks on the front disc and front axle hub. Text in Illustration
HINT: The above step is not necessary when the front disc will be replaced. |
|
(b) Remove the front disc.
14. REMOVE FRONT DISC BRAKE BLEEDER PLUG
(a) Remove the front disc brake bleeder plug cap.
(b) Remove the front disc brake bleeder plug.
 Components
COMPONENTS
ILLUSTRATION
ILLUSTRATION
...
 Inspection
INSPECTION
PROCEDURE
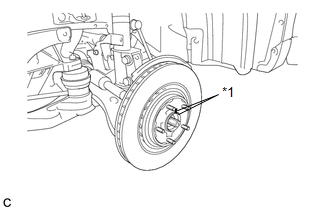
1. INSPECT PAD LINING THICKNESS
(a) Using a ruler, measure the pad lining thickness.
Text in Illustration
*1
Ruler
...
Other materials about Toyota Venza:
Inspection
INSPECTION
PROCEDURE
1. INSPECT INNER REAR VIEW MIRROR ASSEMBLY
(a) Inspect operation of the electrochromic inner mirror.
(1) Connect a positive (+) lead from the battery to terminal 1 and a negative
(-) lead to terminal 2.
(2) Press the AUTO switch.
...
Installation
INSTALLATION
CAUTION / NOTICE / HINT
HINT:
Use the same procedure for the RH side and LH side.
The procedure listed below is for the LH side.
PROCEDURE
1. INSTALL FRONT POWER WINDOW REGULATOR MOTOR ASSEMBLY
NOTICE:
The regulator arm mu ...
Seat Heater System
Precaution
PRECAUTION
1. NOTICE FOR INITIALIZATION
HINT:
When disconnecting the cable from the negative (-) battery terminal, initialize
the following systems after the cable is reconnected.
System Name
See procedure
...

0.1343